Tracker Extraordinaire rescue

I’m gonna take a break here.
I know it was a disappointment but we’ve all been there. Luckily I caught mine before the head was torqued down. It didn’t make me feel any better but I used it as a lesson moving forward. Yea, sometimes it’s easy to be so focused on one thing you miss the big picture. (Raising hand)
 
What I did as remove the 8 head nuts, 4 cover bolts and took the cover off. Do not loosen the 3 remaining small bolts.
I did not replace the head gasket. Worked out for me.
That's how I'd play it. Long as you don't disturb either gasket... base or head.
I'd also suggest leaving the chain tensioner tight until the last minute. That should help hold the jugs and head in place while you remove the rocker box.
 
👌 that morning coffee and login was a rough surprise 🙃
Thanks for the replies regarding the “fix” procedures recommended.
I will do just that. Fortunately the 8 head bolts loosened up nicely to a “hand tight” state now. Valve clearances are all backed off ofcourse and I did leave the cam chain set snug for now.
I won’t forget this one lol.
Among all the surprises that life can dish out, it seems this will be resolved with little trouble or expense. We all get our turns at much worse surprises than this So… Thank You everybody ! I’ll keep my head on “more better” moving forward.
Today I Award Myself The Flying Fickle Finger Trophy !
IMG_0062.jpeg
 
He did, post 82, I missed it too.
And have done the same before. :doh:
That is what I meant. There are some sharp eyes here that prevented our OP from going deeper. Seems the rework is simple while the engine is out of the frame. This isn't a "happy ending" but I guess the OP is glad the SNAFU was caught early and no damage and less cussing is the result. I have not done any engine work except adjustments, carbs, clutch so I myself would not catch anything wrong in that picture.
 
Last edited:
IMG_6609.jpeg

L👀
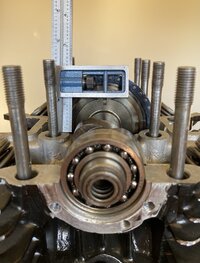
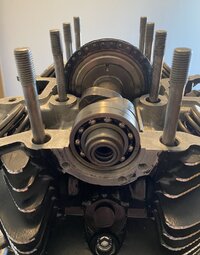
K at the now correctly positioned cam.. I’m cautiously confirming the camshaft timing now.. Pics-
I do have most of the camchain tensioner pressure back on the chain.
There is some other news that is likely a positive for doing the work again.
Upon removing the tapper cover and end caps I noticed those gaskets had been barely squished and are basically “as new” still. This has me believing that the cam shaft roller bearings were not all the way seated on the cam shaft journals ?
Now I’m being more particular about the centering of the cam and those bearing positions.
Anybody watching feel free to 👍 or 👎 on my work at this time please 😅
Thanks all -RT
 

Attachments

  • IMG_6606.jpeg
    IMG_6606.jpeg
    442.8 KB · Views: 22
  • IMG_6607.jpeg
    IMG_6607.jpeg
    288.7 KB · Views: 20
  • IMG_6608.jpeg
    IMG_6608.jpeg
    331.1 KB · Views: 19
You're off about a tooth at the crank. Rotate the crank until the timing mark lines up at the yellow line. You're on the red one.
Should still be within a half a tooth at the cam, but it's best to check now.


1709753305777.png
 
IMG_6619.jpeg

I’m convinced the camshaft needs to be “centered” in an approximate position determined mostly by the end roller bearings seated on the journals, which are kinda pinched in their position by the end cap seals. And those seals properly set inboard the cap surfaces described in the tech section.
So with light brass tapping and rotating the cam, all the components “settled” in this position that seems fine.
The cam shaft end caps and seals have been know to leak in threads read over the years.
I’m hoping I got it right because another re-do isn’t in the plan
😃
IMG_6621.jpeg
 
That is what I meant. There are some sharp eyes here that prevented our OP from going deeper. Seems the rework is simple while the engine is out of the frame. This isn't a "happy ending" but I guess the OP is glad the SNAFU was caught early and no damage and less cussing is the result. I have not done any engine work except adjustments, carbs, clutch so I myself would not catch anything wrong in that picture.
My apologies. I was not thinking on the same line as you.
:doh: :oops: :thumbsup: Sorry Kevin!
 
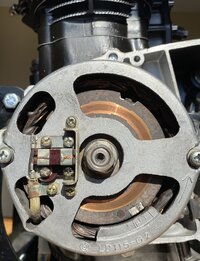
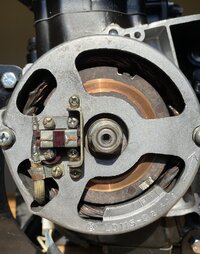
😆there is no Oops in my opinion voicing any input on my thread lol.. All the input is appreciated.
Trust me I Can and Do my own damage which incidentally leads us here to my latest near disaster on this top end project..
L👀K at those fancy chrome Oil Feed Tube fittings ! Those components came to me with the project.
In a test fit which I just couldn’t resist to do I ran those fittings in the tappet cover dry. Very Bad !!
It turns out those pretty Chinesium fittings (Korean actually?) are not manufactured to correct 10mm x 1.25 pitch. They are “over size” in thread fit. Could be the pitch, could be the minor, not sure but one of those buggars got stuck in my tappet cover concerninly badly and damn near ruined the aluminum threads to get it out
🥵
Although I had a tap and carefully re cut some stressed threads, I didn’t have a die in hand but could easily prove the fittings were “tight” (very) because several nuts also would not screw on the fittings…
So, after getting a die and repeatedly running the oiled die over the fitting threads, I again have functional components.
I let my guard down on carefulness trusting these fittings in the first place!
So WARNING to All here ! If you or you see these being installed, remember this! They could potentially cause much trouble
😧🤬
Slowed me down quite a bit and the XS again has to wait as I have removed a window to my garage and have to fit the new window.. priority.
IMG_6629.jpeg
 
Last edited:
IMG_6722.jpeg
IMG_6721.jpeg

Slow as a 🐢
But, this notched advance mechanism nut is a weird one. I’ve searched a bit but am still wondering what kind of tool combination is wise to tighten the nut and how tight.
Brass rod & small hammer ? 🙈
 
Looks like the left oil tube is touching the head. That's not unusual. They always seem to favor that side for some reason. Tubes are brass copper... they tweak pretty easy. Might wanna tweak that and get about 3-4mm clearance. Otherwise the vibes can rub a hole in it.


1711073621467.png
 
Last edited:
Back
Top