Waking up my nicely rested engine. What would you do?

Yes 5twins you are right about that!

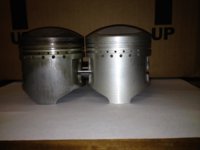
I did not want to be one of 'those unfortunate people'. I gave the product photo a real good stare down ....and triple checked the OE reference number shown in the text of the ad.

XStretchified
 
This thread is just what I was hoping to find on this forum. I bought a 1978 Special with 9,100 miles on it about a month ago that was last licensed in 1994. It looks like it's been sitting in a barn for 20 years. I knew I wanted to at least pull the top of the head off but wasn't sure how much further to go. This thread has given me some fantastic guidance. Thanks!

BTW XStretch, your bike looks great!
 
Well....

I said I would put up a post when my piston order from Japan arrived.

Order Received Today...........before lunch!

.....this must be some sort of record.

I'll try to post photos and piston data tomorrow.

XStretchified
 
Sorry gggGary...I was sleeping...sure hope you didn't get out of bed early on my account.

The photos: To my eyes the piston features and ring grooves closely match the OEM piston. There are a couple of tiny tick marks on the domes but similar things are apparent on the original pistons as well.

I can weigh the new set and old set later today. The machine shop is closed so no dimension data til Monday.

Oh...and you can sleep in a bit, they don't open until eight.

XStretchified
 

Attachments

  • IMG_1821.jpg
    IMG_1821.jpg
    146.6 KB · Views: 236
  • IMG_1808.jpg
    IMG_1808.jpg
    192.1 KB · Views: 242
  • IMG_1810.jpg
    IMG_1810.jpg
    153.2 KB · Views: 263
  • IMG_1811.jpg
    IMG_1811.jpg
    147 KB · Views: 263
  • IMG_1818.jpg
    IMG_1818.jpg
    141.4 KB · Views: 237
  • IMG_1813.jpg
    IMG_1813.jpg
    118.6 KB · Views: 240
Back again with some information on the new pistons.

I had the machine shop match bore the cylinders the dimensions of the second over pistons. One new piston measured 2.9710" and the other measured 2.9712" so the difference between them was .0002".

I have a small electronic scale:

The old pistons weigh 281 grams and 282 grams. These are now skirt worn and under size.

The new pistons weigh 287 grams and 289 grams, so two grams variation. I did some reading on how tightly piston weights should be matched and I think I am fine.

I could do a tiny bit of balancing by pairing them with the new pins but I did not weigh the pins yet and it is likely that my scale isn't going to pick up a difference between the two pins since it weighs in whole grams. I can also remove a bit of material from the inside but between the running effect of the oil cling and carbon build up and the rings and unknown connecting rod weights finite balancing is not an exact science.

What do you think?
 
All is good...

Just weighed the new piston pins and one comes in at 81 grams and the other is at 82.

So...matching up the right pieces gets me piston/pin sets are at 1 gram difference.

On another subject the valve guides and the valve stems all fell within dimension specs. The top of one valve was a little pitted so I had the tops refaced. He cut off 0013". I asked the machinist whether I should be concerned with the hardness after milling ....He said don't worry about it 'they were really hard material'.

I ordered CB elephant foot adjusters the other day. Besides being a better design than oem they have plenty of length to make up the 0013".

.......Plenty to work on tomorrow.

XStretchified
 
How did you measure the valve/guide clearance? This has always seemed a bit tricky to do for me.
 
gggGary...

I asked the machinist to measure the valve guides for me. I was not there but he gave me his notes and he had numbers for the inside bores so I imagine he has one of these:

www.cylinderheadsupply.com/kl9449.html

If he was just measuring the wiggle room with a dial indicator his notes would be different.

I have dial indicators for truing wheels and while I could have used one to measure the wiggle room at the valve stem I did not think that that method could give me a good reading of the entire bore from top to bottom. Earlier I had measured the valve stems and knew that they were in spec. but I still needed accurate numbers for the guides.

Basically... $20 to measure the valve guides (and stems) and reface the tops was more than fair.

Xstretchified
 
Great thread!! I have a 1980 I bought at the end of summer & I have no idea when it ran last... this will come in handy when I get some time & get working on it...
 
I haven't updated on this thread in a couple of weeks but I have been working away on the bike. Here is what I've been doing:

Installed the second-over piston set. No filing was needed to gap the rings, all of them had gaps within the new install set-up specification dimension window. Some were wider than I would have intended to file them to but like I said they were all in the window. The pistons and rings were from Cruzinimage.

I installed the CB adjusters. I ground down the rockers instead of dishing them out, I wanted as much oil as possible to get to the foot and ball of the adjuster. I considered dishing out the rockers and then drilling a couple of small holes sideways through the dished hood to let oil through to the foot and ball but decided against it after having a vision of destroying a rocker or launching it from the drill press.

I put the valves back into the head. The intake valves took the lapping well and passed the solvent leak test. The exhaust valves wouldn't seal up after three or four diligent attempts at lapping. I took the head to the machine shop and had the exhaust seats/valves recut. He said the seats were cupped....All good now.

I noticed that one of the spark plug threaded holes was pretty bad in the aluminum section of threads and the cast iron threads were basically what was holding torque on the plug. The plug would be pretty wiggly right up until it was about to seat. There was not enough material left to chase the threads in the aluminum so I had the machinist install a helicoil.

I installed the new cam chain. This was a test of wills because they sure don't give you anything extra in the length of chain....I mean like nothing. But it does fit if you work at it until your fingers bleed.

I assembled the head cover and torqued it all down.

Then I removed the head cover. I had to move the camshaft bearings inboard so there was enough room for the rear collar of the backing plates for the points and advance unit. Clymers makes a point of telling you where to position the bearings but Haynes does not. I was using the Haynes book that day (mainly because the pages are still clean and attached to the binding). That first time with the bearings I checked the Haynes book...found nothing... and then placed the bearings where I thought I could make out a shadow of their original location. All good now.

I reinstalled the advance rod mechanism and new points sets. I've been reading up on the timing-points-coil-spark threads and am getting a grasp of how these work together. It is a little different than what I thought. I want to get the motor running with the points so I can have the knowledge. I do plan to switch to a pamco later.

One screw up that I have not dealt with is I neglected to install the crimped metal oil baffle. It was bagged up with the breather and I did not even think about it until I saw a comment on another thread.

I could use some guidance here. The oil breather does have the rubber inserts in the tubes...I will be using stock air boxes with KN filters. That baffle does not look like a highly technical part....what are the consequences of leaving it out? If I had a gasket on hand I would just do it...I may be able to save the gasket but since I do not have an extra gasket I'd like to hear from others who have run without the baffle.

Please make my day.

XStretchified
 
Makin' progress there, stretch!

My take on the baffle is that it blocks liquid/frothy/droplet oil from puking out the breather during hard running, and some fellas may be missing it and not even know it, except for the oil stains...
 
Back
Top