What have you done to your XS today?

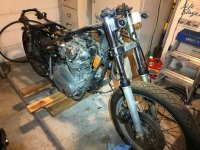
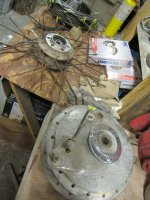
Pulled the forks all apart this afternoon. Scary as the Allen head bolts holding the lower fork leg to the damper assemblies on both forks were only finger tight!
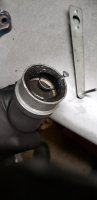
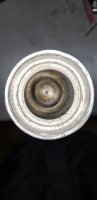
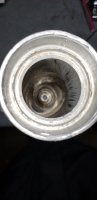
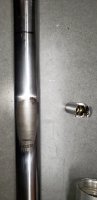
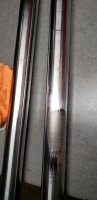
What do you guys make of the attached photo of stanchions? Both are straight, but some scoring and the odd bit of rust which would possibly damage the new seals. Figure use some emery cloth or 400 grit paper on the small rust specs? The other issue is two types of washers used on the allen head bolts. Rubber on one and fibre on the other. What is correct ?
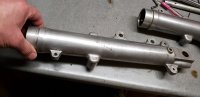
 

Attachments

  • 20201220_135617.jpg
    20201220_135617.jpg
    154.8 KB · Views: 121
Well the leg with the circled area is toast that'll never do anything but pump up fork oil. All the chrome is worn away, there's gotta be a story there!
tubes.jpg

Long as the rust spots on the other leg are up out of the seal slide area they'll be fine. Is it straight?
Any small rust pits you decide to smooth; my goto is the buffing wheel with black then white compound. That'll round over the sharp seal cutting edges. 400 or even 600 is too crude for a fork slider. I use 1500 or 2000 grit wet on caliper pistons. (or the buffer)
The only correct washers for the bottom bolts are copper. Was there any oil in them?
 
More info. I was riding this bike before without fork seal leaks but needed to put new springs in so thought it wise to do full tear down and full inspection. Old seals really really tough to get out.
 
Thank you gggGary. They are straight and that area where the chrome is gone would be inside the lower fork leg. Would that be ok?
I'm guessing that lower is crushed, bent, oval??? and that's what tore up the chrome, something bad is happening there. Parts are readily available, I'd find a better complete fork leg. Per chance were the fork legs shaved or altered? The only fork tubes I've seen with chrome worn off like that are aftermarket Franks tubes. The chrome is not as good as stock chrome. But I think mailman found a similar problem on his 72 and it was a bent or dented lower that caused it..
 
Thanks guys. Will try the pry bar technique tomorrow, having hit the large socket with the hammer first to hopefully free them a bit as I found in the posts. There is a scrape on the lower leg which was paired with the missing chrome fork tube. Maybe this is the reason for the damage? I hadn't considered this to be a cause but maybe so.
 

Attachments

  • 20201220_212321.jpg
    20201220_212321.jpg
    114 KB · Views: 112
Wheels in progress, waiting for the bearings and the other spoke sets,
not done with all the wheels, still many hours on sanding, polishing left,
Question: after finishing the polishing do you guys recommend to put a clear coat on all the shiny aluminum?
not only the rims, hubs, engine cases etc. let me know your opinion and your experience,
Cheers
 

Attachments

  • IMG_0001.JPG
    IMG_0001.JPG
    184.9 KB · Views: 104
  • IMG_0002.JPG
    IMG_0002.JPG
    209.2 KB · Views: 111
  • IMG_0004.JPG
    IMG_0004.JPG
    179.6 KB · Views: 101
The front brake seems to be rusted on the disk. :( Gotta figure that out.

Tap with a soft plastic or rubber mallet. If it really won't shift, undo the brake line and take the wheel out complete with caliper, then you can better access. Main thing is not to damage the caliper, but you probably need new pads anyway, so you can even use oil or WD40 to get things moving.
 
Last edited:
Put together a simple brake stay + mount, welded the mount onto the Radian arm. I think that's all the Radian arm needs - can probably send it out for powder at this point!

Screen Shot 2020-12-22 at 2.43.14 PM.png

Project is still mostly stalled out since I'm waiting on a tank - can finish the rear subframe once that shows up. Ordered in July, dude said 3-6 weeks... Sigh.
 
The fork seals from hell are out, used the drilled hole and screw being pried out with a claw hammer to get them out. Pry bar held in vice would not budge them. I believe the tops of the legs are no longer round. In one of the photos you'll see my steel angle grinder wrench, which I used to bridge the top of the lower leg, with the screw proud of the wrench, through the hole in wrench, so I could pry on the wrench with the hammer without further damaging the fork leg. Note the carnage on the fork leg was caused by a PO.
Having reassembled to test movement I have marked with sharpie the travel of the stanchion where it would go through the seal. Clearly, the lack of chrome is a problem. Note the interior of the lower fork leg - I presume this is where the damage occurred, although no serious obvious exterior damage on the leg. Maybe just a bit bent? The stanchion is not bent.
Also in the photo is the socket adapter I made to hold the damper assembly.
The reason I took these apart is because they were squeaky and the springs were weak. Perhaps not enough oil?
Now on the hunt for replacement forks local to Vancouver Island. Thoughts?
Sorry for long text.
 

Attachments

  • 20201221_205822.jpg
    20201221_205822.jpg
    72.2 KB · Views: 144
  • 20201222_193019.jpg
    20201222_193019.jpg
    74.4 KB · Views: 106
  • 20201222_193103.jpg
    20201222_193103.jpg
    75.9 KB · Views: 101
  • 20201222_195249.jpg
    20201222_195249.jpg
    164 KB · Views: 120
Back
Top