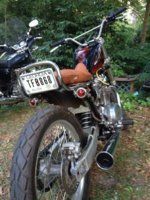
What have you done to your XS today?

If it doesn't vrrm vrrm at day's end I probably won't even need a phone to hear her.
Putting the front end back together on the survivor 79. Couldn't stop myself, had to strip the clear coat off the fork legs. Tapered steering bearings in, original style bars back on. Fiddling with cable routing "unbending clutch cable elbow" etc etc. Throttle cable seems to have "minimum slack even with the barrel all the way in, there's JUST enough slack to get the arm against the idle screw. Tank is off so it's not routing.
 
Got my GPS mounted and wired.
 

Attachments

  • IMG_20150518_112420[1].jpg
    IMG_20150518_112420[1].jpg
    268.2 KB · Views: 128
You aren't REALLY lost til the GPS goes dark.
Wife made it home fine, said it started first try. "I had to pull kinda hard to stop." Wait till she tries a drum brake XS.
 
I need a lathe with a bigger swing, or???

Damn it's harder than I thought to do a survivor style, the LH cover just got stripped and polished. :doh:
 
Getting lost on a M/C is part of the fun Phil.

Indeed. BTDT

This summer my wife and I are planning a big loop that includes, Hamilton MT, Victor ID, Eureka CA, and Ashland OR on the aged XS650s. We're hoping NOT to arrive at the crash site an hour or two before medical help. :)

Stay tuned for more.
 
successfully replaced my non-working starter motor. Swapped it for a working one I got from Daddygcycles (Thanks again)...and other than getting to those two awkward bolts, it came out/swapped in no problem. New seals, new cable boot and it works great!

So I went to see what was up with the old one...My suspicion was that the seal had failed allowing oil into the unit, and once I cracked the case open, the nastiest sludgy oil mixture oozed out of it. Must have been leaking for a LONG time, as most of the oil in there wasn't fresh looking...

I spent about an hour cleaning it out, getting the contacts to shine (the brushes looked OK)... put it all back together and ZING! works like new. Albeit, I don't have new seals for it...but at least it's a working starter motor in case I (or someone) need it down the road.
 
Finished up the front brake. Then did the head bolt retorque. Compared dry and anti seized threads, torqued dry, marked the nuts, removed, added anti seize, the anti seize added about 1/12 of a turn to the nut at 32FP that was fairly consistent across all 8 studs. This is on a 10K mile bike that was in great original shape. Note; the 5mm bolt above the chain tensioner was barely finger tight.

I'm trying to do this as a survivor but day-am it looks so much nicer when you start polishing aluminum!

attachment.php
View attachment 54282

RH as was

attachment.php


LH stripped and polished

Also straightened the bend in the already replaced by PO clutch cable, changed the routing of clutch and throttle to where they were supposed to be. Polished about 50 bolt heads, washers and other little pieces on the buffer.
 
Added a voltmeter so I can monitor my intermittent charging issues if I ever get a free minute to ride this thing.

8999-447FEC06858D-617-00000103F03FADCB_zpsaqwlhrz4.jpg
 
Nice...how did you mount it?

Thanks, but it's the cheesiest mount job ever. The plastic "housing" it's mounted to was some type of extra piece from a universal weedwhacker kit I had sitting on the shelf. I drilled it to fit the meter, and drilled the sides so I could hold it down with a zip tie. I couldn't believe how well it worked when I slapped it together..

This meter actually started falling apart as I was installing it, and I superglued it back together. Quality is NOT there, but it seems to be giving accurate readings.

It's a cheapie meter that can be had for a few dollars off ebay. I bought it with the intention that it would be temporary, and I planned to just zip tie it directly to the handlebar while I work through my charging issues. I really want a nice 1.5" analog meter, and would like to mount using an aluminum plate attached to the handlebar risers. However I need to focus my efforts on getting this thing to run/stop/charge reliably before I get fancy :)

I've been slowly acquiring discount pieces from ebay to do a PMA swap if it comes down to that.
 
Thanks, but it's the cheesiest mount job ever. The plastic "housing" it's mounted to was some type of extra piece from a universal weedwhacker kit I had sitting on the shelf. I drilled it to fit the meter, and drilled the sides so I could hold it down with a zip tie. I couldn't believe how well it worked when I slapped it together..

Well, I think it looks really good... nice job.
 
Thanks, but it's the cheesiest mount job ever. The plastic "housing" it's mounted to was some type of extra piece from a universal weedwhacker kit I had sitting on the shelf. I drilled it to fit the meter, and drilled the sides so I could hold it down with a zip tie. I couldn't believe how well it worked when I slapped it together..


It's all about ingenuity brother. I've got parts from every aisle in the hardware store on my bikes, plus some stuff that sat around the shop so long I have no idea what it was originally.
 
Got my new handlebars in the mail today. Didn't have time to mount them tonight, but this weekend I should have time. New bars should change the look of the bike a ton.
 
Checked fit and finish of some new parts today. New side covers and alt cover installed. Bolted on my new controls from old school speed. Still got a long way to go and still have a pile of new parts waiting to bolt on, but it's good to see it coming together.
 

Attachments

  • image.jpg
    image.jpg
    303.5 KB · Views: 140
Installed tapered roller bearings in my neck. Initally i'd stuck it together with sealed wheel bearings, spacers, and shim stock, because that's all I had on hand. Worked surprisingly well, but it didn't really give me a warm fuzzy feeling. uploadfromtaptalk1432360236373.jpg
 

Attachments

  • uploadfromtaptalk1432360395675.jpg
    uploadfromtaptalk1432360395675.jpg
    131.6 KB · Views: 139
Back
Top