What Top End Parts Would You Replace?

Coleman67

XS650 Enthusiast
Messages
91
Reaction score
0
Points
6
Location
Mount Juliet Tennessee
Hey Guys ! I have a 1975 650B with 36,000 miles showing that I have owned for about a year now. While getting it ready to ride this spring, I have found some of the dreaded plastic bits in the sump. I don't want to have to worry about the cam chain tensioner all summer, so I am planning to pull the engine and replace the cam chain and front and rear tensioners. Other than the plastic bits, the bike is running great with no leaks. Has anyone been able to successfully go in and replace only the gaskets, chain and tensioners ? Should I also be looking at replacing other things such as valve seals? I'm not trying to cheap out here, I just want to know what I need to be looking for. Any information is appreciated.
 
Yes, replace the valve guide seals, they're 30+ year old rubber and most likely hard as rocks. They are included in the complete engine gasket set anyway, so you'll have them on hand (you are getting that gasket set, right?). The rear tensioner may be fine but you'll definitely want to do the front guide and the chain. Anything else will just have to wait until you see what it looks like. Most can use rings (end gaps will be too big on the old ones) and a hand lapping of the valves to cure minor leaks.
 
Thanks 5twins ! Yes , I will be getting the complete rebuild gasket set from Mike's as soon as more are available. I will throw in a set of rings and valve-lap tool also. Thanks Again !
 
Like I said, wait until you get in there before you start ordering parts (well, you can get the gasket set, you know you need that). My buddy's bike ran fine but we found one cylinder so scored up, he needed a bore job. Stock rings will be useless to you and just a waste of money if you happen to find something like that.
 
Gotcha -- I'm going to try and work around Mike's $150 minimum for free shipping. Their Athena Premium Overhaul Gasket Set appears to be the best they have. I'll go ahead and get the gaskets, chain with master link, front cam chain guide to get me to $151. I'll get the rest as neeeded to get that free shipping !
 
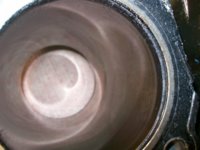
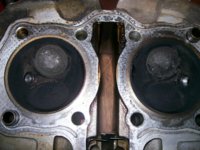
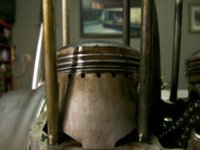
I got some goodies in from Mike's on Friday. After some research and some great how-to videos, I removed my engine and mounted onto a TC Bros stand. I then got the top end appart and sure enough, the front cam chain guide was missing some of the plastic from the outer edge, so it is getting replaced along with the chain. To the best of my knowledge (which isn't much) the rear tensioner and guide look good and the cylinders look great -- slick with no scratches at all. Please take a look at the pics and tell me what you think. Unless otherwise advised, I will be ordering a new set of standard rings from Mike's as well as the valve lapping accesseries. Will a standard automotive valve spring compressor work for these springs or do I need to order one from Mike's? Also, is paint thinner and a tooth brush all I really need to clean the piston tops and valves ? As always, thanks so much for your input and suggestions.
 

Attachments

  • 100_4131.jpg
    100_4131.jpg
    147.2 KB · Views: 143
  • 100_4132.jpg
    100_4132.jpg
    302.7 KB · Views: 139
  • 100_4129.jpg
    100_4129.jpg
    152.6 KB · Views: 118
I would get a machine shop to give the bores a light hone to allow the new rings to bed in. Don't forget to check your ring end gaps.
 
Some auto valve spring compressors will work, it depends on the style. I have a few and they will work with some fiddling. The absolute best I have and now use pretty much exclusively is the C clamp style one in the red box from Mike's (Part #35-0115). It's a wonderful tool.

To clean the carbon off the pistons and combustion chambers, use paint stripper. It will also remove the old gaskets. Don't worry too much about getting all the carbon off the valve faces with the stripper. They're hardened steel so once you remove them, you can use a wire wheel to clean them up without damaging them. If you want the pistons really clean, after the paint stripper, soda blast them. This is particularly good for cleaning the sides and ring grooves out.

As for the valve grinding stuff, you may be able to pick it up locally at an auto parts store. Try to get a duplex container of grinding paste that contains both fine and coarse compound. When lapping valves, it's really best to start with coarse and finish with fine. The job goes much easier and quicker this way.

http://paceperformance.com/i-5926547-cta2219-valve-grinding-and-lapping-compound.html

This is the very same product I've been using for years. The container has been updated since I bought mine but the part #2219 remains the same.....

VZ9gIbg.jpg
 
Last edited:
Thanks 5twins ! I will be sure and check the numbers on the pistons to make sure that they are indeed stock items -- then order my next batch of goodies!
 
Regardless if you have stock pistons or not, you need to make some measurements. With high milage, the pistons and the cylinders should be carefully measured. There are limits on cylinder taper, and the piston/cylinder clearance, with the clearance maximum around 0.004". Use a dial indicator to measure for valve guide wear. If you don't have the tools, get a machine shop to do the measurements.

As 5twins said, don't order any parts until you have made measurements of what you are dealing with.

You need to read the Yamaha Service manual.............www.biker.net.
 
Thanks for all the input guys. I'm pretty sure I have access to all of the needed measuring devices and will begin prepping for pulling these measurements. I also have a Clymer manual in hand and using it along with all of the information in this forum. I'll be getting together my next parts list soon -- I really don't want to rush this ... Thanks again again for the emphasis on importance of getting these measurements.
 
When you get the piston tops clean, you'll find a 3 digit number stamped in the top. That is the fractional part of the original size, as in 74.xxx mm. On the sides of the sleeves that hang out of the bottom of the cylinders, you'll find a 3 digit number stenciled on the side. That is the fractional part of the original bore size, as in 75.xxx mm. Compare what your parts measure now to what they were new to determine the amount of wear. Obviously, the pistons being alloy, they will wear 1st and more so than the steel bore.

I never had a way to accurately measure the bores so I would just measure the pistons and see if I could get a .004" feeler jammed in between the piston and bore. If the piston wasn't too worn from new and it passed the feeler gauge test, I'd call it good and just hone and re-ring. Let me stress that I consider this a one time only, 1st time rebuild option. The next time it comes apart, I would bore it. Being the tool junkie that I am, I recently scored a bore gauge from eBay. Now I can check this measurement and can't wait to try it out.
 
Back
Top