YL82
Perpetual Restorationist
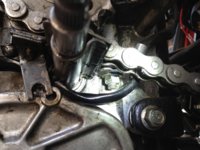
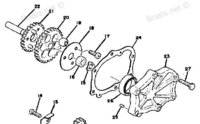
I have refurbished my Starter Motor and am ready to re-install into Reduction Gear opening, tighten 4 Bolts, hookup cable to solenoid, etc.
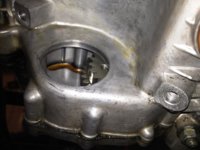
I have the original oil seal that was between the hole to the Reduction Gears where Starter Motor Shaft goes. It's got some wear on it, so I plan to replace, but I'm not sure which oil seal I need.
I had considered just putting back in the oil seal that came out (have decided against that), but I'm not sure what the proper way it is supposed to be inserted (either over starter shaft cowl or in face of reduction gear opening).
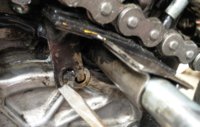
One side of the oil seal is hard rubber (with circular spring in center) while the other side has a rubber lip. Please take a look at image - which way does seal face? I'm assuming a new seal with look similar to my damaged one...
Part Number that I need (OEM and Mikesxs)?
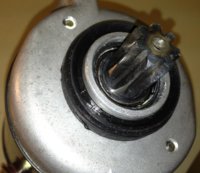
In the one image, I have my worn oil seal fit over the starter motor where shaft comes out - of course I'm not sure whether its facing the right way...
Thanks!
I have the original oil seal that was between the hole to the Reduction Gears where Starter Motor Shaft goes. It's got some wear on it, so I plan to replace, but I'm not sure which oil seal I need.
I had considered just putting back in the oil seal that came out (have decided against that), but I'm not sure what the proper way it is supposed to be inserted (either over starter shaft cowl or in face of reduction gear opening).
One side of the oil seal is hard rubber (with circular spring in center) while the other side has a rubber lip. Please take a look at image - which way does seal face? I'm assuming a new seal with look similar to my damaged one...
Part Number that I need (OEM and Mikesxs)?
In the one image, I have my worn oil seal fit over the starter motor where shaft comes out - of course I'm not sure whether its facing the right way...
Thanks!


")


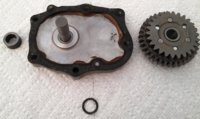
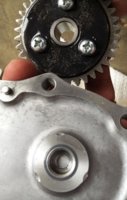
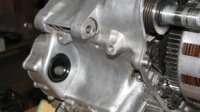
 When I turned the cover over (while spraying it with cleaner), the gear slipped off. I later recalled seeing a wave washer and I eventually found it lying in on my garage floor. Where does the wave washer go? Between what and what?