My paint booth is between the houses but only when the breeze is right and I’m always watching for bugs flying through lol
-
Enjoy XS650.com? Consider making a donation to help support the site.
XS650.com receives a small share of sales from some links on this page, but direct donations have a much greater impact on keeping this site going.
You are using an out of date browser. It may not display this or other websites correctly.
You should upgrade or use an alternative browser.
You should upgrade or use an alternative browser.
For my next dumb idea… a taste of Italy
- Thread starter WideAWAKE
- Start date
Cycle World tested a Ducati 750Ss or 900ss in the 70s that had a fly in thegel coat on the tank IIRC.My paint booth is between the houses but only when the breeze is right and I’m always watching for bugs flying through lol
Today was " WOI "..... Wheels of Italy..... anything from Italy on wheels... 4 R E's.... Lambo's,,, Fiat's ..old and new.. some with the price stickers in the window.. $668,900.oo ! Yikers ! A group of 10 Lamnie's scooters rode in..... I think about 12 made the scene...... I had one years ago and is the subject in Tom Cotter's book, " 50 Shades of Rust ".... ( barn finds, except in my case... garden shed find )... my army buddy had his 34'Moto Guzzi... I rode in with my 1951 Aremacchi " swan "... Your scoot is look'n great. !! 
Attachments
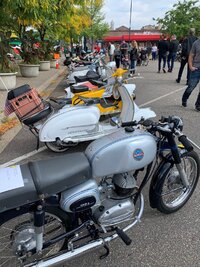
Today was " WOI "..... Wheels of Italy..... anything from Italy on wheels... 4 R E's.... Lambo's,,, Fiat's ..old and new.. some with the price stickers in the window.. $668,900.oo ! Yikers ! A group of 10 Lamnie's scooters rode in..... I think about 12 made the scene...... I had one years ago and is the subject in Tom Cotter's book, " 50 Shades of Rust ".... ( barn finds, except in my case... garden shed find )... my army buddy had his 34'Moto Guzzi... I rode in with my 1951 Aremacchi " swan "... Your scoot is look'n great. !!
That “swan” is a fantastic lookin bike!
I saw some video posted by Lambretta Club USA earlier this morning of the event.
I saw that brake disc and thought……”Hey….wait a minute.  I forgot this had been resto modded.

I forgot this had been resto modded. I saw that brake disc and thought……”Hey….wait a minute.
View attachment 251976
Yes, very much.
The (highly overkill) dual disc that was on the bike is going to another party.
**As a side note the Lambretta was the first production motorbike to utilize a disc brake.
Its original design was a floating disc hidden inside the front hub.
Made a little more progress.
Parts started to arrive the other day.
A long stroke crank, 60mm with a 110mm rod where as standard is 57x107.

A very nicely built VAPE ignition

And a 5 speed gear box

As luck would have it, both motors that I have are using a shorter layshaft so I am not able to use it with the 5 speed gearbox and need to order a longer one so building the actual motor has been halted for a bit. I have another batch of parts that need to be ordered, but my cylinder is out of stock. I’m only trying to pay the shipping from Germany 1 time.

Layshaft and gears should sit at the same height.
Tubeless rims and tires showed up and it’s a bit of a tight fit with the disc caliper but it does clear.


I also installed some upgrades silent blocks which should really cut down on the vibration. As you can see, they are substantial bigger.


The PO did a laughable job at extracting a broken case bolt and left another one broken inside. Fixing his screw up was fun, but got it done. I did get luck in that I’m using an early case with a later cover. The later covers run an 8mm stud where these two broken ones are so at least they needed to be drilled out anyways.


Got my motor as far as I can get it for now.
Painted and prepped to start building when I can get the rest of my parts ordered.
In the mean time, I make it a roller, test fit everything and pushed it to the corner of the shed.


Parts started to arrive the other day.
A long stroke crank, 60mm with a 110mm rod where as standard is 57x107.
A very nicely built VAPE ignition
And a 5 speed gear box
As luck would have it, both motors that I have are using a shorter layshaft so I am not able to use it with the 5 speed gearbox and need to order a longer one so building the actual motor has been halted for a bit. I have another batch of parts that need to be ordered, but my cylinder is out of stock. I’m only trying to pay the shipping from Germany 1 time.
Layshaft and gears should sit at the same height.
Tubeless rims and tires showed up and it’s a bit of a tight fit with the disc caliper but it does clear.
I also installed some upgrades silent blocks which should really cut down on the vibration. As you can see, they are substantial bigger.
The PO did a laughable job at extracting a broken case bolt and left another one broken inside. Fixing his screw up was fun, but got it done. I did get luck in that I’m using an early case with a later cover. The later covers run an 8mm stud where these two broken ones are so at least they needed to be drilled out anyways.
Got my motor as far as I can get it for now.
Painted and prepped to start building when I can get the rest of my parts ordered.
In the mean time, I make it a roller, test fit everything and pushed it to the corner of the shed.
Beautiful work!  Those sure were some nice quality looking parts, that’s a shame you couldn’t get all your parts yet. I shudder to think how much those parts must cost.
Those sure were some nice quality looking parts, that’s a shame you couldn’t get all your parts yet. I shudder to think how much those parts must cost. Jp - scooters of the era seem to have much more focus on body and curves than their bigger motorbike counterparts. Almost like a two wheeled car.
Mailman - a good friend has a dealer account so dealer prices were part of the deal haha. But off the shelf, the gear box is about $700, the crank is not bad, around $175 and the vape ignition is about $350 which is quite surprising seeing as how expensive on is for an XS.
This is the full spread on the ignition. There is quite a lot that goes is to it. Maybe that puts into perspective how many people ride vintage lambrettas vs XS650s worldwide. Although here in the states I’ve seen far more XS in the wild than scooters

Rims originally run a split rim and a tube which makes changing tires really easy, but a blow out is no fun. Tubeless ones are machined billet.
Mailman - a good friend has a dealer account so dealer prices were part of the deal haha. But off the shelf, the gear box is about $700, the crank is not bad, around $175 and the vape ignition is about $350 which is quite surprising seeing as how expensive on is for an XS.
This is the full spread on the ignition. There is quite a lot that goes is to it. Maybe that puts into perspective how many people ride vintage lambrettas vs XS650s worldwide. Although here in the states I’ve seen far more XS in the wild than scooters
Rims originally run a split rim and a tube which makes changing tires really easy, but a blow out is no fun. Tubeless ones are machined billet.
What a beautiful ride. I really enjoy following your builds. Your quality of craftsmanship and attention to detail are second to none. Glad you are writing this one up!
What a beautiful ride. I really enjoy following your builds. Your quality of craftsmanship and attention to detail are second to none. Glad you are writing this one up!
^^^^ what he says. Amazing work, and the detail is off the charts.
Thank you very much for the kind words but I do think you two need your eyes checked haha.
Made a little more progress.
In order to run a 5 place clutch(4 is standard) some pockets needed to be machined in my crown wheel. I don’t have a mill, much less a rotary table so I scratched my head for a day and come up with this.
The crown wheel runs the clutch basket on bearings… stuck the clutch basket (an old one) on the back of the crown and it spins in a perfect circle, add a bolt to clamp and tighten it up. Clamped the clutch basket in the vice on the drill press and there ya have it, poor mans rotary table haha.
Worked nicely, and now I have enough room to get another fiber and steel plate in.


I was finally able to get the rest of my needed parts on order. I had to wake up at 3am and order from Germany the day they got in stock. They had a shipment of 30 cylinders last Friday and they sold out by 6:30am California time when I got the email they were in stock. They said they would have 30 more on Tuesday. By 7am California time, they were all gone again.
In the mean time I started building what I could.
Got the crank in and the mag housing rebuilt. A nice part of the Lambretta engine design is that it’s got a built in crank puller.


Mag housing was a bit crusty

I also got my ignition in and built a bracket for the coil and regulated to me cushion mounted and not vibrate to death.


The rest of my parts should show up Monday so I can hopefully get this up and going soon.
I am not looking forward to shimming the gearbox as I’ve no heard anyone say it’s been a pleasant experience, but I’d like that 5th so gotta do what ya gotta do.
In order to run a 5 place clutch(4 is standard) some pockets needed to be machined in my crown wheel. I don’t have a mill, much less a rotary table so I scratched my head for a day and come up with this.
The crown wheel runs the clutch basket on bearings… stuck the clutch basket (an old one) on the back of the crown and it spins in a perfect circle, add a bolt to clamp and tighten it up. Clamped the clutch basket in the vice on the drill press and there ya have it, poor mans rotary table haha.
Worked nicely, and now I have enough room to get another fiber and steel plate in.
I was finally able to get the rest of my needed parts on order. I had to wake up at 3am and order from Germany the day they got in stock. They had a shipment of 30 cylinders last Friday and they sold out by 6:30am California time when I got the email they were in stock. They said they would have 30 more on Tuesday. By 7am California time, they were all gone again.
In the mean time I started building what I could.
Got the crank in and the mag housing rebuilt. A nice part of the Lambretta engine design is that it’s got a built in crank puller.
Mag housing was a bit crusty
I also got my ignition in and built a bracket for the coil and regulated to me cushion mounted and not vibrate to death.
The rest of my parts should show up Monday so I can hopefully get this up and going soon.
I am not looking forward to shimming the gearbox as I’ve no heard anyone say it’s been a pleasant experience, but I’d like that 5th so gotta do what ya gotta do.
Alright! New parts. I can’t wait to see this gorgeous project going down the road.
Take it to the joke page. That is effnnn funny.
Started in on the major parts of the motor…
I was dreading setting up this 5 speed gear box and well… it was warranted. I built it and took it apart 5 times before it was correct. Took about 6 hours in total.
I built it straight forward the first time to see where it all needed to be adjusted. This required getting the rear hub on and torqued down, setting ear gear and checking alignment of loose gears with the gear cluster, checking the shifter (sliding dog) on each gear for perfect engagement. Then putting the clutch backing plate on and torquing down to spec to then finally be able to check that the gearbox shim is correct.
Long story short, I had to machine a .5mm spacer to push out my hub bearing, thus allowing my layshaft to sit deeper in the case.
When I first torqued down my clutch plate it hit the gear box and would not seat all the way as seen in the pic.


In order to fix this, I made the above mentioned spacer.
I found some .5mm aluminum stock, rough cut it to size, super glued it to an old bearing and machined it to size on the od and bored out the id. It fell off a few times but ultimately I got it done.


Pushing the layshaft back then meant my shift hit the back of the crank case so that needed to be relieved.

Put it all back together for the 5th time , pulling the rear hub is a pain so I figured I’d put the brake shoes on and call it done. And they rub…

Pulled em off and I’ll correct em another day.
Got it all buttoned up, correctly shimmed and ready to go.

Then I got my station cleaned and prepped to set up the top end.

As luck would have it, they didn’t send the wrist pin and circlips sooo a complete build was not possible (I got the parts on the way)
Made use of a spare wrist pin and check the port timing. Using a long stroke crank means I need to raise my cylinder by 3mm.

At bottom dead center, piston should sit about .015 below transfer ports. So we’re good there.

Then it was to check my squish which should be 1-1.1mm… checked it with a 1.5mm head gasket and well…


It’s said that spec is 1-1.4 and the 1.1 being ideal so I have another 1.2 head gasket coming with the wrist pin which should put me bang on.
Set my ring gaps and then put the top end aside for the moment and buttoned up what I could in the crankcase.

Clutch plates are soaking tonight so I can finish that up tomorrow.
The remaining bits should be here Monday.
Maybe I can get it up and going next week.
I was dreading setting up this 5 speed gear box and well… it was warranted. I built it and took it apart 5 times before it was correct. Took about 6 hours in total.
I built it straight forward the first time to see where it all needed to be adjusted. This required getting the rear hub on and torqued down, setting ear gear and checking alignment of loose gears with the gear cluster, checking the shifter (sliding dog) on each gear for perfect engagement. Then putting the clutch backing plate on and torquing down to spec to then finally be able to check that the gearbox shim is correct.
Long story short, I had to machine a .5mm spacer to push out my hub bearing, thus allowing my layshaft to sit deeper in the case.
When I first torqued down my clutch plate it hit the gear box and would not seat all the way as seen in the pic.
In order to fix this, I made the above mentioned spacer.
I found some .5mm aluminum stock, rough cut it to size, super glued it to an old bearing and machined it to size on the od and bored out the id. It fell off a few times but ultimately I got it done.
Pushing the layshaft back then meant my shift hit the back of the crank case so that needed to be relieved.
Put it all back together for the 5th time , pulling the rear hub is a pain so I figured I’d put the brake shoes on and call it done. And they rub…
Pulled em off and I’ll correct em another day.
Got it all buttoned up, correctly shimmed and ready to go.
Then I got my station cleaned and prepped to set up the top end.
As luck would have it, they didn’t send the wrist pin and circlips sooo a complete build was not possible (I got the parts on the way)
Made use of a spare wrist pin and check the port timing. Using a long stroke crank means I need to raise my cylinder by 3mm.
At bottom dead center, piston should sit about .015 below transfer ports. So we’re good there.
Then it was to check my squish which should be 1-1.1mm… checked it with a 1.5mm head gasket and well…
It’s said that spec is 1-1.4 and the 1.1 being ideal so I have another 1.2 head gasket coming with the wrist pin which should put me bang on.
Set my ring gaps and then put the top end aside for the moment and buttoned up what I could in the crankcase.
Clutch plates are soaking tonight so I can finish that up tomorrow.
The remaining bits should be here Monday.
Maybe I can get it up and going next week.
We really want a picture of your silly grin after your first ride...Started in on the major parts of the motor…
I was dreading setting up this 5 speed gear box and well… it was warranted. I built it and took it apart 5 times before it was correct. Took about 6 hours in total.
I built it straight forward the first time to see where it all needed to be adjusted. This required getting the rear hub on and torqued down, setting ear gear and checking alignment of loose gears with the gear cluster, checking the shifter (sliding dog) on each gear for perfect engagement. Then putting the clutch backing plate on and torquing down to spec to then finally be able to check that the gearbox shim is correct.
Long story short, I had to machine a .5mm spacer to push out my hub bearing, thus allowing my layshaft to sit deeper in the case.
When I first torqued down my clutch plate it hit the gear box and would not seat all the way as seen in the pic.
View attachment 253701
View attachment 253700
In order to fix this, I made the above mentioned spacer.
I found some .5mm aluminum stock, rough cut it to size, super glued it to an old bearing and machined it to size on the od and bored out the id. It fell off a few times but ultimately I got it done.
View attachment 253702
View attachment 253703View attachment 253704View attachment 253705
Pushing the layshaft back then meant my shift hit the back of the crank case so that needed to be relieved.
View attachment 253706
Put it all back together for the 5th time , pulling the rear hub is a pain so I figured I’d put the brake shoes on and call it done. And they rub…
View attachment 253707
Pulled em off and I’ll correct em another day.
Got it all buttoned up, correctly shimmed and ready to go.
View attachment 253708
Then I got my station cleaned and prepped to set up the top end.
View attachment 253709
As luck would have it, they didn’t send the wrist pin and circlips sooo a complete build was not possible (I got the parts on the way)
Made use of a spare wrist pin and check the port timing. Using a long stroke crank means I need to raise my cylinder by 3mm.
View attachment 253710
At bottom dead center, piston should sit about .015 below transfer ports. So we’re good there.
View attachment 253711
Then it was to check my squish which should be 1-1.1mm… checked it with a 1.5mm head gasket and well…
View attachment 253712
View attachment 253713
View attachment 253714
It’s said that spec is 1-1.4 and the 1.1 being ideal so I have another 1.2 head gasket coming with the wrist pin which should put me bang on.
Set my ring gaps and then put the top end aside for the moment and buttoned up what I could in the crankcase.
View attachment 253715
Clutch plates are soaking tonight so I can finish that up tomorrow.
The remaining bits should be here Monday.
Maybe I can get it up and going next week.
Boy, you’re really having to work for those modifications! Nice job! 