Show me your wires!

Jpwhit1

XS650 Enthusiast
Messages
94
Reaction score
0
Points
6
Location
Scappoose,Oregon
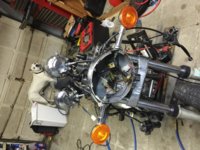
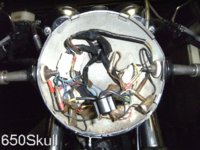
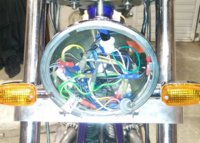
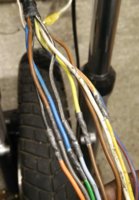
When your brilliant like me and forget to properly document where things were and have a hard time grasping wiring schematics pictures help a lot! Any of you willing to take pictures of connection areas? Inside headlight, both sides of bike, under seat.... I bet if someone made a video on YouTube about a basic wire harness install it would get a ton of hits. Any visual help is appreciated!:thumbsup:
 
This is the spaghetti behind the headlight.
 

Attachments

  • image.jpg
    image.jpg
    276.7 KB · Views: 143
I have videos on chopper harnesses on Youtube BUT if you are dealing with a stock harness that is not that hacked up its plug and play HAHA Yamaha has made it very simple with all the different connectors. Now reading there diagram another problem. What I tell most guys who are interested in doing there own harness is DO IT IN STEPS LIGHTS/CHARGING/IGNITION/TURN SIGNALS/etc and you won't get lost in the mess of wires. Colors screw you up REDS are HOT BROWNS are HOT RE-WHITE HOT/ Some BLUE-White HOT WEIRD WEiRD WEiRD. But that's the way it is in a lot of harnesses STOCK. You want to learn ......buy yourself a stock used harness and tear it apart you will be amazed what hooks to what.
That's why my harnesses that I sell are broke down easy
RED HOT 12VOLTS
BROWN HOT
BLACK GROUND
BLUE HIGH BEAM
GREEN LOW BEAM
WHITE RUNNING LIGHT
ORANGE BRAKE LIGHT
YELLOW LEFT TURN
GRAY RIGHT TURN
PINK NEUTRAL LIGHT
ALL REDS AND BROWN 12 VOLTS
ALL BLACKS GROUND
EASY RIGHT now look at a stock on many more colors
HAVE FUN and KEEP CHOPPIN
RICH
 
Its pretty much plug and play. Some of the bullet connectors can be a bit confusing, just remember color to color and some connectors are triples like the Indicators and earth wires and sometimes the yellow from the headlight.
 

Attachments

  • Copy of DSCF7015.JPG
    Copy of DSCF7015.JPG
    218.7 KB · Views: 131
Jp check out my recent post for headlight help
I tried to break it down as best I could without a service manual to assist me, but it should do you well enough.
I'll link you...
http://www.xs650.com/forum/showthread.php?t=41687

I have my entire harness off and everything plugged back in where it should go, let me know what you need specifically yourself and I'll see what I can do to help.
 
Thanks for the pix! In not using things like blinkers and a few other items, it should make for a cleaner and thinner harness. I bought the replacement coils from Mikes and the colors don't match originals. Things like that make a rookie nervous. Pics of Condenser wire and points cam wire connections would be awesome!
 
Don't Laugh.
Rainbow Noodles!
It gets real hot in there with the Headlight on.
I'm going back in this afternoon with some sunglasses and chopsticks.
Goodluck with your wiring.
 

Attachments

  • noodles.jpg
    noodles.jpg
    35.8 KB · Views: 133
I'm doing a conversion on a points bike,'78, and converting to TCI along with removing the rlu and anything else I don't need.
Best advice so far is to strip the harness down to the wires and connectors, use the link that DaddyG has posted above and a pic of the stock harness for the year that you're working on. Have all the components that you're going to be using in place and start connecting.
Use a volt/ohm meter to check continuity as you go along. I'm starting at the battery and going forward. It gets tricky with some colors and what they do but refer to the stock harness schematic to determine if you need to go that route or not.
Patience, coffee and good wire connectors will be needed...
 
If you want to start with a stock harness, and need one, I have mine off my 80 special. If you're making a simple harness then good luck!

And to OP, if I have time when I get home I'll take pictures of other connections.

Helping a friend move her entire apt today...
 
I don't even think the original coils had matching colors. On the coils one wire is hot the other ground. Most aftermarket coils come with a brown and orange wire. Use the brown wire as hot, the orange as ground.
On your 71 Thr brown hooks to the brown harness wire, the orange to the points. On left or right hook the coil for the right plug to the upper set of points. the left to the lower set.
On your 79 hook the brown coil wire to the red/white wires from the engine stop switch. the orange to the points. right/left same as the 71.
On most of the rest of the wiring as mentioned just plug and play. Just besure you have the colors match across a plug. In the headlight buck is a dark brown wire for the headlight that looks very much like the chcolate wire for the turn signal. If switched around the headlight will try to flash with the turns and the left turns will light up when you turn on the headlight.
If you look at most any diagram you will see that every component will have it's own set of wires. They each have it's own color code. You may find two connectors that have 6 or 8 wires but the color of the wires won't match.
Also on the srtock harness with all the components in the stock place the harness connectors only reach the correct parts.
Leo
 
I peeled back some tape and found the PO had their own take on the colour code: :wtf:
Fat chance of figuring it out. Gonna rip it out and do it myself. Just have to get all the wire from somewhere.
 

Attachments

  • wires.jpg
    wires.jpg
    104 KB · Views: 118
Back
Top