My engine rebuild from scratch!!

thats very observant of you carbon :wink2:

we'll have to call you hawkeye :D

Maybe airwolfie hasn't fitted his clutch yet ?

BINGO! :D

oooops :) guess so :laugh::doh:
peanut I'm laughing so hard tears are flowing

Jumping the gun here!! I'm going to install it once the engine is in the bike, less weight to lug into the frame!

Thanks for the kind words gents!
 
Back to business!!

Flip the transmission over the right way. You will need four bolts here. One short one,two slightly longer ones, and a very long one.

Short one

9862104754_63ef810e70_b.jpg


Two longer ones

9862108934_7e9833ed7e_b.jpg


9862112185_d690d5f16d_b.jpg


Long one

9862095914_5661134580_b.jpg


Split ring washers are used here too. Torque them downto spec in the sequence shown in your manual. Add neutral switch, and dip stick along with corresponding seals.

Transmission done!

9862091385_cf0a5ba3e1_b.jpg
 
The cam chain tensioner has a little bar that is in the way of the endless chain, so I cut mine off, put the chain in, replaced the little bar with a piece of tubing and a bolt and two nuts. DO NOT DO THIS!!!

9922429836_136c57e361_b.jpg


Turns out the nuts stick too far out, preventing the barrel on that side from going down all the way. MORE backwards building for me!!! That bar is not essential, so I now have left it out.

Stuff all the openings with whatever you can find(underwear ans paper towels for me!) to stop ANYTHING falling in there. Place the tensioner in it's position, facing the rear, rubber side inwards.

9922419676_8a8cd01fe6_b.jpg


Two differen pairs of screws here, one with a shoulder, one without.

9922555393_1c54453b24_b.jpg


The ones without the shoulder go on the left side, and the ones with, go on the right. Use blue locktite here!

9922551283_b86a1a2fa2_b.jpg


Torque them up to spec. Then hang a wire/string/cable/whatever to the chain as to prevent it falling down the transmission. I used garden wire, nice and rigid.

Next the front cam chain guide.

New shiney nuts and bolts! With copper washers.

9922403236_a60dd3aabf_b.jpg


Anti seize for aluminium to stainless steel

9922435854_a21c2a429c_b.jpg


Blue locktite for the bolts that hold the guide, loosely do the bolts up, so you can align the guide straight and true before toqueing it down.

9922530723_d8e682abf8_b.jpg


I VERY LIGHTLY honed my sleeves with a honing tool I borrowed of a fiend of mine. I ten liberally oiled them, ready to accept the pistons

9922449424_319fc8cd85_b.jpg
 
Pistons are next.

Carefully pry the rings off with some needle nose pliers, Pull the end out and up, keeping it close to the piston without scratching the sides or top

9922350586_23d21911c1_b.jpg


Next I took a wire brush and gave them a good scrub, especially inside the grooves where the rings will sit in.

New rings......

9922421084_125bd72da7_b.jpg


Note the lettering on the ends. This is important, they need to point UP.

9922503543_50ef233ddb_o.jpg


As you can see, five rings are present. Top one is the SINGLE thinnest one, second one is the thickest, third will be one of the thin pair, fourth is the wavy one, and fifth is the last remaining thin ring.
I started with the wavy one in the bottom groove. This makes the two thin ones installation easier, as they need to be above and below the wavy ring. You will also notice the wavy ring has the inner end raised, the thin ones but up against this, hence them going in afterwards. It's a bit tricky but you will get the idea. Install them the same way you removed theold ones.

Also make sure the wavy ends do NOT overlap. I also put them back in the way they came out, with the ends pointing downwards, like so....

9922353696_9383531b10_o.jpg


NOT like so....

9922499003_df1c971714_b.jpg


Next, the gaps need to be in a certain place. This image I found on the net will help.

Numbers indicate ring position and ring number

9922264235_97ba87590c_b.jpg


Arrow on the top of the piston points forward.

9922372684_a7594e356a_b.jpg
 
Install O-rings around the sleeves!!! So many people forget these and get lovely oil leaks!

9922484633_e592b9e3d2_b.jpg


Also be sure the barrels are present. Mine were on the top part.

Place a piston inside each sleeve, making sure the arrow points to the front. After undoing this the first time, I found it's easier to add the piston shafts in first before putting them in the barrels. NOT ALL THE WAY, just enough to start the slide over. Dont' forget the circlips on the other end, towards the middle.

9922475933_29d8fa6792_b.jpg


Give the sleeves and pistons a good coat of oil, it makes for easier insertion!(sounds familiar!!:D)
Now we need to get those rings into the sleeves. No need for fancy expensive ring clamps, just a popsicle stick will do! Got this great invention no thanks to I am Carbon! Check out Carbon's video to see him in action! Love the commentary too!!

9922366954_28b0e35cb5_b.jpg


9922361674_54c6da5313_b.jpg


I found it easiest to start right opposite the open end, most of the times that part is already in! Work your way round, putting some pressure on top of the piston. One ring at a time. once they all in, push the piston down until the shaft hits the side of the sleeve.

Now clean all the fitting surfaces, place the gasket( I found it less stressful and tear preventative to place it on the top half, and then let it slide down the bolts, rather than trying to fit it carefully down on its own), pull the camchain through, make sure the guide is in as well(this all works better with two pairs of hands!), align the piston rods into the pistons, and slowly drop the head down, and get something to stop the head going all the way down.

This is what you should see......

9922347994_276b855665_b.jpg


Note my piston rods aren't in the pistons yet!

Now carefully drop the head a bit more until the piston rods are inside the pistons. wiggle the arm about whilst trying to slide the shaft into its hole. Once it bites, push it it all the way in

9922439013_273b77aeb5_b.jpg


Cover that gaping wound before trying to put in the circlip!!!!

9922338264_2103425fcc_b.jpg


Insert circlip, and you are done!

9922288576_df5ec580ac_b.jpg


Now, pull the chain up, and remove your spacer and hole-filler , and slide the head down all the way home. You may need to tap it a bit at the end with a rubber mallet to get it down all the way.

9922412553_14bcb6a475_b.jpg


Getting there!!:thumbsup::bike:
 
Last edited:
Valve cover next. Make sure this bit is in its place!

9922241085_20518d8dc9_b.jpg


Clean all mating surfaces, add liquid gasket sealer around the bolt holes and around the can chain tunnel, again make sure its nice and thin, you don't want this oozing out into the engine.

9922397183_f9c9af5f6c_b.jpg


I placed the gasket on the top again as my barrels were in there, it made for easier fitting.

9922245786_7806532a2d_b.jpg


Three bolts are needed here, two 8mm and one 6mm

9922219775_6e6b771e3a_b.jpg


Two big ones go in next to the spark plug holes

9922236156_b154d09f6d_b.jpg


9922205275_1b13749e14_b.jpg


The small one goes in the back

9922231296_6b3d4fa4a0_b.jpg


Torque them up to spec.

You should have something like this...

9922265564_42ee46247b_b.jpg
 
Right, so next is the camshaft. you need to get the chain around it, and then wiggle it in place, it's a bit fiddly but you will get it in there eventually!

Make sure the notch is to the left when sitting on the bike.( I bloody hope this is right!!!)


9957789363_8301bb834a_b.jpg


Find DTC. There are many ways to do so, I went with peeking down the plug hole, and moving the crank back and forth until I was happy I got TDC, there is a SLIGHT non-movement area between going up and coming down. I also noticed the pin hole in the crank along with the notch for the keyway, will be at 6'o clock and 12' o clock. I placed an earbud in the hole to make sure id doesn't move while putting on the chain. ( It looks a bit off but it was just an indication, not a rule, the hole was bigger than the earbud!)

9957676794_232a25b3ee_b.jpg


I later found it's easier to have the chain on the right of the sprocket, you will see what I mean when you do it! Make sure you have your secure life line attached at all times until you are CERTAIN the chain won't go anywhere!

9957770703_989f93474f_b.jpg


(man it's hard taking pics with one hand whilst building a bike with the other!!) Start on one side. working the chain onto the sprocket. Ensure the notch is pointing at 12' o clock. This took me a few tries, so don't worry if you get it wrong, just undo it and try again. In this picture it was a bit off, but this is to show how to run the chain onto the sprocket.

9957675296_c66e27a204_b.jpg


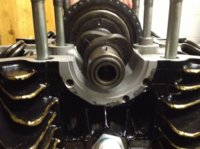
This is what you should have when it's right

9957655854_81d60b4812_b.jpg


Now there is a notch at the end as well which you can also use as a guide.

On the flip side there is a pimple, this has to line up with the face of the bottom end, this is the time to check this is right, if not, do it again!

9957754853_ae2d0951b1_b.jpg


Clean the bearings, or get new ones, and slide them over the shaft in postion. They are going to be a bit tricky and tight, just be patient, the will go! do one at a time each side.

9957616755_c4721f6843_b.jpg


Next make sure the sleeves are in place in the rocker cover! Replace the o-rings while you at it, and tap them in place.

9957636244_e2a527ba3c_b.jpg


9957741323_fe970c6ae4_b.jpg


Clean all fitting surfaces, add gasket sealer to the rocker cover(easier to go round without having barrels or bolts in the way). Again, a really thin coat.

9957602515_7be16f5df3_b.jpg


Place rocker cover in its place, and put the brass and copper washers in their places like so(some people will use rubber seals instead).

9957617674_bb2d96bdf2_b.jpg


Place remaining four bolts on either end with regular washers, add crown nuts, and torque up to spec.

And the big part of the build is done!!

9957629086_4b5948b477_b.jpg


Now go pat yourself on your back, have a beer/whisky/brandy/add favourite alcoholic beverage here, light a cigarette/cigar/pipe/doober/bong/fresh air, and do a little happy dance in the back garden!!(well.....YOU don't have to but I did!!):cheers::smoke::cheers::smoke::D
 
nicely done squire :thumbsup::D

I also found that fitting the cam chain over the cam sprocket was an absolute pitta. At one stage I thought it must be impossible but it just needs some major fiddling.
 
Really2 nice build guidance for amateur like me....:) keep up the good work..

Thanks Java! I did this for us novices!:wtf::confused::wtf::D

More coming! I still need to do the clutch, kick starter, PMA, that will all be in here! Also setting the points will be here.

Veeeerrrryyy nice!! I smiled at the last picture.. what a great build up and cool write up!!

Thanks Lasper!

Subscribing!!

Great thanks!:thumbsup:
 
Airwolfie, you have done some great work there, my friend, but put my mind at rest, please - in your pick of the cam and the cam chain (attached) you have the mark vertical. Now, I did exactly the same thing on three top-end rebuilds so I am quite a reluctant serial cam chain remover and putter-onerer. I noticed that when the mark is vertical without the bearings on (as in the pic) it is not vertical when raised to the height of the bearings (the tension of the leading side of the chain pulls the cam two teeth out of vertical. Please put my mind at rest - did you check the cam was vertical/TDC after you put the bearings in? If you didn't, it is no big deal to remove the rocker cover and 'ripple the cam chain a couple of links.

Anlaf
 

Attachments

  • 9957655854_81d60b4812_b.jpg
    9957655854_81d60b4812_b.jpg
    89.2 KB · Views: 308
Back
Top