-
Enjoy XS650.com? Consider making a donation to help support the site.
XS650.com receives a small share of sales from some links on this page, but direct donations have a much greater impact on keeping this site going.
You are using an out of date browser. It may not display this or other websites correctly.
You should upgrade or use an alternative browser.
You should upgrade or use an alternative browser.
giddy! 71 within my grasp
- Thread starter angus67
- Start date
-
- Tags
- restoration
angus67
Welder's penetrate deeper!!
Thanks, guys.
Vincent, How did you get a copy of the original title? How much?
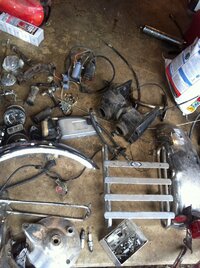
So heres pictures of junk I got. most of the parts are off a 1980, the project. I have the title for that too, we didn't want to make the dmv ladie's head explode. Ill do it next weekend. As far as the 1980 project I got from him, The frame is hardtailed but warped. If I cant bring it back in, I'll cut the back off and get a tc rear. It did come with a engine. The kid inside me tells me to make a go cart with it.
on with the show......
[/URL][/IMG]
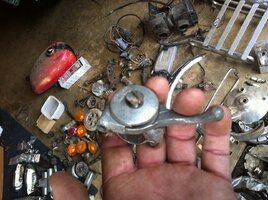
Is this a de-comp lever? says magura on it.
[/URL][/IMG]
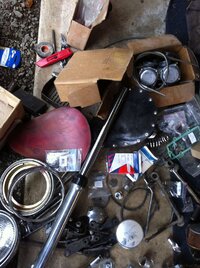
airbox, some sort of luggage rack.....
[/URL][/IMG]
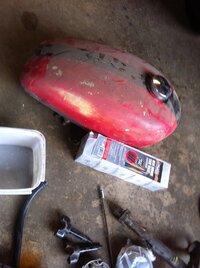
don't know what this tank is. greg says its been banging around for a long time. its old fiberglass, so prolly useless with ethanol, potential bird house.....
[/URL][/IMG]
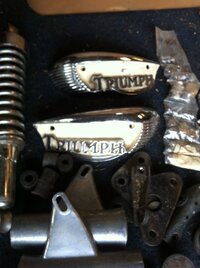
various mounts, hardware kit to go with full rebuild gasket kit. Whatyear are these triumph badges? worth anything? Recognize the headlight ears?
[/URL][/IMG]
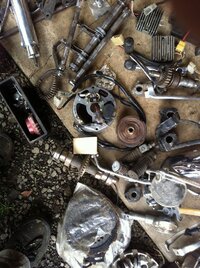
carb rebuild kits, too early 38's, a couple of seats, springs. one fork
[/URL][/IMG]
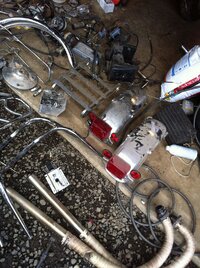
one rotor tests good. haven't checked the stator. two reg/recs, and a black box. I hope the stator and box are good. Those are original(1980), not cheap to replace.
[/URL][/IMG]
Are those 79 fenders? Some pipes.
[/URL][/IMG]
some krazy race pipe. don't know what it goes to. Just thought it was cool, and grabbed it.
[/URL][/IMG]
A couple of wheels.
Vincent, How did you get a copy of the original title? How much?
So heres pictures of junk I got. most of the parts are off a 1980, the project. I have the title for that too, we didn't want to make the dmv ladie's head explode. Ill do it next weekend. As far as the 1980 project I got from him, The frame is hardtailed but warped. If I cant bring it back in, I'll cut the back off and get a tc rear. It did come with a engine. The kid inside me tells me to make a go cart with it.
on with the show......
[/URL][/IMG]
Is this a de-comp lever? says magura on it.
[/URL][/IMG]
airbox, some sort of luggage rack.....
[/URL][/IMG]
don't know what this tank is. greg says its been banging around for a long time. its old fiberglass, so prolly useless with ethanol, potential bird house.....
[/URL][/IMG]
various mounts, hardware kit to go with full rebuild gasket kit. Whatyear are these triumph badges? worth anything? Recognize the headlight ears?
[/URL][/IMG]
carb rebuild kits, too early 38's, a couple of seats, springs. one fork
[/URL][/IMG]
one rotor tests good. haven't checked the stator. two reg/recs, and a black box. I hope the stator and box are good. Those are original(1980), not cheap to replace.
[/URL][/IMG]
Are those 79 fenders? Some pipes.
[/URL][/IMG]
some krazy race pipe. don't know what it goes to. Just thought it was cool, and grabbed it.
[/URL][/IMG]
A couple of wheels.
Attachments
-
 IMG_0996_zps34af93ec.jpg295.5 KB · Views: 1
 -
 IMG_0987_zpsc6757a25.jpg210 KB · Views: 1
 -
 IMG_0988_zpsbf0067c0.jpg239.4 KB · Views: 1
 -
 IMG_0989_zps8355e2fa.jpg226.3 KB · Views: 1
 -
 IMG_0990_zps32bb366a.jpg207.6 KB · Views: 1
 -
 IMG_0991_zps6e10361a.jpg178.2 KB · Views: 1
 -
 IMG_0992_zps5035bece.jpg93.3 KB · Views: 1
 -
 IMG_0994_zps48fcbb86.jpg125.8 KB · Views: 1
 -
 IMG_0995_zpsde45a7e6.jpg184.7 KB · Views: 1
angus67
Welder's penetrate deeper!!
now I have to put all this shtuff somewhere. most of it will end up under the house. the extra motor is already down there. the electronics will be kept in the garage. mice love wires.
On the rotor, I see a crack in the insulation. looks like it was hot too. it test good, but it may not last long.
also two buckets worth of various hard ware.
On the rotor, I see a crack in the insulation. looks like it was hot too. it test good, but it may not last long.
also two buckets worth of various hard ware.
Wow, what a pile.
I haven't seen one of those drag-adjustable magura levers in over 40 years.
Seem to recall they were universal application, choke cable, decompression for 2-strokes, bicycle
Items worth a second look would be:
- The Solex carbs
- The front fender and matching brace
- The cam (36 or 34 tooth sprocket)
- Triumph badges (look like '60s)
- Britbike footpeg hardware
angus67
Welder's penetrate deeper!!
the38's are complete, early solex. I have some 77 38's I intend to use on next chop.
front fender is a 71, kinda banged up, but might use on a rat bike for a rear.
the cam is a 80.
front fender is a 71, kinda banged up, but might use on a rat bike for a rear.
the cam is a 80.
Thanx, peanut! What with the recent crop of 'unmolested, low mileage, original' early bikes popping up, I have concerns about members getting 'burned', or vice-versa. Also concerned that a possible 'restored/modified' bike may inadvertently become the standard against which others may be judged.
I dunno, maybe fussing over nothing. '70-'71s are unique enough to stand out on their own. Maybe others share this concern, maybe not. Angus, Vince, gggGary, 650Skull and others have gone through some effort to post good pics of these early models as examples of this genre, and I just wanted to add value to that work...
if it wasn't for all the hard work that you guys put into this then in 5-10 years time when all these bikes have been scrapped or chopped bobbed etc there will be no history of the early bikes .It will just be odd snippits and hearsay
Breaks my heart when I see a mint Xs1 or 2 being cut up . We used to think the same about the early Triumphs over here in the UK once upon a time. I just dumped my 1958 6T Thunderbird in a garden back in 1970. We thought they were not worth repairing !?

What you guys have done is create a lasting and permanent record and reference source of the marque for all time . Good on ya

angus67
Welder's penetrate deeper!!
5-10 years?! shite. ive only got 20 left in me, then My retirement plan is the bridge plan......live under, or jump off. The high prices for these bikes will wain, it will be some other make/model forgotten in granddad's basement worth 3 time new.
For now, im just enjoying having a bike older than me, and prettier than me.
Although it is nice that I could theoretically collect twice what I paid, somewhere down the line, some one will ask me what I paid for, and they will call me a sucker for buying it. yolo.
For now, im just enjoying having a bike older than me, and prettier than me.
Although it is nice that I could theoretically collect twice what I paid, somewhere down the line, some one will ask me what I paid for, and they will call me a sucker for buying it. yolo.
angus67
Welder's penetrate deeper!!
Dang. no power to brown(hot) ground is good. test lite was brite. When I had worked on this bike four years ago, the blinkers didn't work, but the charging system did. do they run off the same feed? To get the blinkers to work, I just ran a hotwire from the hot in the headlight bucket to the flasher unit..Yeah. There's a 70-74 combined manual that's best for your bike.
It's downloadable, but the paper one is better.
Here's a quick diagnostic. Find that regulator connector in front of the battery. It'll have 3 wires, brown (ignition hot), green (power to rotor brush), black (ground). Leave it connected, and just probe into it.
The black wire should show a good ground connection.
When you switch on ignition:
The brown wire should go hot.
- If not, there's a problem with the brown wire power.
The green wire should go hot.
- If not, there's a problem in the regulator.
The green wire connection to the outer rotor brush should go hot.
- If not, there's a problem with the green wire in the harness, maybe in the alternator connector.
The inner rotor brush should show a good ground connection...
What Im going to do for now is run another hotwire for testing purposes to the regulator, then push forward on curley's charging guide, then once im sure the battery is charging, clean up the wires, and try my best not to become a dreaded po.
So...... if I energize the brown wire, then can I go forward with your regulator test?
Last edited:
Dang. no power to brown(hot) ...
So...... if I energize the brown wire, then can I go forward with your regulator test?
Sure! Unless something in there is shorted. That brown wire feed to the regulator shouldn't draw more than about 3 amps (to power the regulator and the rotor). So, to be safe, feed it from a fused jumper, or from another good brown (that's fuse protected anyway).
Edit: The brown wires at the rear part of the main harness, between the downtube and battery box, go to only 3 locations: The rear brake switch, the flasher relay, the regulator. That area is one of the hardest to access, and any previous attempts to muscle-goof around in there could've broken one of the wire splice connections...
angus67
Welder's penetrate deeper!!
You know, if I remember correctly....the blinker rewire I mentioned triggered a memmory of when I worked on it four years ago. The rear brake switch gets no power either. But the switch it self is good. So some where in that puzzle palace behind the back bone in front of the battery, I have a brake in the brown wire. Ick. battery box removal time. Does the brown wire out of the reg run straight to the headlight bucket, then branch to blinker, rear brake? Or does the brown wire coming out of the ignition switch connector feed the brake, blink, then reg?
Thank you too many. You input on what the brown wire feeds might be a clue......
Thank you too many. You input on what the brown wire feeds might be a clue......
You know, if I remember correctly....the blinker rewire I mentioned triggered a memmory of when I worked on it four years ago. The rear brake switch gets no power either. But the switch it self is good. So some where in that puzzle palace behind the back bone in front of the battery, I have a brake in the brown wire. Ick. battery box removal time. Does the brown wire out of the reg run straight to the headlight bucket, then branch to blinker, rear brake? Or does the brown wire coming out of the ignition switch connector feed the brake, blink, then reg?
Thank you too many. You input on what the brown wire feeds might be a clue......
I recall that they all join at that backbone/batterybox area, but their common line goes forward and splices at the coils' brown feedline, around the rear of the top motor mount. So, one or the other...
angus67
Welder's penetrate deeper!!
Well. it does run, so the break must be after the coil.I recall that they all join at that backbone/batterybox area, but their common line goes forward and splices at the coils' brown feedline, around the rear of the top motor mount. So, one or the other...
I didn't get a chance to do electrical stuff tonight, I got my new front brake cable from mikes. What a pain! figured it out though. lever gets tight just before it hits the grip. Is that about right?
Our factory & dealership setups for most front drum brakes called for 1/2" - 1" lever freeplay, measured at the lever tip. The little plunger-type brakelight switches didn't need much movement to turn on the brakelight.
Our '70-'71s are close to that setting, but a tad different. We have a rotary brakelight switch mounted below the lever pivot. The proper setting is to have the brake light come on, just slightly before the shoes contact the drum.
But, that's factory setup. A lotta folks had their own preferences. Like, get max braking, but without lockup, with the lever fully pulled-in...
angus67
Welder's penetrate deeper!!
I will have to ride it to see if its appropriate. I wouldn't like a lock-up on the front during a oh $hit moment.
for now, I have tank off, seat off wiring coming undone tomorrow, then maybe clean out the carbs again.
The air filters I got from mikes look ok. on one, the gasket to airbox is a bit odd looking, but as long as it seals, it doesn't matter.
until tomorrow., ta-ta.
for now, I have tank off, seat off wiring coming undone tomorrow, then maybe clean out the carbs again.
The air filters I got from mikes look ok. on one, the gasket to airbox is a bit odd looking, but as long as it seals, it doesn't matter.
until tomorrow., ta-ta.
Angus, while you've got the tank off, see if you have the single or dual port crankcase vent.
Also, I'd like to know if your throttle cables have the protective outer springs, and if your cable and harness routings match the pics in this post:
http://www.xs650.com/forum/showpost.php?p=334333&postcount=8
Then, have a look at CalsXS2's harness thread and see if yours is routed similarly:
http://www.xs650.com/forum/showthread.php?t=39044
angus67
Welder's penetrate deeper!!
I have dual port vent, and the original throttle cables have the protective spring. I replaced the throttle cables from ones from mikesxs. they have the springs, too. I still have the originals. they are very hard and cracked.
I stopped at harbor freight today, to grab some evaporust, and just wandering around the store I found a kit that you hook up one wire to the bad wire, and ground another wire, and you can trace it to the short. So im going to try that.
For the clutch cable, I re-routed it from between the carbs, now running along underside of tank, not the tunnel. lubed up the cable and is much easier. don't know if it was the lube, or re-route. Its basically a laid down 'S'. I also pulled the clutch rod, and sanded the shaft with 1000grit till it was shiny, and regreased the clutch worm. Im sure all of these efforts contributed a little bit.
The wiring is different than mine. the main bundle and the ign wires go in the left hole. everything else out of the rite. Good call on the main being ziptied to the tank cup. Mine is too low to my eye-crometers.
I have dual port vent, and the original throttle cables have the protective spring. I replaced the throttle cables from ones from mikesxs. they have the springs, too. I still have the originals. they are very hard and cracked.
Great. Good to know.
I stopped at harbor freight today, to grab some evaporust, and just wandering around the store I found a kit that you hook up one wire to the bad wire, and ground another wire, and you can trace it to the short. So im going to try that.
Is it this gadget? I have a network analyzer and coax cable tester that uses 'reflected termination' technology to find breaks and such in coax. This 'HF cable-tracker' apparently uses RF, like a treasure detector. Interesting if it works on your harness.
http://www.harborfreight.com/household/electrical/cable-tracker-94181.html
The wiring is different than mine. the main bundle and the ign wires go in the left hole. everything else out of the rite. Good call on the main being ziptied to the tank cup. Mine is too low to my eye-crometers.
Hmmm. That could be a clue.
angus67
Welder's penetrate deeper!!
Yes. that's the one. It did work, but the wand must be perpendicular to the wire.
so what had happened was some one at some point connected the regulator brown to the blinker out! As soon as I turned on the blinker, it worked. So I ran a nice new heavy wire from the keyed brown 4 way connector in the headlite bucket, other end to the regulator. turned key to run, brown and green went hot, switched to parking lights, not hot on regulator, and I believe that's how it should be? But now I have to get some really good electrical tape, and wrap up my harness. BTW, I can clearly read my harness tag. don't know if you want that info?
so what had happened was some one at some point connected the regulator brown to the blinker out! As soon as I turned on the blinker, it worked. So I ran a nice new heavy wire from the keyed brown 4 way connector in the headlite bucket, other end to the regulator. turned key to run, brown and green went hot, switched to parking lights, not hot on regulator, and I believe that's how it should be? But now I have to get some really good electrical tape, and wrap up my harness. BTW, I can clearly read my harness tag. don't know if you want that info?
Your 'switched on' description sounds right. The harness tag is probably the part number. If not, posting a pic may help future archeologists.
I dug out my old harness, thinkin' that a coupla pics may help diagnose yours, but after uncoiling it, I remembered that I had modified it for the chopper. So, don't want to tarnish this thread with that thing.
However, it brought back some memories. If you look at your harness, at the brown power feed to the coils, you should see that the coils' multi-connector has 2 brown wires. One of them comes from the headlight area, the other runs back to the regulator area. So, that's how the splicing is done there. Maybe a spot to examine?
[/URL][/IMG]
Is this a de-comp lever? says magura on it.
Hi angus,
Ooh! Look at all that stuff!
De-compression cable levers don't usually have that friction disc layout, they tend to look more like 1/3rd-sized clutch or brake levers.
That lever could be for either a choke cable or a manual spark advance cable.
Attachments
Similar threads
- Replies
- 61
- Views
- 2K