Atlas Primed (Ayn Rand)


-
Enjoy XS650.com? Consider making a donation to help support the site.
XS650.com receives a small share of sales from some links on this page, but direct donations have a much greater impact on keeping this site going.
You are using an out of date browser. It may not display this or other websites correctly.
You should upgrade or use an alternative browser.
You should upgrade or use an alternative browser.
Mailmans XS2 , the rebuild.......again
- Thread starter Mailman
- Start date
Best body work ever seen 
Hey Now! I wasn’t expecting this. Something I already noticed, see these two little screws that Jim thoughtfully installed in the emblem holes? Yeah, Marbles Motors never bothered doing that. 
Those holes were nearly filled with primer and paint. I had to dig it out with an exact knife and run a tap through them before I could get my emblems installed!

Looks great Jim, Thanks!

I wasn’t expecting this. Something I already noticed, see these two little screws that Jim thoughtfully installed in the emblem holes? Yeah, Marbles Motors never bothered doing that. Those holes were nearly filled with primer and paint. I had to dig it out with an exact knife and run a tap through them before I could get my emblems installed!
Looks great Jim, Thanks!
Filling the gap around the tank filler with JB Weld also turned out to be a winner. Looks much better than original. Don't worry about the holes, I sized 'em for a drill bit after painting.

Filling the gap around the tank filler with JB Weld also turned out to be a winner. Looks much better than original. Don't worry about the holes, I sized 'em for a drill bit after painting.
Yeah that looks super clean, I like it!
Kinda make ya wonder who the professional really is don't it....Something I already noticed, see these two little screws that Jim thoughtfully installed in the emblem holes? Yeah, Marbles Motors never bothered doing that.

Kinda make ya wonder who the professional really is don't it....
You said it brother! My vote is for you!
Kinda make ya wonder who the professional really is don't it....
That is so true with so many things. Thats why I do to majority (less boring, valve jobs) of my own engine/mechanical work. Learned that in 73 when I left the shop after a tire change and discover (in Time) they never tightened the axel clamps.
A professional is a person who does a job within a quoted price. An amateur is a person who does a job for love. Well, etymologically speaking.
Nice Job. Made me get my tank and sitting on my lap like a doodle dog...don't spare the clear urethane.
Humm, just saw this if any help: House of Kolor: UC 35 Kosmic Acrylic Urethane Klear + KU 100 Urethane Enamel Catalyst...
Was looking for my tank @ https://www.facebook.com/MoeColors/
Humm, just saw this if any help: House of Kolor: UC 35 Kosmic Acrylic Urethane Klear + KU 100 Urethane Enamel Catalyst...
Was looking for my tank @ https://www.facebook.com/MoeColors/
Last edited:
Atlas Primed (Ayn Rand)
I believe that was actually written by Ima Sand...
A professional makes a living out of what he is doing. As Raymond says, a talented enthusiast does it for love - the money is a necessary distraction. I am surprised we are commenting on the excellence of Jim's work. What did we expect?
Did I mention I like the idea of red and white?
Did I mention I like the idea of red and white?
There's more than a grain of truth there. When I painted for a living, I grew to despise doing it. Now I'm doing it for fun... and it is fun again.A professional makes a living out of what he is doing. As Raymond says, a talented enthusiast does it for love - the money is a necessary distraction. I am surprised we are commenting on the excellence of Jim's work. What did we expect?
Did I mention I like the idea of red and white?
From my SG resto thread.Very nice! Would you be willing to post a picture of your tank-holding jig? Beats the hell out of the clothes hanger wire I used last time...
It rotates 360° and with a piece of safety wire through the back mount and a hook in the ceiling, it's easy to paint underneath.

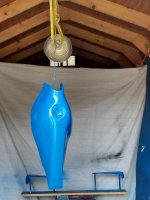
Coat hanger is a malleable accessory but I am impressed by the gables on that shed!
A little progress........
I haven’t touched this old bike since I reinstalled the engine. I still had the padding on the frame.

I’ve been spreading my interests around, I did a bunch of work on my other bike and my Fiat. Then I had an outpatient surgery to remove a skin cancer on my back and I still have stitches in for two more weeks, I’m supposed to be taking it easy, but man I’m getting tired of just sitting. So I toddled out to the garage and looked for a few things that I could do that wouldn’t make me crawl around on the floor.

I’ve got lots and lots of stuff to reinstall and connect. This looks like a good place to start.

I got the carb mounts on, then hung the carburetors.

Then dug out the breather and put it back on and hooked up the hoses.


Then I routed my wiring harness from the stator up the frame and plugged the connector in, and got the wiring and my vent hoses secured to the frame and pulled my clutch cable down through the carburetors and out the other side. And I reattached the neutral wire.

Just taking my time, enjoying the process, it was a nice warm day and it felt good to be doing something productive. Still have lots more to do,
The chain and chain guard
The electronic ignition
New plug caps and new plugs
Air boxes and clean the filters
Install all the cables and adjust
Reinstall the starter
The battery
And I’m sure there’s more.......
Later,
Bob
I haven’t touched this old bike since I reinstalled the engine. I still had the padding on the frame.
I’ve been spreading my interests around, I did a bunch of work on my other bike and my Fiat. Then I had an outpatient surgery to remove a skin cancer on my back and I still have stitches in for two more weeks, I’m supposed to be taking it easy, but man I’m getting tired of just sitting. So I toddled out to the garage and looked for a few things that I could do that wouldn’t make me crawl around on the floor.
I’ve got lots and lots of stuff to reinstall and connect. This looks like a good place to start.
I got the carb mounts on, then hung the carburetors.
Then dug out the breather and put it back on and hooked up the hoses.
Then I routed my wiring harness from the stator up the frame and plugged the connector in, and got the wiring and my vent hoses secured to the frame and pulled my clutch cable down through the carburetors and out the other side. And I reattached the neutral wire.
Just taking my time, enjoying the process, it was a nice warm day and it felt good to be doing something productive. Still have lots more to do,
The chain and chain guard
The electronic ignition
New plug caps and new plugs
Air boxes and clean the filters
Install all the cables and adjust
Reinstall the starter
The battery
And I’m sure there’s more.......
Later,
Bob
Good to see you are back at it. Who's going to get done first? You or the guy painting your tank?
Similar threads
- Replies
- 4
- Views
- 998