1976 XS650 restoration and rebuild, advice and help welcomed!

Hi George, I've got one of those too! Mine has 17k miles. After a ton of work it runs great. Swing arm bushings and rear shocks made it a different machine. I am running the stock points ignition. I just replaced the points and condensers, lubed the advance shaft and replaced the advance springs. I needed to clean out the tank and entire fuel system. The bike is very smooth and reliable. These are fun to ride and work on.
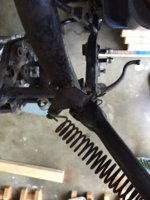
Would you be able to take a picture of the side stand bracket on the frame? Mine is broken off where the spring hooks on. I would like to weld back something so that I have a side stand but don't know what was there...

Gibson, thanks for the comments so far. Here are a few photos of the side stand from my frame. If you need a different vantage point, just holler. The engine is out of the frame now, so I can manuever it easy enough...

Thanks!
George
 

Attachments

  • IMG_0013.jpg
    IMG_0013.jpg
    156.3 KB · Views: 314
  • IMG_0014.jpg
    IMG_0014.jpg
    160.4 KB · Views: 319
Great! Lookin good! Please keep us posted on what you find in there. I was fortunate with the engine anyway on mine. I was able to just clean/ rebuild the carbs and do ignition tune up. I just rode it on Saturday. Ill bet the iron brake caliper is seized. (very common with them). I've decided on mine to not do any mods that are not easily reversible (like cutting anything off). I've been running synthetic oil and changing every 1K miles or so. The more I run it, the better it runs! These things are tanks...
 
Great! Lookin good! Please keep us posted on what you find in there. I was fortunate with the engine anyway on mine. I was able to just clean/ rebuild the carbs and do ignition tune up. I just rode it on Saturday. Ill bet the iron brake caliper is seized. (very common with them). I've decided on mine to not do any mods that are not easily reversible (like cutting anything off). I've been running synthetic oil and changing every 1K miles or so. The more I run it, the better it runs! These things are tanks...

Thanks. I know for sure that I need the top end redone... The motor has a compression reading only in the low 60psi range. With the bike having sat in a airplane hanger for nearly a decade, then kicked over, there must have been some damage to the cylinder wall. I definitely dont want to skimp on getting the engine as tip top as possible.

Now its time for the hard stuff.
 
Maybe just stuck rings from sitting...But it may have been parked for a reason. You will soon find out. I got lucky because the fuel and oil was drained out prior to 25 or so year storage. Gas back then had no alcohol in it, so fuel system corrosion was not too bad. I'm using Stabil marine in the gas now every tank full. Appears to be stopping the tank from rusting any more...I hope. Thanks for the photos!!:thumbsup:
 
There is a good list on things to do before a first start on this site. Since you have pulled the motor I suppose that is academic at this point.
 
Alright! finally an update after a good nod from the time management gods. Made some headway. I was able to move the engine into its new temporary home for cleaning and overhaul. One piece of wisdom I learned. If pulling the engine, drain the oil first. Oops.

- The frame, swingarm, side and center stands going to the sandblaster tomorrow. The frame as a fair amount of surface rust, and grime... I wish I had a proper workshop, but outsourcing this step will create far fewer pain points!

- Engine mounted up onto the new engine work table.

- Wheels ready to be dismantled, I will clean up the rims, hubs, and respoke. I am contemplating black powder coat to match the frame, with fresh spokes.

I am actually getting very nervous as I move closer to putting the sockets to the engine and opening it up... I've never rebuilt a motor, but I suppose no better way to learn...
 

Attachments

  • IMG_0016.jpg
    IMG_0016.jpg
    291.7 KB · Views: 382
  • IMG_0018.jpg
    IMG_0018.jpg
    224.9 KB · Views: 382
  • IMG_0021.jpg
    IMG_0021.jpg
    148.3 KB · Views: 394
  • IMG_0025.jpg
    IMG_0025.jpg
    179.4 KB · Views: 402
Last edited:
Time management gods must have been smiling - I see you varnished your engine stand - it'll be easier to wipe down that way. I am in the piece of cardboard and throw out when soiled camp.
 
Time management gods must have been smiling - I see you varnished your engine stand - it'll be easier to wipe down that way. I am in the piece of cardboard and throw out when soiled camp.

I call that making lemonade. The Mrs required planters for succulent garden. I snuck the table into the workflow... :cheers:
 
Made a very small but rewarding bit of headway into the engine dept. Removed the stator and alternator. Used the old 'hold the rotor with the rag' method to loosen the fixing nut. Used a proper puller, and voila. A quick photo summary. Hopefully there are not any glaring red flags regarding the cases (from this limited view...) Thanks, more to come!
 

Attachments

  • IMG_0052.jpg
    IMG_0052.jpg
    244.6 KB · Views: 323
  • IMG_0047.jpg
    IMG_0047.jpg
    264.8 KB · Views: 330
  • IMG_0041.jpg
    IMG_0041.jpg
    208 KB · Views: 341
A bit more progress. Right side cover removed, oil filter removed, ignition and auto advance covers. There was quite a bit of oil that dropped out on to the bench, once the gasket seal between the cover and the lower case was broken.

A few questions for anyone that might see these...

1. On the 5mm allen bolts that fasten the cover to the engine, only a few of them had a copper washer. Is that correct?

2. The oil filter had caught a significant amount of metal particle. Possibly my first major red flag. See photo below... I hope its not the sign of a massive detriment to the engine.

3. Is it normal for any oil to collect in the basin of the side cover?
 

Attachments

  • IMG_0053.jpg
    IMG_0053.jpg
    171.1 KB · Views: 347
  • IMG_0054.jpg
    IMG_0054.jpg
    210.6 KB · Views: 328
  • IMG_0055.jpg
    IMG_0055.jpg
    295.6 KB · Views: 339
  • IMG_0056.jpg
    IMG_0056.jpg
    301.5 KB · Views: 335
What you found in the oil filter is pretty normal for one of these when you first get it. These require frequent oil changes and filter cleanings, like every 1000 miles, and most didn't get that sort of treatment in their past. What you have is probably a long time accumulation. The oil may have been changed but the filters weren't cleaned every time.

The black rubber bits are usually attributed to the front cam chain guide but can also come from the rubber ring attached to the #4 starter gear to pad it when it is thrown into engagement.

Thank you 5twins, that is really great info. I read a number of quasi-related posts on that, and began to feel slightly more at ease. The engine turns over freely, and even kicked over on starter fluid a month ago, so I'm optimistic for what lies within! Thanks again for the expert advice.
 
As you're probably aware, the more important oil filter to inspect is the larger one mounted to the sump plate on the bottom of the motor. That's the one that's prone to failure. They sell so-called "improved" replacements but honestly, I don't think they're any better. They rupture the same as originals, and in the same spot. I prefer to repair the originals.
 
As you're probably aware, the more important oil filter to inspect is the larger one mounted to the sump plate on the bottom of the motor. That's the one that's prone to failure. They sell so-called "improved" replacements but honestly, I don't think they're any better. They rupture the same as originals, and in the same spot. I prefer to repair the originals.

Yes, for sure, and thanks! I read a number of threads that noted torn sump filters, which seemed to allow particle to blow right through... doh!
 
Back
Top