1976 XS650 restoration and rebuild, advice and help welcomed!

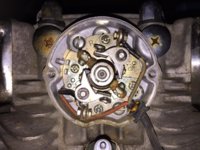
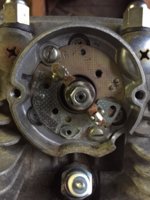
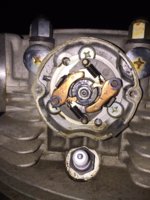
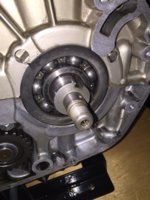
Points mechanism safely removed. Helpful hint, good to have the spark plug IN when removing the points assemblies. Many small washers and hardware, possibly easily falling into your cylinder if the plug wasnt there!

It might be worth noting at this stage, that from a step by step standpoint, I've been following the Gibson article/guide. So far so good.
 

Attachments

  • IMG_0064.jpg
    IMG_0064.jpg
    294.3 KB · Views: 304
  • IMG_0068.jpg
    IMG_0068.jpg
    225.8 KB · Views: 334
  • IMG_0069.jpg
    IMG_0069.jpg
    218.5 KB · Views: 271
  • IMG_0071.jpg
    IMG_0071.jpg
    220.6 KB · Views: 299
Instead of taking everything off the backing plate you could have removed it all as one unit. Remove the two big screws that hold the backing plate and the whole thing comes out.
This minimizes lost parts.
Leo
 
Thank you Leo, so very true. The reassembly was good practice though... While I was at it, managed to get the advance side handled easily enough as well. Thanks!
 

Attachments

  • IMG_0073.jpg
    IMG_0073.jpg
    246 KB · Views: 294
  • IMG_0058.jpg
    IMG_0058.jpg
    295.6 KB · Views: 285
  • IMG_0075.jpg
    IMG_0075.jpg
    212.2 KB · Views: 278
Each housing for the advance and points mechanism is now safely removed... Does anyone have a good siggestion for removing the old stubborn gaskets on those puppies?

Thanks!
 
Paint stripper, apply and let soak, scrap away with a plastic scraper, old credit cards work well for this.
Reapply as needed to remove.
They make a gasket removal spray that does the same thing.
Leo
 
Yes, paint stripper, several applications. Here's a housing after the 1st application, soak, and scrape. It got about half way through the gasket .....

1stApplScraped3.jpg


The 2nd application and soak freed up most of what was left. Just a couple more little dabs required on the remaining pieces .....

2ndApplScraped3.jpg
 
Thank you gentlemen for the gasket removal advice. Putting it to the test shortly...

This week I have managed to remove the entire clutch pressure plate, friction plates, basket, kickstarter assembly. Ill be changing the phillips head pressure plate screws to allen head bolts, but the OE's came off using a #3 phillips bit and a 12" socket wrench. As for the clutch basket, this one was interesting... The basket was drilled out, see my rope job to hold it steady... Either the fine people at Yamaha, or the PO were geniuses. The basket had enough holes to run some rope through to hold the basket and housing secure while I removed the 29mm nut.
 

Attachments

  • IMG_0076.jpg
    IMG_0076.jpg
    139.2 KB · Views: 305
  • IMG_0081.jpg
    IMG_0081.jpg
    217.1 KB · Views: 381
  • IMG_0085.jpg
    IMG_0085.jpg
    184.5 KB · Views: 372
  • IMG_0089.jpg
    IMG_0089.jpg
    172 KB · Views: 344
Now the million dollar question of the week. With nearly all the mech now removed from the right side of the engine, does anyone have a good suggestion for removing the nut securing the primary starting gear in place?

Thanks in advance!
 
To remove the primary drive gear nut, just put back the driven gear/ clutch basket and lightly tighten nut. Jam a piece of wood between the gear teeth, and remove the drive gear nut. I've used this method many times. Some guys use a rag, but it sometimes gets sucked into the gear mesh if not done right.
 
Gibson, thank you. That makes 100% sense. That's partially what allowed me to remove the clutch basket nut. I should have thought of that!

Thank you!
 
As Gibson mentioned, put the bike in gear, start to loosen the nut. As you turn the nut you will see the rear wheel turn. When this happens I slip a wooden hammer handle through the spokes so as the wheel turns it jams the handle up against the swing arm to hold the wheel as you loosen or tighten the nut. I use the same process to tighten or loosen the front drive chain sprocket nut.
Well I did till I got my impact wrenches, one electric, one air.
I then just Hold the clutch hub with my hand and rattle gun the nut off.
For the drive sprocket nut, I slip it in gear and hold the wheel to keep it from turning.
Now If you don't have the drive chain on or the engine is out of the frame then look through the "Home Made Tools" thread and you will find lots of tools to hold the clutch hub.
Leo
 
Yes, I make up clutch hub holding tools for all my bikes. All it takes is one extra steel plate .....

ClutchHolder.jpg
 
Thanks all for the clutch and primary drive gear removal advice. I put the clutch cover back on the shaft, and wedged a dowel in between the clutch gear and the primary, that did the trick.

So at this stage, nearly all of the right side mech has been removed and cataloged, and I have gotten the camshaft cover off of the top end... Everything looks pretty good I must say. It's the cylinder that I am driving towards and the source of the low compression...
 

Attachments

  • IMG_0109.jpg
    IMG_0109.jpg
    227.3 KB · Views: 291
  • IMG_0106.jpg
    IMG_0106.jpg
    173.3 KB · Views: 299
  • IMG_0100.jpg
    IMG_0100.jpg
    207.3 KB · Views: 298
  • IMG_0099.jpg
    IMG_0099.jpg
    204.1 KB · Views: 299
  • IMG_0097.jpg
    IMG_0097.jpg
    223 KB · Views: 289
  • IMG_0096.jpg
    IMG_0096.jpg
    207.5 KB · Views: 284
Ready for powder coating... I think. Here are some photos of the rims and hubs. For the most part the surfaces are ok-ish. Some heavy pitting and aluminum scoring, especially on the rear hoop.

My plan here is to have the rims and hubs powder coated, and relaced with new spokes... Would anyone have any advice yeah or nay on that plan??
 

Attachments

  • IMG_0179.jpg
    IMG_0179.jpg
    245.5 KB · Views: 259
  • IMG_0178.jpg
    IMG_0178.jpg
    209.6 KB · Views: 261
  • IMG_0177.jpg
    IMG_0177.jpg
    189.1 KB · Views: 266
  • IMG_0174.jpg
    IMG_0174.jpg
    248.8 KB · Views: 274
  • IMG_0138.jpg
    IMG_0138.jpg
    260.8 KB · Views: 300
  • IMG_0132.jpg
    IMG_0132.jpg
    184 KB · Views: 274
While cleaning the rear rim, I came across this ding. Other than that, no cracks or impact areas could be found. Any alarm bells out there?

I am wondering if that can be de-burred and be back on track...
 

Attachments

  • IMG_0173.jpg
    IMG_0173.jpg
    187.1 KB · Views: 270
  • IMG_0174.jpg
    IMG_0174.jpg
    248.8 KB · Views: 307
I just spent a couple hours working on cleaning my front and back '76 spoke wheels and they still do not look as good as yours. I too like to see the plain alloy and wonder how the cost of powder coating compares to new alloy rims.
 
Try white polish on a small buffing wheel. It is very time consuming. I cleaned mine up laced so it was really tough. I gave up eventually and said good enough. Some day I may re lace them with stainless spokes and do it right.
 
Back
Top