Curse the petcocks! Or maybe just the philips head screws. Or something...

griennehornette

XS650 Enthusiast
Messages
79
Reaction score
80
Points
18
Location
Sarnia, Ontario
I dragged my neglected 77D out of the back of the garage after 11 years, and started working on it. My first attempt to get it started several weeks ago ended with a puddle of gas on the floor of my garage. Since then, I cleaned the petcocks and carbs, ordered rebuild kits for the petcocks (along with a bunch of other stuff) and slowly got it back together.

Today, I once again held my breath, poured some gas into the tank hoping to try firing it up... and there's another big puddle of gas on my garage floor.

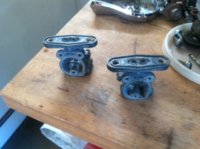
It was not hard to see it pouring out the petcocks. Like, how can it leak out so fast? Even without gaskets, I would think the metal parts screwed tightly together would at least slow it to a drip, drip, drip. But no; it gushes out in quite the little stream. By the time I quit cursing, grabbed my tools and lifted the tank off, 90% of it had drained out. I don't get it.

The rebuild kit gaskets for the back plates were very thin, compared to the old ones I had. Like they were cut from a garbage bag thin. But still; should that really matter?

It was hard to tell; gas might have been leaking from other places, too. Actually, I hope it was, given the volume pouring out.

Gonna try re-using the old gaskets, which are thicker. I managed to remove them without tearing. Also gonna hit the hardware store for a variety of sizes of hex bolts. The Philips screw was designed by a sadist, intent on causing great frustration for millions of people. Why it is so widely used is really beyond me. I dunno if I can find hex bolts which fit everything. But at least I should be able to get little bitty ones to torque down the face plate with On, Off and Res. It's not that tight as I'm paranoid of stripping the delicate little philips heads. The bolts joining the petcocks to the tank are stripped badly; hoping I can find that size, too. The 3 screws holding the back plate on are tapered, so they might be more challenging to replace.

Anyhoo. Typing this was soothing. I feel less like either giving up, or hunting down the inventor of philips head screws with a pair of pliers and a soldering iron. Therefore, any replies are purely bonus. That said, I'll happily and gratefully receive any advice tossed my way... or simply degrading comments about the philips head screw ;-)
 
Aha! Many thanks Paleo! I don't even know what a J.I.S screwdriver is, so it's not likely I've been using one. All my philips screwdrivers are notchy. There's no way they're the official J.I.S. version.

And the tongue thing I'm sure I got wrong ;-)
 
Hi GH:

Yup - those JIS screws can be a bugger if you don't have the correct drivers. Fortunately the right drivers are widely available on Amazon - look for "Vessel JIS screwdrivers" or "Hozan JIS screwdrivers". The Vessel drivers are really nice - a pretty blue-green colour and very well made (Vessel is regarded as the Snap-On of Japan) but there is nothing wrong with the Hozan drivers (they're like Craftsman - perfectly OK, but not quite as nice). Anyhow - you stand a good chance of stripping the heads of the JIS screws on your bike (or Japanese car for that matter, if you try to use even a good Phillips on them - the Phillips drivers almost fit, but not quite and if the screws are tight - you're often toast .

As many folks will point out, once you get the JIS screws out, the best thing to do is toss them and replace them socket-head capscrews (SHCS) or, as they are often known, Allen bolts. These are usually made of much harder steel and do not strip nearly as easily plus they are often available in stainless steel.

When I did mine '76 tank, I used the BIGGEST Phillips driver I could find, I had a buddy hold onto the tank and I used all my weight on the driver and really reefed on it - carefully, and they all came out - barely. Try tightening them first - and then reverse direction to loosen them - that often works.

I wish I had the time to go for a ride - I'd be happy to loan you my JIS drivers so you can get those danged screws out. Unfortunately, I have this huge consulting job right now and am jammed writing the report. If you happen to be coming to Windsor in the next few days, let me know and we can do a meet-up and you can borrow my drivers - or better yet, bring you tank along and we can get them out here.

The leak is likely coming from the fibre washers that are under the head of each screw - and I think I have some spares you can have.

Let me know - I am in the south end of Windsor - right down by the 401.

Pete
 
Oops. Didn't really finish that. No worries, Pete; I undrestand getting buried under work. I'll see what I can do. With luck, replacing with some allen bolts and maybe reinforcing the fibre washers somehow might do it. I'll keep you posted!
 
The other stuff to try - if you've got some - is Hylomar Blue.
Universal-Blue-group.png


It was developed by Rolls-Royce as a gasket goo for use in aircraft engines. It works great wherever you fuel or oil that wants to leak. It is impervious to darned near anything and it (I am told) never hardens. Anyhow, I've only ever found it on-line but its easy to get and the delivery came in a few days.

The other place to ask might be your local airport. Apparently aircraft mechanics use it all the time and somebody might give you a little squirt for a couple of the price of Timmy's. As they used to say in Brylcreem commercials...."A little dab'll do ya", ;)

The impact driver is also handy - but I was reluctant to use one on my fuel tank. I didn't want to squish it - and having a buddy hold it while I reefed on the petcock mounting screws did the trick.
 
Last edited:
You can find allen head screws for petcocks. The taper or angled for the back, also I suggest a button head type screw for petcock to tank and the face plate. The square shouldered/headed bolts are too long for the face plate. The selector lever can't clear them. For the thin gaskets, you might try using the old gaskets behind them.
 
"The selector lever can't clear them." Of course! Thanks weekendrider, you saved me a grumbling return trip to the hardware store, as I would've gotten those for sure.
Good call on using the old gaskets behind them, too. I'll try that.
 
....and if that doesn't work, take a look at that Hylomar stuff. It is quite amazing.
 
OK, so last night I cruised "leaky petcock" threads, and gathered various ideas. Today I went out and got 320, 600 and 1500 grit sandpaper. I only got as far as taping the first two to a piece of glass, and sanding down the back of the petcock lever. I did the same to the sealing edges of the 3-screw backplate (the corresponding edge on the main body has a thin, slightly raised "spine" following all the way around the edge. Figured that's probably there for a reason, and shouldn't be sanded off.

I also noticed that the wave washers from the petcock rebuild kits were smooth on one side, but sharp on both sides (kinda like a ice skate blade) on the other. From the threads, I got the impression that sharp = bad. So I sanded the wave washers smooth too...

Holy schnikees! Thinking about the wave washers, I just realized what the main problem might be!

I'm an idiot. A moron. Or any other synonym one might wish to apply.

I just realized I had the wave washers *under* the lever...

So the wave washer was sandwiched between the round rubber bit with 4 holes in it, and the flat back of the lever. That effectively created a gap of at least the thickness of the wave washer. Probably more, assuming it doesn't get pushed completely flat. No wonder fuel was pouring out so much!

So the gaskets may not have been a problem at all. It was the idiot assembling the petcocks incorrectly...

And the moral of this story (at least for a beginner like me) is: pay attention to the exploded drawings in your manual.

Sigh. At least all the sealing surfaces will be nice and smooth. I'll do the tank seat while I'm at it. Might as well get everything flush.

I'm shaking my head at myself. Hopefully this will at least provide some amusement for whomever reads this.
 
Don't be too hard on yourself GH - we've all boobbed at one point of another. At least you found it.

I have found that if all else fails, check out DiscountYamahaParts.com - they have exploded diagrams of darned near everything on the bike and it can sometimes give you a clue as to how these things are intended to go together.

Check out the post about 2 hours ago in the Canada and US Great Lakes Forums (fora??) - JRWilliamsQM and I are planning a meeting up!

Pete
 
Last edited:
I'm thinking you may have distorted the 4 holed seal doing this, maybe not. If you started with a new 4 holer seal you can flip it over if it did get distorted, works most of the time. I'll use silicone gasket maker sometimes with the petcock to tank gasket, and under the mounting screws, but too much or in the wrong place will make silicone boogers that can clog the petcock or petcock screens if there are any, not worried about the carbs because I always use fuel filters.

Scott
 
Last edited:
Success!

I followed advice from various threads. Lightly greased joining parts as suggested by 5twins. Put the old gaskets behind the new ones as weekendrider suggested. Sanded as per glennpd.

Nary a drop this time. And the bike started without much ado.

Right on!
 
Adding something after the fact, Refurbishing the petcocks on my newly purchased, 1975 XS 650 (had been sitting for 20+ years with gag in the tank when I got it). I filed flat surfaces on opposite sides of the mounting screws to get the mini Vise Grip to hold. This worked well. I agree, don't use an impact driver!

With the lever cover plates screwed down tight. I couldn't turn them. I backed the screws off a bit and still very stiff, but operable. I don't think the cover plate needs to sit tight against the body of the petcock to prevent leaking. I'll soon see however. I'm working on the carb's now.

Additionally, The short and long brass tubes ("on" and "reserve" fill pipes) had completely corroded down to the base of teh petcock. After soaking, I reamed the remaining crud out of the holes by hand with a 3/16" drill bit and bought a 12" length of 5/32" brass pipe at Blick Art Supply. This fit perfectly inside the remainder of the original brass tube. I was going to solder the new pipes in but decided to use a gas resistant adhesive Seal-All instead. I wish I had known about Hylomar Blue.
 

Attachments

  • Petcocks.jpg
    Petcocks.jpg
    69.9 KB · Views: 162
Adding something after the fact, Refurbishing the petcocks on my newly purchased, 1975 XS 650 (had been sitting for 20+ years with gag in the tank when I got it). I filed flat surfaces on opposite sides of the mounting screws to get the mini Vise Grip to hold. This worked well. I agree, don't use an impact driver!

With the lever cover plates screwed down tight. I couldn't turn them. I backed the screws off a bit and still very stiff, but operable. I don't think the cover plate needs to sit tight against the body of the petcock to prevent leaking. I'll soon see however. I'm working on the carb's now.

Additionally, The short and long brass tubes ("on" and "reserve" fill pipes) had completely corroded down to the base of the petcock. After soaking, I reamed the remaining crud out of the holes by hand with a 3/16" drill bit and bought a 12" length of 5/32" brass pipe at Blick Art Supply. This fit perfectly inside the remainder of the original brass tube. I was going to solder the new pipes in but decided to use a gas resistant adhesive Seal-All instead. I wish I had known about Hylomar Blue.
I'm enjoying and appreciate this site. Thanks
 

Attachments

  • Petcocks.jpg
    Petcocks.jpg
    69.9 KB · Views: 137
Back
Top