Custom EPO's, mild porting

barncat

XS650 Addict
Messages
359
Reaction score
69
Points
28
Location
Candor NY
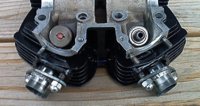
spent a few hours fabbing and welding these EPO's up- 1.500" OD x .060" wall tubing. a nice clean path for exhaust gasses that is port matched to head by removing a bit of port roof area. the flanges draw the ring down to compress the gasket and seal the lathe turned tube ends to head steps. will build custom dual exhaust later of the same diameter and weld straight to these stubs.

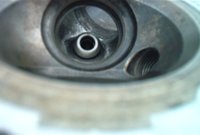
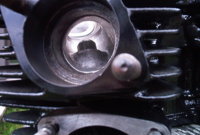
intakes were port matched to the carb boots and generally smoothed up maintaining a roughened finish for atomization, and guide bosses on all ports were eased to remove some of the the large lips that create turbulence.

this is an early style motor, technically a 306 (is that the right last digit?) since there is no cast bridge in the chain tunnel. i'll be using VM 34's, which i have quite a bit of practice tuning on other bikes- always get them cheap on ebay and refurbish... otherwise staying with the stock cam which i read is supposed to be pretty good relative to later units, plus the cylinders were honed with fresh rings. will deglaze the steel clutch rings and also go with PMA/capacitor. a nice optimized low budget setup...
 

Attachments

  • IM004115.jpg
    IM004115.jpg
    141.8 KB · Views: 332
  • IM004116.jpg
    IM004116.jpg
    175 KB · Views: 345
  • IM004118.jpg
    IM004118.jpg
    159 KB · Views: 328
  • IM004125.jpg
    IM004125.jpg
    65.5 KB · Views: 374
  • IM004127.jpg
    IM004127.jpg
    125.4 KB · Views: 361
  • IM004131.jpg
    IM004131.jpg
    144.4 KB · Views: 322
you want the the exhaust guide length to be the same as the intake guide length. That's only part of the resistance factor and robs flow and velocity. There's still work around the guide that needs attention in getting the exhaust mass turned without creating resistance for a straighter shot to the header. Shot me an email address.
 
duly noted. always room for improvement. my email sent.

pretty sure from other exhaust work i've done that these EPO's will work quite well, though there is probably nothing particularly novel about them, just common sense... have not really researched commercial options, just DIY'd it.

i've only got early motors here, recently bought. does every model year have that step and expansion in the exhaust ports?
 
Shine on guys. this has potential to be a great thread. Ive always been curious about porting, and Jack, I know this is your area of expertise.
Who knows....maybe someone will learn something!
 
got a request for a couple more pics. ports are difficult to photograph well and generally look rougher than they really are...

one intake pic, two exhaust pics- the exhaust of course being the ports that require more work. they're certainly better than stock at this point but i will defer to those with more expertise.
 

Attachments

  • IM004154.jpg
    IM004154.jpg
    129.6 KB · Views: 350
  • IM004152.jpg
    IM004152.jpg
    58.6 KB · Views: 367
  • IM004144.jpg
    IM004144.jpg
    72.9 KB · Views: 357
On the intake come up a little more with the camera for better shot of the guide boss and one looking in from the spigot. need a shot of the exhaust port bowl. Need shot of the new E/V margin to see if the bottom edge has a radius cut. The exhaust shots are perfect,especially the guide and I'll guide you in shorting it.
 
did some more work on the exhaust ports as per your suggestions. i think these are pretty close. tried to get decent pics...

i also lightly lapped in another new exhaust valve as recommended given how different they are from old OEM, so they are now matched.
 

Attachments

  • IM004160.jpg
    IM004160.jpg
    193.9 KB · Views: 345
  • IM004162.jpg
    IM004162.jpg
    168.3 KB · Views: 343
  • IM004163.jpg
    IM004163.jpg
    177 KB · Views: 326
  • IM004166.jpg
    IM004166.jpg
    182.3 KB · Views: 327
Nice! I have a TON of porting experience on two srokes with only the trx400 for 4 strokes.

Did you fill each port with ATF out of a pipette or the like to match? Is there a need to do that on the XS650?
 
of course chizler. valve is a valve is a valve.
5t used kerosene. I used gas.
5t upgraded his techn ique with a bit of complessed air to the underside of the valve to find pin hole leaks. I let gas sit in my valves for 2 days. no leaks. good enuf. Ivegot 150psi on both cylinders on fresh rebiuld.
...im drinking like a fish......may have mis-understood your question.:laugh:
 
alcohol- the cause of, and solution to all of life's problems :)

chizler- AFAIK it's not super critical to have the ports at exactly the same volume, since both intakes and exhausts are open to the outside. that's more an issue for combustion chambers, though you certainly want to keep the ports as matched as possible by eye and feel.

angus- yes valve to seat seal is a different issue but a critical part of a rebuild of course. various ways to test for leaks. will check that when i re-install the valves. the lapping all looks good, should be enough. i do not have seat cutting tools...

i did not see a lot of porting info on the site, but then searching can be hit and miss. i have some practice but i'm not an expert, just passing along what i've done here with some helpful tips from Jack.
 
Been trying to upload pictures to Photobucket with no luck,emailed the next photo step to barncat,hopefully he has better success than me posting photo's
 
Jack- have been mulling over your suggestion to remove the excess exhaust guide protrusions in the ports. while roughly the first 1/4" from the guide end obviously does not contact the valve stems, is there any chance that Yamaha intended that extension to protect the stems somewhat in that harsh environment? they, i would think, shield a portion of the stems that does critically interact with the guide from wear, and might also keep the stem a few degrees cooler relatively speaking... i could be wrong. would value your opinion on this.

given that this is a street not a race motor, i may opt to stop where i am with this head. your pointer to take more off the outside of the guide bosses will certainly help get gasses turned outward and increase overall flow.
 
There's no telling why they extended the guide further in the port,resistance in the port allows more heating of port ,guide and stem. That big protrusion of the guide slows the gases around the guide hindering flow and builds resistance in the port. Trimming the guide and shorting by what ever means is just your basic approach to porting what ever head you're working on. It does make a difference on that particular port when flowed but if you wish to stop at this point,just make sure the area around the guide has a slight upward radius,that picture i sent you with red arrow, look how the opposite side has a radius,do the same for both.You don't want any flat spots in that particular area,it's about forming a smooth transition for the hot gases to travel towards the roof. If I can be of any more assistance give me a shout. Good Luck to you! Jack
 
thanks for the further info. sounds like you've not had any issues then with exhaust valve stem wear after guide removal. i may decide to take the next step, it would improve the streamlining...
 
put the motor back together about a week and a half ago. made my own copper head washers out of 1/8" sheet, and also designed my own PMA bracket, which took some time. hope to get this project back on the road by month's end. total rewire, exhaust build, paint work and numerous details to go...

opted not to grind the exhaust guides off this time around on the port job, but have more motors to do. kudos to Jack for valuable porting assistance and generosity in providing some small but important parts. thanks man.
 

Attachments

  • IM004228.jpg
    IM004228.jpg
    84 KB · Views: 298
  • IM004231.jpg
    IM004231.jpg
    78.3 KB · Views: 292
Been trying to upload pictures to Photobucket with no luck,emailed the next photo step to barncat,hopefully he has better success than me posting photo's

Barncat; did you get those pics? Could you post them for us?
 
i'd prefer not to post someone else's pics unless specifically instructed to do so. the pics i did post were as far as i took this head, and the next step is eliminating most of the excess exhaust guides and blending them in. may try that on the next motor...
 
Back
Top