Cylinder wall scratch, new bore. (with pics)

ebb0tk

XS650 Addict
Messages
123
Reaction score
13
Points
18
Location
Sweden
I did upload this at facebook. But i would like the see what some gurus on here think about it.

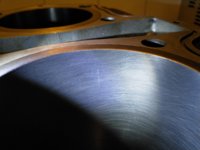
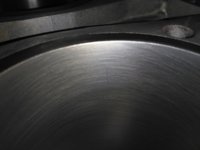
Not sure if the scratch was there when i left the company who bored the cylinder, or if i have made it. I've finished filing piston rings for the other bore, which in this case does not have any scratches like this even after ive put rings down that bore x10 times.

Its bored to 700cc, i can feel the scratch very sligthly but it does not stop my nail from moving over. I know its hard to say "your fine to run" but i would like to hear if someone else has ignored such a small scratch and went ahead. One picture is taken through o loupe, where it may look like its a crack. I doubt it, but i will check if i got a magnaflux at work. Other than that my options are, rehone? or run.. Lets hear it.
 

Attachments

  • IMG_20171105_152717 (1).jpg
    IMG_20171105_152717 (1).jpg
    139.1 KB · Views: 435
  • IMG_20171105_143819 (1).jpg
    IMG_20171105_143819 (1).jpg
    176.5 KB · Views: 402
  • IMG_20171105_152425.jpg
    IMG_20171105_152425.jpg
    94.8 KB · Views: 392
i would like to hear if someone else has ignored such a small scratch and went ahead.
I ignored a lot worse than that.
P.S. Last pic looks stranger though, more like a deep crack. Which pic represents it best?
 
I'm sure I'd go ahead with it. I'd make sure there's no raised edges though, with some fine emery paper or one of the honing stones. If you ask yourself what's the worse that could happen with a scratch like that, it would be you lose some compression, in the case of yours maybe .000001 oz. :) I'm not the most experienced engine builder here, but that makes sense to me. Where did the 700cc rings and pistons come from?
 
Google "cylinder hone crosshatch angle", yours looks too shallow.
Lightly rehone, but DON'T sandpaper the scratch. That would remove cylinder metal, make a depression, and make that area leak. Just let the hone knock off any burrs from the scratch.

The threshold of human touch is about 0.001". Surface imperfections that can't be felt would be less than that. I don't see a significant problem with that scratch, even tho' it's a bit high. The critical area for this engine is within 20° of crank TDC, the top 1/8" of piston travel.
 
Thanks. Ill get it lightly rehoned to remove any burrs. Will post pics after its done. I guess the scratch may still be visible after rehoned.
 
.. doesn't look like a do over.... avoid place'n the ring end gap near it...
 
I'm sure I'd go ahead with it. I'd make sure there's no raised edges though, with some fine emery paper or one of the honing stones. If you ask yourself what's the worse that could happen with a scratch like that, it would be you lose some compression, in the case of yours maybe .000001 oz. :) I'm not the most experienced engine builder here, but that makes sense to me. Where did the 700cc rings and pistons come from?
the piston/rings are JE from www.hoosracing.com
 
Lightly rehone, but DON'T sandpaper the scratch. That would remove cylinder metal, make a depression, and make that area leak. Just let the hone knock off any burrs from the scratch.
Don't go overboard with the hone either ;)
 
Well..... a bit concerned it might be a crack, that wouldn't be good. I'm with whoever mentioned that hone job don' look so great.
 
Google "cylinder hone crosshatch angle", yours looks too shallow.
Lightly rehone, but DON'T sandpaper the scratch. That would remove cylinder metal, make a depression, and make that area leak. Just let the hone knock off any burrs from the scratch.

The threshold of human touch is about 0.001". Surface imperfections that can't be felt would be less than that. I don't see a significant problem with that scratch, even tho' it's a bit high. The critical area for this engine is within 20° of crank TDC, the top 1/8" of piston travel.

Is this something to be possible with one of those handdrilled attached hones? :)
 
You need to take it back to the person who did the boring and honing and tell them you found a crack, if it could be a crack. The honing, it's not textbook perfect but so what. I'll work fine, especially breaking-in in the winter. You're cruzin to be hung up by internet perfectionism.
 
Last edited:
The cylinder is at the shop, where they did a light rehone. Ill upload some pics tomorrow when i get it back.
 
The cross hatch does say something about the shop he took the work to.
Not sure what it says about what. There's a machine shop here, only big shop in 30 mi or so. I know they have a good reputation and are very busy. New bldg, great location. I decided kind of lamely that I wanted my rear sprocket bolts drilled for safety wire. I took some there, and when I came back for them the guy who talked to me said they were too hard to drill. Then he said something about using a hand drill. I thought ok, whatever, and when I got them home and opened the bag, two of them were drilled, halfway through at a random place in the threads!

(I was re-using old locking tabs and had forgotten how well new tabs do work)
 
Last edited:
just a thought...

Have your machinist measure a freshly honed cylinder with what I expect is a dial bore gage.
observe closely and see if it leaves the marks you are concerned about. Cracks in this type of cast material are rarely straight, usually more jagged .
Mine is a little heavily sprung and leaves these marks.

Now on to honing as a "symptom of boring" . I don't particularly care for the hone pass in that cylinder either.
I have to give very explicit instructions to automotive machinists because they just don't know, or get it .
If I hear "we know what we're doing" I take it elsewhere.

I bore to PISTON SIZE , HONE #240 TO 2/3 CLEARANCE, HONE #320 TO CLEARANCE.

As to the "angle" I see in the photos it seems inconsistent. Some looks 40 some looks 60 degree. As opinion only I prefer a fairly "flat" angle because I subscribe to the "inhibit ring rotation, reduce vertical blow by" camp. The whole idea of the #240 behind the #320 is that little of the #320 will be left after break in and the #240 scratches retain some lubrication as they are not completely removed by the #320 hone.

hope it helps

I am so fortunate that the equipment exists that I can borrow to do this as the owner of the equipment does the boring right to the ten-thousandth and lets me finish. We don't agree on hatch angle or finish but both operations work. His break in faster, mine seal a bit better and last longer but require careful break in (more heat cycles) .
I'm also quite anal about ring end gap and dressing.
 
Back
Top