Damaged Speedometer Gear Parts, Proper Re-Assembly

YL82

Perpetual Restorationist
Messages
851
Reaction score
8
Points
16
Location
Goose Creek, SC
I recently bought a new speedometer cable from Mikesxs for my XS650C.

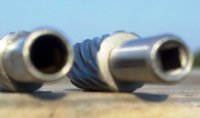
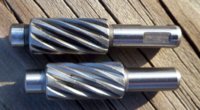
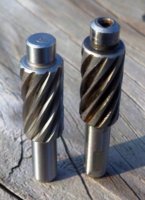
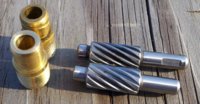
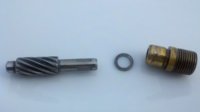
After disconnecting the old cable, I removed 3 parts (see attached images) from the speedometer drive gearbox housing.

It appears that some wear/damage that has occurred to the following parts:

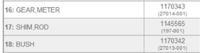
1) Bushing (brass) (306-25136-00-00), the smooth part looks to have a groove in it.

and

2) Meter Gear or "Skew Drive Pinion" (306-25138-00-00), the end that fits up into the Gearbox housing appears to be hollowed out or unevenly worn.

I've ordered a new bushing. The gear (skew drive pinion) is a little pricey, so I have not ordered a new one at this time, but may have to.

I'm not familiar with the the exact function of each of these parts, so I'd like to know if this 3-piece assembly simply plug into back into the speedometer drive gearbox housing. I've not removed the gearbox housing (looks to be a pain in ass), so I'm not sure whether any repairs or parts replacements are necessary.

I'd appreciate insights into the form and function of these speedometer parts.
 

Attachments

  • 2011-07-05_09-39-12_909.jpg
    2011-07-05_09-39-12_909.jpg
    208 KB · Views: 236
  • 2011-07-05_09-41-51_693.jpg
    2011-07-05_09-41-51_693.jpg
    310.9 KB · Views: 273
  • 2011-07-05_09-42-27_859.jpg
    2011-07-05_09-42-27_859.jpg
    106.5 KB · Views: 254
  • 2011-07-05_09-43-31_332.jpg
    2011-07-05_09-43-31_332.jpg
    34.2 KB · Views: 244
  • 2011-07-05_14-58-28_388.jpg
    2011-07-05_14-58-28_388.jpg
    52.6 KB · Views: 278
Last edited:
I guess I'll reply to my own post since noone else will.... :shrug:

I went ahead and ordered a new meter gear in addition to the bushing.

The bushing looks like my old one, except for being in pristine condition. Looks like I just need to tap it into the gear housing.

The meter gear I ordered from bikebandit looks somewhat different than the old one I had in there. The new meter gear is shorter, has no hole on the gear housing end and lacks the notches on the bushing end that the old one has. The new one also has a squared off end where the cable goes into it.

The OEM part number is correct (306-25138-00-00) on the new part, so I assume its OK to use. I may call Bikebandit to make sure since there are several differences.

Comments, anyone, anyone?
 

Attachments

  • 2011-07-11_18-54-22_887.jpg
    2011-07-11_18-54-22_887.jpg
    148.6 KB · Views: 244
  • 2011-07-11_18-53-57_604.jpg
    2011-07-11_18-53-57_604.jpg
    155.5 KB · Views: 236
  • 2011-07-11_18-48-55_320.jpg
    2011-07-11_18-48-55_320.jpg
    306 KB · Views: 214
  • 2011-07-11_18-50-45_718.jpg
    2011-07-11_18-50-45_718.jpg
    223.5 KB · Views: 248
  • 2011-07-11_18-47-08_322.jpg
    2011-07-11_18-47-08_322.jpg
    320.8 KB · Views: 222
Can you tell me if these parts are good for a replacement? It may be useful if I need one for my bike. Thanks!
 
Short answer: Don't know yet...

I looked at motogrid.com and the brass bushing (OEM 306-25136-00-00) and (steel) meter gear (OEM 306-25138-00-00) are the same for your '72 XS2 and my '76 XS650C.

There's also a shim that goes between the bush and the meter gear

The 2nd image I attached is the Bikebandits part numbers for the same parts.

As to the differences in the design of the meter gear, I'll have to get back to you after I check with Bikebandit and/or a Yamaha dealer to verify that this new part will work in my gear housing.

Will also get back to you after I find out how well it works in my '76C.
 

Attachments

  • Picture2.png
    Picture2.png
    77.5 KB · Views: 256
  • Picture3.png
    Picture3.png
    73 KB · Views: 254
  • Picture1.jpg
    Picture1.jpg
    92.6 KB · Views: 417
Short answer: Don't know yet...

.. as to the differences in the design of the meter gear, I'll have to get back to you after I check with Bikebandit and/or a Yamaha dealer to verify that this new part will work in my gear housing.

Will also get back to you after I find out how well it works in my '76C.

Thanks a lot bro, I appreciate it.
 
Honestly, I don't think what you're looking at on the old parts is wear/damage. I think it's just manufacturing marks. That brass bushing is a press or slip fit into the housing and doesn't spin. There's no way wear should or could occur in the area of that groove. The same with that hole in the bottom of the gear. There's nothing going on inside the housing that could cause that.
 
I appreciate your comments, 5twins.

It would be interesting to know how/why those marks did occur, but your speculation at least sounds plausible/reasonable.

I had been wondering whether these new parts would meet the same fate (i.e., end up looking the same way after extended use), but doesn't sound like they should or even could.

Do you have any reason to believe that the new meter gear with the different design will NOT work? (Haven't had time to discuss with bikebandit, Yamaha, etc.).

I was wondering whether the shorter gear length could present an issue, but just thinking about it (while at work), I would think I'd just have to tighten the threaded cap of the speedo cable a little more to secure to the bushing...

Thanks.
 
There might be an issue with the shorter worm gear mating properly with the round gear in the housing. The new one also looks slightly bigger on the O.D.? I would put it in and hand test it for proper operation. I have about a 6" long piece of old speedo cable (square on one end) that I use for testing and working on speedos, tachs, and their drive units. With it, I can spin them by hand or chuck the cable in a drill and power spin them to mimic actual operation.
 
I haven't had time to check for difference in O.D.

I recently bought a new speedo cable from Mikesxs, so I have a spare cable to fashion one like you have for testing purposes.

Any reason to retain the outer housing/sheath for this 6" testing cable?
 
No, just clip the end off the inner, make it 6" or so long. You can insert the square end into the drive and spin it by hand or, like I said, chuck it in your cordless and power spin it. For speedos and tachs, you need the power spin. Turning the cable by hand isn't fast enough to do any thing. You also need to spin it in the right direction or that needle ain't goin' nowhere, lol.
 
So what happened with your parts does the new parts work? did you need the new parts? Im have an 80 sg and I have the same problem spin the cable with drill speedo works.so there is some wrong with my speedo gear unit too:eek:
 
It's taken nearly a year to get back to my speed gear parts (don't ask)...Been busy...

I have a new speedo cable to install. Well lubed with Motion Pro Cable Lube. Good stuff.

QUESTION: Before I insert the new gear parts (see images), do I need to pack the gear housing with high-temp grease?

Seems like I read to do this someplace, but I can't find the reference.

I'll be glad to share how these parts work out for me as soon as I can.
 
Having a similar problem with my xs400 - but I cant get the gear out of the hub to see what is causing it to bind up. Can you tell me how you got your's out?
 
Having a similar problem with my xs400 - but I cant get the gear out of the hub to see what is causing it to bind up. Can you tell me how you got your's out?

I know its been awhile, but did you ever figure out how to get the pieces out? Mine has road grime inside and I'd like to clean it up.
 
I know its been awhile, but did you ever figure out how to get the pieces out? Mine has road grime inside and I'd like to clean it up.
No, never got it out. Tried soaking and prying and cursing. It now serves as door stop! Ended up replacing the hub.
 
Personally, I've never gone as far as YL82 and removed the little gear (#15) or the threaded collar (#17). I really don't think it's necessary and it certainly doesn't seem easy. There looks to be a roll pin (#27) that would have to be removed and then that threaded collar is probably a press fit too. All I take out is the bigger stuff in the main housing, parts 9 - 12 .....

SpeedoDrive.jpg


Part #9 is a wire snap ring. Pop that off and the other stuff comes right out. This will expose one side of the #15 worm gear in the bottom of the housing. Clean what you can see, rotate it a little, clean some more, etc. I've always managed to get it all cleaned out OK. Then a fresh coating of grease on all the parts and I'm good to go.
 
Back
Top