funky
XS650 Junkie
Looking good nice work on the wiring
Thanks funky, I’m glad I took the full rewire route. Tuning up next, and then time to consider paint! Gonna just touch up the frame lazy style this year since it’s almost time to ride, but I’m gonna start posting reference photos to get folks’ opinions on colors soon! Might just redo the yellow but I’ve got a few ideasLooking good nice work on the wiring
I'm no big fan of yellow, but as someone who is invested in the preservation of the patina of our barn finds, I must admit I've developed a "special" affection for that cool tank, in all its glory.Thanks funky, I’m glad I took the full rewire route. Tuning up next, and then time to consider paint! Gonna just touch up the frame lazy style this year since it’s almost time to ride, but I’m gonna start posting reference photos to get folks’ opinions on colors soon! Might just redo the yellow but I’ve got a few ideas
Well that’s one vote so far already towards “keep the crust, control the rust”. It really is pretty cool just the way it is. Still gonna need to paint the side covers, as the po decided checker pattern duct tape would add a nice touch and it looks like total shit. Front fender could use some love too, but just enough to blend in the with rest of it. I’ll keep it for the summer I think and go from thereI'm no big fan of yellow, but as someone who is invested in the preservation of the patina of our barn finds, I must admit I've developed a "special" affection for that cool tank, in all its glory.
.
.
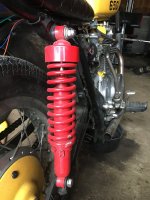
Thanks 5t. Have you considered changing your handle here to google?Yes, the NGK BP7ES is the normal plug for these. Get them at an auto parts store, not a cycle shop, they'll be cheaper. Those shocks look like originals just painted red. But maybe they're not from a 650, maybe from some other Yamaha model.

Thank you for clearing that up 5t. I think I’ll take the hit on the ngk plugs since I got the wires free. Also, I was reading through some older threads earlier (and without mentioning names) you lit a guy up for being a “mechanical moron” and causing more damage to his bike than good. I just wanted to say that I appreciate you being so understanding of my wet-behind-the-ears ignorance and always popping in with solid info. Thank you again!You don't need the resistor caps with a stock points system, but they won't hurt anything, and the NGK's are the standard of the industry. If the caps you got free are just plain rubber, keep an eye on them as they age. They tend to crack and "leak" spark energy, arching out to the motor fins around the plug. Observe the bike idling occasionally at night or in a dark garage. You'll see the arching if it's happening. Also check it under damp or wet conditions. Your high output coils may cause spark leaks more readily.
Gonna keep doing what I can to right by this old girl, heaven knows she’s been hurt in the past! That looks great, should I splay the wires similarly, but all the way around to the outside of the insulation on the coil end before crimping on the terminals? I’ve got a fresh set of the “copper core” BP7ES waiting for install. I work 4 am to 1230 so I’ll be heading home to the garage shortly to fiddle/fab up new rear “fender” and wrap up wiring until my rectifier gets here, and as per you and Jim’s (?) advice I’ll be wiring together my new reg/rec set upI guess I've mellowed with age, lol, but it still bothers me seeing some of the things guys do to these. You seem to be doing just fine, and with the occasional pointer or push in the right direction, I think you'll continue to do so.
The NGK plug caps aren't that expensive and I consider them pretty much a "must do". They're pretty much bulletproof so should be a one time investment. It's one of the first things I do to all my bikes, or to any I'm working on if the owner will allow me. Plug wires get changed too if possible. Unfortunately, some coils have the plug wire molded in so you can't change it. Those get the existing wire trimmed back to get to some fresh wire.
And this is how I mount the caps to insure a good connection. If you look inside the end of the cap that goes on the plug wire, you'll see what looks like a wood screw in there. The cap is made to "screw" onto the end of the wire and into it's wire core. I strip about 1/8" of insulation off the wire then fan the strands of the wire core out in a radial pattern. I brush the end of the wire with a little dielectric grease then screw the cap on .....

Also, I was reading through some older threads earlier (and without mentioning names) you lit a guy up for being a “mechanical moron” and causing more damage to his bike than good. I just wanted to say that I appreciate you being so understanding of my wet-behind-the-ears ignorance and always popping in with solid info. Thank you again!
Oh totally, not following the advice given is just a roundabout way of wasting folks’ time that are trying to help. That’s why I ask soo many questions, in order to follow the instructions given as specifically as possible. As the old saying goes, “you can lead a horse to water”.. some folks ask the question then don’t like the answer and end up makin their problems worseI can't and don't want to try to speak for 5Twins or anyone else here. But from what I have seen on this and a couple other forums totally unrelated to XS650's. The worst thing someone can do is ask a question and then when several long time members say check this or that come back three day latter and say I bought this or that and it still won't work. Totally ignoring what was suggested to be checked and replacing something totally unrelated to the problem.
Almost as bad as: My front brake seems awful spongy What should I do?
Suggestions: Bleed and flush brake, Check caliper mounting hardware, check for warped disk.
Next post from OP: I put new seals in the forks and brake is still spongy, might try swing arm bushings next!
Might sound far fetched but not that far off at times!

That’s what mine look like now, just assume the p/o was being lazy about it! Will do, thanks again 5tI think for those coil end crimps, you just fold the whole braided core over one side of the insulation and trap it under the crimp. That's the way the ready-made ones I've used were done.
As the old saying goes, “you can lead a horse to water”.. some folks ask the question then don’t like the answer and end up makin their problems worse
Hahahahaaaaa oh man that’s good. On the subject, I think this bike might be a camel. It’s proven to be extemely efficient at storing water in all of its many orifices... talkin bout rustTrue, some must be camels as they can go a long time without drinking the "water" that is offered freely to them!