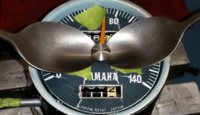
Well, Mailman, my XS2 speedo is being a son-of-a-gun. It hasn't been cracked open, but there's a history with the trip knob. Looks like it was glued on, and I had to make a puller to get it off.

View attachment 114984 View attachment 114985

View attachment 114986

The knob looks good from one side, some mangling and clutch cable rubs on the other side. The inner flat is gone, probably why it was glued.

View attachment 114987

The aluminum shaft extension won't unscrew. Studyin' this part, there's a tiny access hole. Got some penetrant in there, may need to cook-up a tool.

View attachment 114988

Worse case would be a destructive entry. But want to avoid that, save the shaft extension...

Thanks 2M. I really appreciate all the effort you're making here for one old shade tree mechanic!
 
In the meantime, I've been stripping the bike down. I've got all of the controls off of the handlebar, removed the entire front brake assembly, the front fender, exhaust, footrests, kickstart, brake arm and shIfter. I want to get it down to a roller and clean and check everything, go through all the wiring and repaint stuff. I am having a blast!
By the way, I had the front wheel off and all apart, and I gotta say, that front disc setup is the weirdest thing I have ever seen. It doesn't bolt to anything, at all. I'll get some photos of it later, but it floats inside some cast recesses, trapped between the right fork and the wheel. When you pull the front wheel out, you have to be careful because the disc just drops out, and it's heavy! Weird stuff.
image.jpeg
image.jpeg
image.jpeg
 
but it floats inside some cast recesses, trapped between the right fork and the wheel.
There's two types of disk brakes (EDIT: mainstream types. There are others)... the "floating caliper", which is mostly used in the automotive and motorcycle world. And then there's the "floating disk" type brake which is more commonly found in the aviation world. Maybe Yamaha thought the "aviation brake system" was needed for the XS...;)
 
Last edited:
OK Bob, fess up, now we need the truth. Did you hire Molly Maid to come in there before you took those pics? No way you're actually doing work there. Looks more like a sterile operating room than a bike shop.

Haha! I wish! I'm kind of a neat nick anyways, but a clean shop with clear floors makes it easier to spot and stomp scorpions!
 
Scorpions, Camel Spiders... Centipedes the size of a 9/16 wrench.... oh yeah... Sand Vipers... The First Gulf War taught me to intensely dislike creepy crawlies... Them and Scud missiles...
 
Really hard for me to imagine something deadly creeping around my garage. Maybe a skunk or raccoon, coyote, no way, but nothing deadly. So creepy!!!!!

Scott

But....I am 10 miles from an area that Bigfoot has been sighted by many witnesses that had no knowledge of the other sightings, and we definitely have no bears. Our Bigfoot group is not known to be aggressive....yet.

Scott
 
I don't mind the occasional gritter or buggie... I hate the dreaded garage Gremlins .... they move.. hide tools.. hide parts then, drop'd nuts ..bolts simply disappear... electrical wires are reverse'd...
 
I know I've mentioned this product before but for cleaning/preserving plastic, rubber, leather, and vinyl, I use the Tannery. It's been around for decades and really works well. It's like a spray foam. Spray it on the part or on a rag and wipe the part down with it. For detail cleaning, you can spray some in a little cup and dip Q-tips in it. It will get the wiring looking like new, great for seat maintenance too. It doesn't make the seat slippery like Armor All.

http://www.acehardware.com/product/index.jsp?productId=31784526
 
The Tannery - I’m going to look for that stuff. I have often used Armor All but have been unhappy with how it leaves seats too slippery.

Thanks for the tip 5Twins!

Pete
 
I usually buy a couple of cans at a time I use it so much. I clean my leathers with it, tire side walls, seats, and all the plastic and rubber parts. It works well for cleaning/preserving carb diaphragms too. For a seat, just spray it on then spread it all over with your fingers. Let it soak for 5 or 10 minutes then wipe/rub it off with a rag. If you use a light colored rag, you'll see all the dirt it removes. One word of caution - this stuff cleans so well that it might remove the stenciled name on the back of your seat. I don't spray and soak that area, just give it a quick wipe-over.
 
Ok, Bob, I've flogged my XS2 speedo within an inch of its life, and think I have a plan for yours. Compiled 33 pics of this process, but since you already know whut yer doin', I'll just pop the salient points.

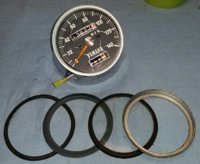
First, to just gain access to the gauge face, you don't need to remove the trip knob's extension shaft, and the chrome outer shell. Just hold the shell out of the way while gyrating on the crimp ring.
XS2-Speedo-11.jpg XS2-Speedo-15.jpg

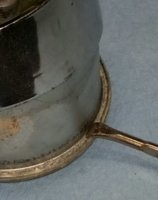
If you can get a small end-nipper, it'll make opening-up the crimp easier. I'd strongly recommend grinding the jaws so as to avoid bending the outer periphery of the trim ring, the bottom jaw in this pic.
XS2-Speedo-17.jpg
 
Sure 'nuff, the pointer is really *stuck* on there.
Love your 2-spoons removal rechnique.
Apply tape over the faceplate screws (they'll be the fulcrums), and a piece of tape to hold the needle vertical, out of the way.
XS2-Speedo-21.jpg

The pointer easily *popped* right off.

Now, remove the gauge face screws, and you can do your decal thing...

XS2-Speedo-23.jpg
 
You won't need to remove your tripknob extension shaft, it's not visible to the outside world, being covered by the rubber boot and knob.

But, if you must, here's how I had to do mine.

First, wrap some protective tape around the aluminum shaft extension, and clamp a small vicegrip on that thing.

Then remove the trip shaft's retainer c-clip.
XS2-Speedo-24.jpg


Skootch the tripmeter to the left, exposing the shaft's right end.

XS2-Speedo-26b.jpg


Using small, serrated jaw, needle-nose pliers, get a death-grip on that shaft end.

XS2-Speedo-28.jpg


The extension shaft uses left-hand-threads. The factory used threadlocker on the threads, and it is really locked on there. I had to twist one way, then the other, several times before it started to loosen up. Not a *pop* release, more of an imperceptibly slow yield. Eventually it unthreaded.

*Dayum!*
XS2-Speedo-29.jpg


As an afterthought, maybe heating that extension with a soldering iron would have made it release sooner...
 
Back
Top