Ok thanks. I’m exploring my options right now. There are some new reproductions and used ones available on eBay. I have not ruled out a one piece brake line either. To tell you the truth, I was sorry I ever ordered them. I was going for the correct look, but they are an inferior brake line, and I never liked all the connections.
Hey check this out, Walmart for all your vintage Yamaha parts! :D
B00F8E08-5DD1-470B-B97A-85CD3E2EEBC6.png
 
I would do as Jim suggested. Cut only flare and use a new nut and forming a double flare. Should have enough length to squeeze another flare. Bring it to a brake place they should be able to do it or better yet have them make a completly new line. You can but the nuts and use 3/16 steel line. That way you get two good crush flares.
 
I would do as Jim suggested. Cut only flare and use a new nut and forming a double flare. Should have enough length to squeeze another flare. Bring it to a brake place they should be able to do it or better yet have them make a completly new line. You can but the nuts and use 3/16 steel line. That way you get two good crush flares.

Do you think if I took it to a brake shop they could keep it metric and do you think they could copy the shape?
Ever had that done?
 
I’m a little concerned about cutting any length off of the existing line. Because the length puts the fitting right at the mounting point on the fork leg. It has to hit that at just the right spot because there is a rubber bushing that goes over the fittings and fastens to the leg.
 
A good brake shop should be able to duplicate it.
 
I'm not sure of your exact problem but I'm just going to throw this out there.... If you have a leak from a brake line at the threads try some Grey silicone gasket maker.
 
There's nothing special or complicated about that line. You or a brake shop could easily make another. The metric fitting and the flare style (inverted) are very common. Auto parts stores will have the fittings and line. You can buy ready made straight lines in various lengths. You would then just need to bend it, cut it to length, and re-flare the cut end. Steel tubing can be tricky to bend but they also make a softer nickel copper alloy line that bends very easily and is rustproof.
 
For the $75 asking price of that old original line, you could buy the flaring tool, end fittings, and a 25 foot roll of steel line, lol. It's crazy the prices people ask, and then that other people actually pay them. A buddy of mine told me he had all the lines replaced on his pickup. It cost him like $1200. I replaced almost all the lines on not one but two vehicles for around $100. I used a whole 25 foot roll of the nicopp line and started into a second.

https://www.ebay.com/itm/Copper-Nic...h=item2cb6f80bd9:g:PucAAOSwzGhaoYzK:rk:8:pf:0
 
Find some speed or hot rod shops in your area. I'm sure they could make you up a copy of your line for $20 or less, probably even in stainless tube. Yes, there is stainless brake tubing, not the braided flexible line but pipe just like your original line. The fittings can be had in stainless as well.
 
First an update on my brake line :cussing:. Then......Pamco Ignition with E- Advancer installation.

I hopped in my Fiat this morning with brake line in hand , full of optimism and determined to come back home with something, anything to break this log jam I’ve reached. I went to......
A Brake shop.......they don’t do custom work
A local garage where all the guys are ASE certified and seem experienced..........Nope won’t do it
Two auto parts stores, just looking for a straight line that I could bend......... all the wrong sizes
A transmission shop.......they said sure, well maybe, not today, How much? I asked. Don’t know....depends ( big help)
So the search continues. 5Twins, you are absolutely right, for the cost of a new reproduction line, I could buy a tubing bender, flaring tool, tubing and fittings. But this is the first brake line I’ve ever had to make and honestly I can’t forsee ever having to make another another, I hate to buy all those tools and just have them sit unused.
The heck of it is, I’m not 100% confident that the steel line is the culprit here. All I know is that union leaks.

Moving on......
I needed to get some foward progress going again, so I decide to tackle a job that I knew I could complete with the remaining part of my day. And so ......

HERE IS MY PAMCO INSTALLATION

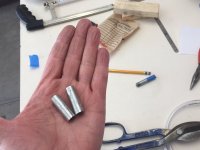
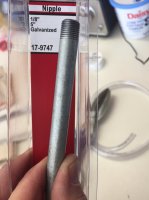
The first thing I did was decide where to mount my coil. I am going to mount it in the same location that the factory coils were located. I like to keep brackets simple, the mounting plate is just an aluminum plate with slotted mounting holes to allow back and forth adjustment in case I need to adjust for clearance. The stand offs I made from a galvanized pipe nipple ( cheap) cut to 25mm.
36137CD6-B0A3-49B7-ADC0-83B43BEF06C2.jpeg CE65F50E-3DE0-4532-B6A5-9E4F0FBF627E.jpeg
30BAD534-BEC0-4BCE-ABD7-71760404F1F7.jpeg
2898C31F-B624-4B00-BAB1-70F9F4B85BF0.jpeg

4A1C2CF0-61A8-4E2F-864F-433F7DB6C5AB.jpeg
A9268B72-0661-42C3-AE0C-D930C0FBAF77.jpeg


Then I installed the Pamco backing plate.
AA78C514-BFBE-44EB-A4E6-037486232038.jpeg


Then I installed the rotor on the advance rod and slid it through the cam.
F24BD196-16D7-49EF-8318-BD5A0ED82C20.jpeg


And installed the advance mechanism replacement hub on the other end of the advance rod.
9E11CE25-660B-4EF7-B028-3360A982434A.jpeg


Then made all my wiring connections as per the Pamco website instructions. All ground points on the frame were shined to bare metal with a Dremel.
E0D152EB-3CDB-45FE-9D0F-748A8034D2B2.jpeg


After that I needed to make up the spark plug wires. I bought 4’ of copper core silicone wires from an eBay seller,
And a set of NGK suppressor caps.
140547CB-A683-4A33-BE77-CA6600B119C9.jpeg


And installed.
B41E0174-7772-4F97-99FD-175B36D87FE3.jpeg
44C3C5F8-F639-4A58-8C13-B647F0D14A14.jpeg


So the Pamco is now installed and awaiting start up and final timing set. I do have one question at this point.
The ignition wires from my original wiring. I know that the gray and orange wires are not used, the red wire w/ white stripe goes to one side of the coil.
Coming from the wiring harness was the red wire w/ wht stripe and it was joined to a brown wire in the same multi plug.
7A86C988-F99A-48BE-A007-FF1C1FFC90C7.jpeg


I did not use that brown wire. I wrapped up the gray and orange and that brown wire and tucked them away.
Should I have done something else with the brown wire?

Lastly, I installed my breather tubes, just loosely for now until I fine tune the routing.
23DFC073-A868-48E0-8CD9-65059F3BDC17.jpeg


I still have to figure out my front brake riddle but it felt good to make some progress today.

Until next time,
Bob :cool:
 
RUH ROH! Did I mess up my safety relay? As I read that, the brown wire that was bundled together with my red wire w/ white stripe went to the safety relay?
I wasn’t sure what to do with the brown wire. It has just been taped up and put out of the way for now.
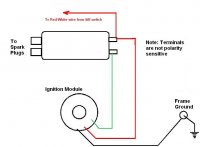
( instructions from Pamco)
1E8C850C-AA83-4400-BD7C-E3427D4F175F.jpeg

My ‘77 650’s wiring harness , the red/white wire was by itself. No brown wire.
 
Some of the diagrams in tech have lost their year markers. I'll see if I can remark them.
I think 70-71,that brown is the flasher, 72 it powers the safety relay, which pulls the starter off when the motor fires. Funny I never realized this year the starter button is the HOT to the solenoid.
 
Red/White wire is power from the kill sw. Needs to go to (in parallel) coil, Pamco card and safety relay. Where you tie them in doesn't matter as long as all 3 get power from the kill sw. Brown just sent power to coils... not needed.
 
Thank you! You’re reading my mind, I was hoping for a diagram! It helps my little lizard brain understand. So is that safety relay in your diagram , the brown wire I was referring to?

Also, I was going to redo the wiring a little tomorrow anyways. I forgot, it’s not in the official diagram, but Pete recommends a 7.5 amp inline fuse , set up like this. ( doesn’t have to be under the seat)
01620324-6754-4C75-81B2-75FA01FAE662.jpeg
 
Back
Top