-
Enjoy XS650.com? Consider making a donation to help support the site.
XS650.com receives a small share of sales from some links on this page, but direct donations have a much greater impact on keeping this site going.
You are using an out of date browser. It may not display this or other websites correctly.
You should upgrade or use an alternative browser.
You should upgrade or use an alternative browser.
Mailman’s XS2 a full on restoration
- Thread starter Mailman
- Start date
Yeah Bob - to paraphrase, a little grime is not a crime....and it would make the rest of us feel a bit less inadequate.


Nice ruler, Bob.
Nice ruler, Bob.
I knew you would appreciate that. It was for your benefit!
Now you've got me trying to remember where the heck my ruler like that is hiding! Believe it's a foot long and folds to a 3 inch size when folded all the way.I knew you would appreciate that. It was for your benefit!
Knocked off the first page in the Garage.............whats going on

Knocked off the first page in the Garage.............whats going on
Haha! Well I guess a little update is in order then!
I’ve been out of the garage a lot here lately, life gets in the way. I’ll tell you getting all the little fine details ironed out has been really time consuming, and I wind up going over a lot of the same ground over and over, I wasn’t sure if you guys were interested in such things.
But here we go,
First thing today I worked on getting my front brakes done. I started that two weeks ago but got sidelined with a persistent leak at one of the hose connections , which in turn led to a search for a new steel brake line. One was ultimately supplied to me by forum member Ken Hansen, Thanks Ken! His old XS2 is living on in my bike and many others, he’s a good guy!
When I got his brake line it was a little corroded, but not bad. I threw it in my ultrasonic cleaner for a hot soak, rinsed it off and then shot carburetor cleaner through the inside of the line. It cleaned up pretty nice.
A while back when I was trying to get this leak fixed, just as a backup, I went to the hardware store and bought a bunch of small copper washers. I intend to use one in this trouble spot just for insurance. Before I used it I took some of the diameter off, so it would fit inside the hose fitting and I sanded it, until it was nice and thin.
When I tightened the line up in there you could feel the copper compressing, and it sealed up really nice!
Thanks to Jim for that suggestion, that’s a keeper!
And , just like that, Presto! No more leak, and the brakes have been bled. There is still a little air in the line, so I’ve tied the brake lever tight and angled everything uphill to the master, it should self bleed.
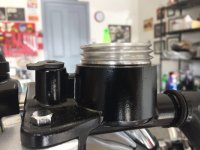
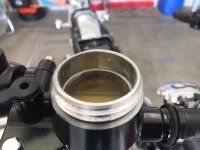
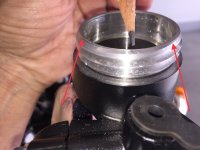
Speaking of the master cylinder, I’m really not crazy about it. It was very crudely machined. When I bought it the threads for the cap are really course and had lots of sharp and rough edges. And the way they machined the threads all the way up to the top, you wind up with an edge that isn’t flat all around for your cap to seal against.
There is literally at least a third of the top edge that has a knife edge on it for the gasket to seal against. Third photo has two arrows, between the arrows is that knife edge.


I’m worried about potential leakage of brake fluid from the cap not sealing properly.
Then I worked on my clutch cable some more. I really wanted to try 2Ms torque wrench test to see ho much force was required to turn the clutch worm, but since you have to turn it counter clockwise, all I kept doing was loosening the lock nut. So I wanted to try something else. I took the cable loose and let it flow unrestricted in a large arc from the clutch lever to the left side cover.
Taking all the curves and bends out of the cable, really did help make the pull easier, so that tells me that this is mostly a cable issue. I re routed it , yet again, keeping the flow as straight as possible, and it’s still pretty heavy , but I can live with it until some later point.
Next up, I really needed to do a test fit of the gas tank to see if where I mounted the coil for the Pamco ignition was going to be ok. I used a flashlight and mirror to check up underneath the gas tank tunnel to make sure that nothing was going to hit or rub. We’re all good here!
While I had the gas tank on I also checked the relationship of the filters to the location of the petcocks.
Yeah, this ain’t gonna work. They’re ay too close. I’m going to have to pull the airboxes and carburetors off again and redo all of this. I might as well get some decent fuel line while I’m at it, this stuff is way too hard to work with.
As you can see from the photo above, my gas tank will need work before mounting it. They didn’t mask the petcock area or plug the bolt holes. The bolt holes have not only paint, but also tank liner in the threads. The business that did my paint is a well known company that advertises in Classic Bike magazine and his work was expensive. They made several mistakes, some in the finish. The bike will look nice, but it is no show quality paint job. And don’t even bother telling me to confront the guy, I did, and it didn’t end well.
I got the decompression cable mounted , as well as the left side foot peg and shifter.
So, the tank is back off and stowed away. I still have the throttle cables to install. As I said, lots of detail stuff right now and kind of slow going. As of right now I’m not real sure when my next garage day will be. I don’t know what I did today but I jacked up my back, I’m sitting here with a heating pad and having muscle spasms.
Nothing that being 30 years old again wouldn’t cure I’m sure.
Till next time,
Bob
shawnkva
XS650 Addict
This bike is beautiful and the one that I am striving to mirror. At least as far as attention to detail and cleanliness. Mine is just a lowly '81 special, but I want it to look like better than new. Like this one. Great work!
I hope your back gets better quickly.
I hope your back gets better quickly.
This bike is beautiful and the one that I am striving to mirror. At least as far as attention to detail and cleanliness. Mine is just a lowly '81 special, but I want it to look like better than new. Like this one. Great work!
I hope your back gets better quickly.
Thanks Shawn,
I’ve been following your build too. You’re doing really nice work. I’m sure it’s going to be a beauty when you’re done!
And thanks for the well wishes!
Keep plugging away. I learned a long time ago it's the details of a project that will kill you. The big stuff takes care of itself.
If this is one of the blemishes in the paint you alluded to I don't blame you for being upset with the paint.

The brake fix was probably unnecessary. The new line should have sealed OK.
It's looking good, I think you need to get it to the point where you hear some noise out the exhaust. You sound like you are getting a bit bummed out. That would give you the shot of adrenaline you are going to need.
If this is one of the blemishes in the paint you alluded to I don't blame you for being upset with the paint.
The brake fix was probably unnecessary. The new line should have sealed OK.
It's looking good, I think you need to get it to the point where you hear some noise out the exhaust. You sound like you are getting a bit bummed out. That would give you the shot of adrenaline you are going to need.
This bike is beautiful and the one that I am striving to mirror. At least as far as attention to detail and cleanliness. Mine is just a lowly '81 special, but I want it to look like better than new. Like this one. Great work!
I hope your back gets better quickly.
Shawn: IMO, no XS650 is lowly. If you want to see a couple of very pretty Specials - check out Canuck1969's and JimD54's threads. Those two guys have really made those black beauties sparkle! ...and for an awesome transformation from a Special to a Cafe bike - have a look at Brassneck's build thread.
Keep on keepin'-on!
Pete
The brake fix was probably unnecessary. The new line should have sealed OK.
It's looking good, I think you need to get it to the point where you hear some noise out the exhaust. You sound like you are getting a bit bummed out. That would give you the shot of adrenaline you are going to need.
Regarding the brake line, yeah, it might not be been necessary, but when I first installed that brake line finger tight, I wasn’t very tight, I could wiggle the line in the connection. So in went the washer and now it’s tight as a drum!
I don’t think bummed out is exactly right. It’s more like burned out. It’s just tiring having to take 3,4,5 times to try and fix things, and I am super disgusted by all the money that I have thrown at new parts that turned out to be worthless crap! Sometimes it gets a little exhausting trying to figure out work around for things that should’ve been straight foward. I’ve been hammering on this almost every day for a year and it’s getting to the point that some days I’ve got to push myself to go out and try and make some progress.
I’m so close now that I don’t want to take a break from it, I’m just ready to be done for a while. If that makes any sense.
Yup - I understand and I also get your point about pain (believe me). It wears you down and really saps the fun out of anything you are trying to do. I for one would be just fine to see you put things on hold for a time to get feeling more solid Bob.
Having said that - I gotta tell you - HOLY COW is that bike looking good!
Pete
Having said that - I gotta tell you - HOLY COW is that bike looking good!
Pete
Makes perfect sense. When I was working I did projects that sometimes took up to a year to complete. After so long I just had to go home and get away from it. The hardest part was always ironing out the details.I’m so close now that I don’t want to take a break from it, I’m just ready to be done for a while. If that makes any sense.
Specials need love too. Yeah... I'm looking at you Gary....Shawn: IMO, no XS650 is lowly. If you want to see a couple of very pretty Specials - check out Canuck1969's and JimD54's threads.

Here's my 80 SG build that hopefully will get done soon as it warms up.
And here's Canuck's. I think he set a record for the fastest resto.
shawnkva
XS650 Addict
Just think about how close you are to riding that bike. Man, that thing will turn heads and I bet you will be having admirers asking all sorts of questions. Most likely talking you ear off of keeping you from getting on down the road. You will be pretty damn proud to talk about it though and time and money spent won't mean a thing. My saving grace is this....I'm not keeping track of money spent. Don't want to know what I have in it.
I'm not keeping track of money spent. Don't want to know what I have in it.
Nope! I save my receipts, but quit adding them up. It might give me pause for doing the kind of work I want.

shawnkva
XS650 Addict
Specials need love too. Yeah... I'm looking at you Gary....
Here's my 80 SG build that hopefully will get done soon as it warms up.
And here's Canuck's. I think he set a record for the fastest resto.
WOW! now I have some reading while I'm at work tomorrow. I LOVE the index on you first page Jim. Book marked that thread.
Your back will heal Bob, and it will be stronger than ever, just a needed adjustment is going on there. Bet you've got Popeye arms and a six pack ab after all of that wrenching.
Scott
Scott
You have our permission to relax and watch the flowers grow for awhile, Bob.
We'll find some sort of knitting project for Doug to do to occupy his mind and relieve his tensions....
We'll find some sort of knitting project for Doug to do to occupy his mind and relieve his tensions....

