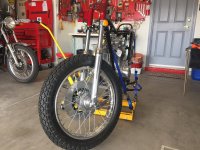
Not saying Bob wouldn't do a good job at all.................Hell have you tried to rearrange and rebuild a thread like this.....116 pages to date........If your really lucky, it might be redone to a 50 page thread...................The time it takes, (this would take weeks), and when you start to look at other contributions and then realize just what and how much they actually add to the information of that area, and then make decisions based on size of the rebuild and weather to leave out this or that for condensing purposes, then weighing up the loss of the sum for ease or length of thread, or leaving out some of the tip bits that have actually help to make the decisions on what direction the build has taken..............

Go and look up the Pamco thread................it took me days to build that thread and it is only i page in length.............The thing is with this thread it is already here.................On a rebuilt thread, if some one was looking for a certain area to get some information then they will still have to go through the whole rebuilt thread to find the area they need.............make links at the beginning like an index easier for all.

Besides this is only a suggestion based on my experience on building a tutorial thread. Not to criticize, or a reflection on someones ability.
 
Last edited:
Go back to the first post.....In your first post, post links to the relevant parts of the thread......Eg; Forks, Cables, Wheels, seat and such, may be a couple of links to an area in different parts of the thread........This way you can also do the links in an order as a build this is where a couple of links for one area from different parts of the thread will work .... People can jump to the area and also read any of those small tips/links ect.
Yeah... like this.
Only took a few hours.
 
Here is a book I would buy in a heartbeat. An edited edition of these threads:
1) Mailmans XS2 Restoration - covering early models
2) Mailman's Birthday thread - covering mid- models (1976)
3) Jim D's 1980 GS Restoration thread covering late models (broken into 2 parts; the bike and jigs)
4) gggGary's Period Piece - down and dirty; how to get a bike running in 60 seconds or less.

Not saying this would be easy. Probably would have to hire an editor to boil it down to the essentials and to give others their due. Also not dissing many other great threads. But damn, that would be the quintessential XS650 book.
 
Ok......done with the honey do’s. The yard is all cleaned up but I’m done for the day.

So, when I get back out there, I will definately try the old torque wrench test and see where I’m at, maybe on both bikes and compare, might be interesting. I will also make sure the mounting spot on my left case is clear of any burrs of casting flash.

Scott, thank you for taking the time to measure that cable. That will be a handy comparison for me.
And Gary, great tip on the custom silver Motion Pro cables. I will definately check that out.

The thing with the cable is, I believe the stock one was pretty short to begin with just because of the way it was routed. The new one is even shorter than my stock one. The length the sheath is shorter by about 1.5 inches. Here is the old and the new , side by side.
3F3FC08F-6039-4401-8531-592537B786D4.jpeg

A8549A06-FFC6-441F-A535-0DE7FEE6CAF4.jpeg


That in turn creates more exposed cable and makes it had to adjust freeplay.
397CA3AD-81FF-4E92-9375-72BA6EFFE7F2.jpeg
4584183D-269A-43A3-BD5F-524730664CFC.jpeg


When I first installed it and took all the freeplay out of the adjuster screw at the worm. I stil had to crank the handlebar adjustment way too much to take up the slack.
8F952C31-AC8E-4661-80C7-47FD3A318475.jpeg


I took all kinds of measurements at the case between new and old, trying to figure out what the differences were.
The end results were actually closer than the measurements would lead you to believe.
FA672075-D365-41B0-A2EE-EEB97771511A.jpeg
36A80AB4-D448-44F5-A4C0-3AFA400CCD04.jpeg


As for the routing differences, the Motion Pro on my other bike is long enough that it creates a sweeping arc that goes from clutch lever, across the front of the steering head, follows the right side of the frame back bone then comes down between the carbs and goes into the case.
I tried that originally with my new cable and it was like 6” too short.
On my XS2, here is the routing. It comes from the clutch lever, bends back under the speedo, along the upper left side of the backbone, crosses under and follows the right side, until coming down between the carbs. That was exactly the route of the original cable.
5E40B3A4-AB6E-48CD-A78E-675BAC036512.jpeg
30D5BFFF-F2E2-4085-995A-1C76F2AECAC9.jpeg
930E12F6-502F-4122-80D4-E4BE5507DBD5.jpeg
F63FE7D3-F17B-4DB7-990E-BA83BB9605B0.jpeg


And Finally.....Skull you may be right about , the better method being to provide an index with links in the first post.
Let the reader decide what back and forth conversations are valuable to them, there are some hidden gems in those discussions.

A special shout out to Ken Hansen
767287D2-2D46-45A2-A6C4-3CFF39531E3D.png
for sending me an original front brake line, the post office failed to foward it to me at my new address and it was lost in limbo for a while. But I was able to retrieve it today! Yay!
I’ll clean it up and see if it works! Fingers crossed!
Oh and Ken......don’t send me your ‘78. The post office would just lose that too. :cautious:
 
Here is pictures for my standard Yamaha clutch cable and Motion Pro clutch cable I ordered for my '77. The MP is approx. 2 1/4" longer
than the Yamaha one. The tube angle on the MP is less than the Yamaha one. I plan on using the MP when I am ready for it.
 

Attachments

  • clutch cable 1.jpg
    clutch cable 1.jpg
    150.1 KB · Views: 144
  • clutch cable 2.jpg
    clutch cable 2.jpg
    153.5 KB · Views: 163
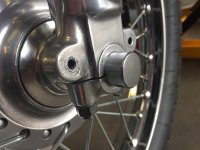
Hey Bob: I may be all wet here, but I was looking at your photo above of the speedo cable fitting down at the front wheel hub.

On Lucille, the cable exits horizontally facing straight back - I don’t suppose you have the speedo drive fitting misaligned.....? On Lucille, that fitting is keyed to the lower fork leg IIRC - but the early bikes may be entirely different.

Pete
 
Last edited:
Pete on his bike the speedo drive locks down wherever it is when you tighten the axle. It can be angled however you want it. I do think he needs to get out his exato knife and trim his gaskets.:rolleyes:
upload_2019-3-3_19-38-20.png
Originals were black. A black felt tip pen may be in order.
 
Robin would be proud of you and your hard work Bob.

Pete

Thanks Pete, I know I sure used to bounce ideas off of him constantly. I really miss him.

Hey Bob: I may be all wet here, but I was looking at your photo above of the speedo cable fitting down at the front wheel hub.

On Lucille, the cable exits horizontally facing straight back - I don’t suppose you have the speedo drive fitting misaligned.....? On Lucille, that fitting is keyed to the lower fork leg IIRC - but the early bikes may be entirely different.

Pete
.
You touched on something here that has had me concerned. My speedometer drive rotates when I push the bike around in m garage. Like it is not locked into position. I might have to pull the front wheel back off and hav a look.
 
Here is a book I would buy in a heartbeat. An edited edition of these threads:
1) Mailmans XS2 Restoration - covering early models
2) Mailman's Birthday thread - covering mid- models (1976)
3) Jim D's 1980 GS Restoration thread covering late models (broken into 2 parts; the bike and jigs)
4) gggGary's Period Piece - down and dirty; how to get a bike running in 60 seconds or less.

Not saying this would be easy. Probably would have to hire an editor to boil it down to the essentials and to give others their due. Also not dissing many other great threads. But damn, that would be the quintessential XS650 book.
I'd have to add RobinC's 77 that he brought back to life....
On the road again at 40.............the bike that is
 
Your XS2 speedo drive doesn't appear to have locking tabs on it that lock it onto the fork leg to keep it from spinning. That means tightening the axle is what holds it in position. You may want to re-visit that operation. The shouldered end of the axle should get pulled in tight against the speedo drive and lock it from spinning. But for this to happen, you must tighten the axle while the axle clamp on the bottom of the left fork leg is still loose. That allows the shouldered portion of the axle to be pulled through it and tight up against the speedo drive. You needn't tighten it quite fully or 100%, but you want to make it pretty tight. The final bit of tightening to align the cotter pin hole can wait until that left fork leg clamp is tight.
 
Yeah, I was going back and looking at photos from my front end build up last night, to see if it had some sort of locking tabs. And you’re right , I need to go back and do the whole front end alignment procedure that you recommended earlier. In my excitement to get everything back together I never did do that.
3E0C7FBB-406B-47FD-80A0-9163ECB06BCD.jpeg CCC06E59-0546-4EEE-89D6-DC7F4410A472.jpeg 7495C47D-965C-40D8-A7A7-4776E8B96714.jpeg 8AAB0597-21B5-4993-9D9B-0D44DC44750B.jpeg 95C66409-4D9F-49D3-90F5-13B453B888B7.jpeg 73E7E6AE-C4E8-441D-AA06-403EFB722691.jpeg
 
Judging from where the hole through the head of the axle is to the fork leg on your pic compared to mine it looks like the axle is not in all the way.
upload_2019-3-4_11-32-24.png
upload_2019-3-4_11-33-53.png
 
Back
Top