http://www.xs650.com/threads/a-collection-of-xsjohns-mods.2426/page-2#post-441417 ......worth doing unless you haven't broken the cam chain..............Just a thought
-
Enjoy XS650.com? Consider making a donation to help support the site.
XS650.com receives a small share of sales from some links on this page, but direct donations have a much greater impact on keeping this site going.
You are using an out of date browser. It may not display this or other websites correctly.
You should upgrade or use an alternative browser.
You should upgrade or use an alternative browser.
Mailman’s XS2 a full on restoration
- Thread starter Mailman
- Start date
http://www.xs650.com/threads/a-collection-of-xsjohns-mods.2426/page-2#post-441417 ......worth doing unless you haven't broken the cam chain..............Just a thought
It’s not broken, just pulled aside. It’s a good idea though.
You still gotta measure old AND new pistons and bores, your weekend homework......Report due Monday, in INK!
You still gotta measure old AND new pistons and bores, your weekend homework......Report due Monday, in INK!
YES SIR ! Haha! Boy , you and 2M sure are tough teachers! I wanted to go hang out with my friends at the mall.
Has brass snubbers.... Requires liberal use of lubricant.....made me think; not so easy to "chuck" these up? Maybe if you could get a steady rest on it? or some sort of plug to support that end with the tail stock..
I wish I had a more organized mind, I really do. And the experience to plan ahead better. Instead of getting a comprehensive order together at the outset of this engine build. I ordered things I thought I would need and then as I’m going along I keep finding things that need replacement and then ordering and waiting. It’s making this a very stop and go operation. My inexperience also led me to ordering things before finding out what really needs to be done, resulting in unnecessary expense. I really just need to be more organi...... SQUIRREL!!!!

Last week my cylinder exchange arrived from Wisconsin, Thank You Gary! Bored over .050 with fresh pistons all set to go. So that whole machine shop hassle has been lifted off me. The cylinders had been media blasted and were clean but felt rough and a little like sandpaper. So after some smoothing and with various abrasives and some wire wheel Dremel work they went from looking like this,

To this,

Much better!
ROCKER ARM SHAFT EXTRACTION AND VALVE COVER CLEAN UP
First let me just say, I am doing a variation of a technique that is right in our tech section.
The first thing I did was to remove one of the long 6mm bolts from the left side engine cover to use for the rocker shaft removal. Then using various combinations of washers, and nuts for spacers and eventually a socket, I simply cranked the rocker shafts out. Two needed to be pulled the whole way and two came out using just my fingers once they were broke free.


Detail showing the oil passageway relief cut into the end of the rocker shaft.

I was surprised to find a lot of metal shavings and sealant bits in the oil passageways and cavities behind the rocker shafts.

Next up I wanted to take a good look at the aluminum epoxy that they had used to seal off some of the oil passageways. It looked like crumbly cottage cheese. That backlit passageway is just a passageway to the breather. For some reason it had a bunch of that crumbly looking epoxy down there and I didn’t like the look of it. So I started scraping it out. Also the epoxy that had been used to seal the oil passageway was loose and flaked right off.


Did you ever wonder how they seal these drilled oil passageways? These all had a ball bearing inserted and the the aluminum was swaged around it, then it had epoxy smeared over it.

I found out why that crappy epoxy was all over inside the vent passageways. It was there to fill voids in the casting.

I gotta believe this is an early engine thing. Everywhere I turn, I am surprised at how crude the castings are. I see a lot of pinholes and in this case some major voids. You would think quality control would’ve thrown a casting like this right in the junk pile, but nope, just roughly smear some epoxy on it! I intend to re apply JB Weld over the oil passageway plugs and inside those vent passageways using some narrow wooden coffee stirring sticks.

To be continued.........I gotta go watch Jeopardy.

Last week my cylinder exchange arrived from Wisconsin, Thank You Gary! Bored over .050 with fresh pistons all set to go. So that whole machine shop hassle has been lifted off me. The cylinders had been media blasted and were clean but felt rough and a little like sandpaper. So after some smoothing and with various abrasives and some wire wheel Dremel work they went from looking like this,
To this,
Much better!
ROCKER ARM SHAFT EXTRACTION AND VALVE COVER CLEAN UP
First let me just say, I am doing a variation of a technique that is right in our tech section.
The first thing I did was to remove one of the long 6mm bolts from the left side engine cover to use for the rocker shaft removal. Then using various combinations of washers, and nuts for spacers and eventually a socket, I simply cranked the rocker shafts out. Two needed to be pulled the whole way and two came out using just my fingers once they were broke free.
Detail showing the oil passageway relief cut into the end of the rocker shaft.
I was surprised to find a lot of metal shavings and sealant bits in the oil passageways and cavities behind the rocker shafts.
Next up I wanted to take a good look at the aluminum epoxy that they had used to seal off some of the oil passageways. It looked like crumbly cottage cheese. That backlit passageway is just a passageway to the breather. For some reason it had a bunch of that crumbly looking epoxy down there and I didn’t like the look of it. So I started scraping it out. Also the epoxy that had been used to seal the oil passageway was loose and flaked right off.
Did you ever wonder how they seal these drilled oil passageways? These all had a ball bearing inserted and the the aluminum was swaged around it, then it had epoxy smeared over it.
I found out why that crappy epoxy was all over inside the vent passageways. It was there to fill voids in the casting.
I gotta believe this is an early engine thing. Everywhere I turn, I am surprised at how crude the castings are. I see a lot of pinholes and in this case some major voids. You would think quality control would’ve thrown a casting like this right in the junk pile, but nope, just roughly smear some epoxy on it! I intend to re apply JB Weld over the oil passageway plugs and inside those vent passageways using some narrow wooden coffee stirring sticks.
To be continued.........I gotta go watch Jeopardy.
Last edited:
I guess you missed Wheel of Fortune, but at least you caught Jeopardy Bob.
Nice work buddy!
Nice work buddy!
OCD's hard to fight off ain't it Bob?So after some smoothing and with various abrasives and some wire wheel.......
I guess you missed Wheel of Fortune, but at least you caught Jeopardy Bob.
Nice work buddy!
Thanks Robin! Just trying to keep up with you man!
OCD's hard to fight off ain't it Bob?
Oh man, and I’m just getting started. At this rate it’s going to be my 65th Birthday Present!!
I'll suggest you don't use jb kwik, use traditional slow cure, it's about 30% stronger and has better heat resistance. I'll guess they hot tanked the head.
I'll suggest you don't use jb kwik, use traditional slow cure, it's about 30% stronger and has better heat resistance. I'll guess they hot tanked the head.
Good info thanks! You know I wasn’t really sure. I was going to look it up online to make sure of the application.
I’ll pick up some regular JB Weld then.
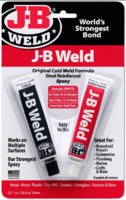
Was just gonna make the same suggestion. You might want to consider something like this.I'll suggest you don't use jb kwik, use traditional slow cure, it's about 30% stronger and has better heat resistance.
Was just gonna make the same suggestion. You might want to consider something like this.
View attachment 121100
I like the idea of putty, it seems like it would be easier to shape and smooth, especially inside that narrow passageway.
I'd recommend epoxying a piece of thin-wall brass tubing in there...
I'd recommend epoxying a piece of thin-wall brass tubing in there...
Hmmm, a whole new direction. What’s your reasoning on that? What sort of epoxy? It would have to be like liquid glue wouldn’t it?
Just a couple more examples of pinholes and voids in the casting.
On the cylinder, you could see spots on the outside of the barrel , between fins where the casting had flaws , voids, and places where the metal looked folded ( for lack of a better term) like the metal had started to cool before it had fully flowed into place. Just really crude by today’s standards. But this was nearly 50 years ago.
Hmmm, a whole new direction. What’s your reasoning on that? What sort of epoxy? It would have to be like liquid glue wouldn’t it?
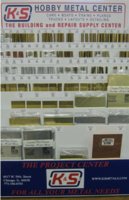
Whups, sorry Bob. Sometimes I forget myself, and take it for granted thinking that folks are familiar with these things. I have a lot of stuff left over from past projects, including a lot of hobby metals. I'm sure you've seen these hobby metal displays.

Find a tube that fits best in the hole, cut to length. I'd even contemplate drilling the drain hole slightly larger, if necessary, to get a close/sliding fit. Maybe even stopping short of completely drilling thru, to leave a stop shoulder for the tube.
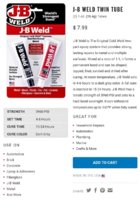
Use the "original" JB-Weld. Check out its specs.


Then mix up some, use a toothpick or small wooden dowel to smear a thin coat inside the drain hole. Also a thin smear on the brass tube. Shove it in there, wipe off excess, put tape over a hole to keep it from creeping outta there...
Last edited:
Hmmmm.......I wonder if a complete engine could be cast from JB Weld and successfully run.
If Bert Monro had it available to him, I imagine he would have done it.

If Bert Monro had it available to him, I imagine he would have done it.
Some of those pinholes wont bother you but it does not hurt to plug them up. Was also going to suggest the original JB. I had to fix a few spots on my 72 head and used JB weld. On thr ball plugs I turnrd the casting so the ball was pointing up and flowed jome JB weld over it and let it set up. Your cylinders look good.Thats a lot of metal and junk you found in the oil passage way. That is one reason I always tear down an engine and look at every detail. I had one 74 Z1 head where they had a cam problem and ground dowm the cam profile to beyond specifications and just put a very large shim in there. Not even sure how the thing ran. That engine also had tonnes of red silicon sealant so I knew it was a hack job.
Last edited:
I’ve been reading up on JB Weld products and even though none of the repairs are structural in nature, I think I am going to go with original JB Weld for all repairs. It is hands down the strongest, even though it’s going to slow down the process somewhat.
Also with regards to the debri, I intend to do a couple quick oil changes and keep a close eye on my filters for a while.
Also with regards to the debri, I intend to do a couple quick oil changes and keep a close eye on my filters for a while.
Yes, good idea. I believe this is a rather old, crude engine design and will generate lots of chips and debris during the break-in process. I also think that process will take some time, much longer than the initial couple thousand miles normally associated with cylinder break-in. Mine came to me with just under 20K on it. There was lots of junk in the filters for the next 5 or 6K. It was tapering off and eventually almost went away, but I still always see a few chips. I think most of what I was getting was just a flushing of what had accumulated since it was new. It probably never got frequent enough oil changes and filter cleanings before I got it.
I keep a jug of the Walmart 20W-50 in the garage along with clean, spare filters. I try to change all this about every 1000 miles. My side filter at the last change, a few bits of rubber and a couple chips, but nothing like it used to come out. I attribute the rubber bits to the rubber bumper ring on the #4 starter gear. It tends to start chunking off when they get old and hard .....


I keep a jug of the Walmart 20W-50 in the garage along with clean, spare filters. I try to change all this about every 1000 miles. My side filter at the last change, a few bits of rubber and a couple chips, but nothing like it used to come out. I attribute the rubber bits to the rubber bumper ring on the #4 starter gear. It tends to start chunking off when they get old and hard .....
