That's doable by hand. It'll take a minute.... but it's doable.There is no way around this. The cylinder will need to be machined to be usable.
-
Enjoy XS650.com? Consider making a donation to help support the site.
XS650.com receives a small share of sales from some links on this page, but direct donations have a much greater impact on keeping this site going.
You are using an out of date browser. It may not display this or other websites correctly.
You should upgrade or use an alternative browser.
You should upgrade or use an alternative browser.
Mailman’s XS2 a full on restoration
- Thread starter Mailman
- Start date
Shoulda come by here, Bob. We could've put that sleeve on my lathe, and shaved off the 0.011"...
Last edited:
Hey! That’s right! I know a good machinist!

Be forewarned, I haven't touched a boring bar or cylinder work for over 40 years.
I just come here to reminisce...
I just come here to reminisce...
Man I’ve been watching YouTube videos about boring motorcycle cylinders. Just how many kinds of machines are out there? I don’t think I saw the same way done twice. One shop just used some kind of automated honing machine to bore oversize, he started out with aggressive stones and changed to finish stones at the end. He just kept stopping and taking measurements until he got to the diameter he wanted.
I gotta tell you, some of these shops don’t seem very scientific about it.
I gotta tell you, some of these shops don’t seem very scientific about it.
I was curious, and found a brand new Van Norman boring bar, still in the crate, on eBay, for $10,000.
And, it's already gone...
And, it's already gone...
Well Bob, I know you've got connections. As a retired USPS employee any discounts available to ship to Canada?
I can get em done here for you, and Pete and I can get em back to you.
I can get em done here for you, and Pete and I can get em back to you.
Well Bob, I know you've got connections. As a retired USPS employee any discounts available to ship to Canada?
I can get em done here for you, and Pete and I can get em back to you.
Thanks Robin! I appreciate that. I know you sure had a good machine shop up there that did your work.
I’ll let you know. I’m weighing my options right now. I’m not in a panic and there seems to be no end of things that need to be done on my project!
Last edited:
That's doable by hand. It'll take a minute.... but it's doable.
Well I’ve been thinking about this comment Jim, and trying to figure out what method you’re suggesting. I’m guessing , remove the liner and flip that liner upside down and sand it on a very flat surface? It could be measured until it reaches the same thickness as the original one. Am I close?
One more thing, I intend to hone the cylinders and get some very accurate measurements of both the cylinders and the pistons and see exactly where I’m at. Maybe by the end of the weekend?
Yup... that's how I'd do it. Start out real aggressive.... 180 grit and lots of oil (WD40 works good for this). Once it gets close, step up to 320 or 400. You familiar with the technique you need to use?I’m guessing , remove the liner and flip that liner upside down and sand it on a very flat surface? It could be measured until it reaches the same thickness as the original one. Am I close?
Actually, I'd just chuck it up in the Atlas.... but you get what I mean......Yup... that's how I'd do it.
I have seen the technique done to level the surface on a head.
made me think; not so easy to "chuck" these up? Maybe if you could get a steady rest on it? or some sort of plug to support that end with the tail stock.. Wondering. BELT SANDERActually, I'd just chuck it up in the Atlas.... but you get what I mean......

My steady rest opens up enuff to hold things that big, for light skim cuts.
But gggGary's idea of an internal, expanding arbor is great.
Trying to think of a way to spin the sleeve, rough cut the flange down (like with Dremel), several thou for starters, then do the lap procedure on the final couple thou. Using only what Mailman has at hand, like kitchen appliances and implements. Coming up dry...
Last edited:
“You new around here pilgrim? You’re kinda far from home aren’t you? I couldn’t help but notice you seem pretty green. I thought maybe I’d give you a hand before you go and kill yourself. “
Well I guess all my floundering has attracted attention. Haha! The man from Baraboo rode up the other day and just kinda casually mentioned, “ You know I just happen to have an XS2 cylinder already bored with matching pistons laying around, looking for a home. If you know anybody interested?”
WHAT WHAT WHAT ??? I couldn’t open my wallet fast enough! He must’ve taken pity on me, watching from afar.
Either that or he was cringing , waiting for me to mangle my old , hard to come by cylinder. Either way, a deal was struck, new parts coming my way, my old parts going to Wisconsin for exchange.
I would just like to say thanks to Gary for taking pity on this old greenhorn shade tree mechanic. This just made my life a whole bunch easier and sped up this process to boot. I’ve still got a long way to go, and a lot to learn, but there is movement once again!
A couple of photos of what’s coming my way.
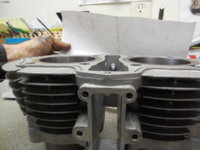
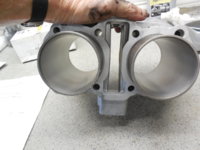
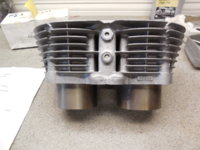
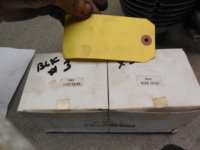
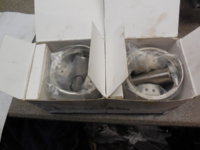
Yeee! Haaaa! Life is good!
Hahaha, that's awesome news Bob! Once again, this place blows me away. Man!
Gary, you're too much buddy!
You're a good man. Thanks for helping out a brother.
Onwards and upwards Bob.
Gary, you're too much buddy!
You're a good man. Thanks for helping out a brother.
Onwards and upwards Bob.
Seeking opinions on a couple of items.
1. The cam chain. My bike only had 5,000 miles on it. The inside of the motor is really clean. I had planned on just running my existing cam chain. I just slipped it off the cam and safety wired it aside. Is that false economy? Is reusing my chain a bad idea?
2. My front cam chain guide. The one that was in the bike looks like brand new, not a mark on it. Not loose, nothing broken off. I ordered and have on hand a replacement from Mikes. On one hand the old one is probably hard and possibly brittle, on the other, the Mikes are not exactly famous for being a quality piece. Speaking of which, do they have trouble with the bolt holes stripping?
Which would you install? Here’s a couple of pics of the one that was in my engine.
Last edited:
1. At 5k it's barely broke in... use it. My opinion
2. At 40+yrs that rubber's hard as a rock and liable to delaminate at any time. I got a NOS Yamaha here for my SG. Rubber's still soft. If it's compatible, I'll let you have it for what it cost me.
2. At 40+yrs that rubber's hard as a rock and liable to delaminate at any time. I got a NOS Yamaha here for my SG. Rubber's still soft. If it's compatible, I'll let you have it for what it cost me.
1. At 5k it's barely broke in... use it. My opinion
2. I got a NOS Yamaha here for my SG. Rubber's still soft. If it's compatible, I'll let you have it for what it cost me.
Re: the cam chain, yes it was a very tight fit to slip off of the cam, even with the cam bearings removed and the cam tensioner removed.
I’ll check on the compatibility of the cam chain guide and PM you. Thanks Jim!
