Just seen the blow up diagram. Yes they are shown.
-
Enjoy XS650.com? Consider making a donation to help support the site.
XS650.com receives a small share of sales from some links on this page, but direct donations have a much greater impact on keeping this site going.
You are using an out of date browser. It may not display this or other websites correctly.
You should upgrade or use an alternative browser.
You should upgrade or use an alternative browser.
Mailman’s XS2 a full on restoration
- Thread starter Mailman
- Start date
PAINTING DAY
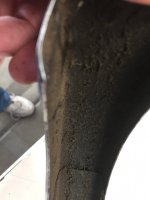
I’ve spent the last few days cleaning crud, rust and corrosion from the chain guard and the front fender, then I sprayed clear enamel on the undersides to protect against rust and then finally polishing the outside chrome.
I’m pretty pleased with the results.
Before.....
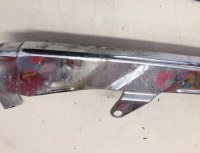
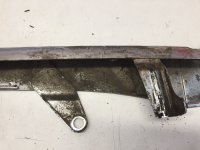
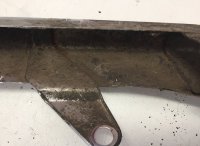
After.... ( Note, I tried a new, for me, product. Satin clear Rustoleum.)


The fender....


I also spent time on the front brake disc. I surfaced the disc,
Before.....

And after.....


I also cleaned up the carrier, repacked the bearings with fresh grease and masked it off and painted it.

The paint was still tacky so no after shot yet. I also ran to the hardware store and ponied up for some very nice stainless steel replacement nuts and bolts for the front disc. It should look really nice when it’s all back together.
Later!
Bob
I’ve spent the last few days cleaning crud, rust and corrosion from the chain guard and the front fender, then I sprayed clear enamel on the undersides to protect against rust and then finally polishing the outside chrome.
I’m pretty pleased with the results.
Before.....


After.... ( Note, I tried a new, for me, product. Satin clear Rustoleum.)
The fender....
I also spent time on the front brake disc. I surfaced the disc,
Before.....
And after.....
I also cleaned up the carrier, repacked the bearings with fresh grease and masked it off and painted it.
The paint was still tacky so no after shot yet. I also ran to the hardware store and ponied up for some very nice stainless steel replacement nuts and bolts for the front disc. It should look really nice when it’s all back together.
Later!
Bob

PAINTING DAY
I’ve spent the last few days cleaning crud, rust and corrosion from the chain guard and the front fender, then I sprayed clear enamel on the undersides to protect against rust and then finally polishing the outside chrome.
I’m pretty pleased with the results.
Before.....
View attachment 133001 View attachment 133002 View attachment 133003 View attachment 133004
After.... ( Note, I tried a new, for me, product. Satin clear Rustoleum.)
View attachment 133005 View attachment 133006 View attachment 133007
The fender....
View attachment 133008 View attachment 133009 View attachment 133010
I also spent time on the front brake disc. I surfaced the disc,
Before.....
View attachment 133011
And after.....
View attachment 133012 View attachment 133013
I also cleaned up the carrier, repacked the bearings with fresh grease and masked it off and painted it.
View attachment 133014
The paint was still tacky so no after shot yet. I also ran to the hardware store and ponied up for some very nice stainless steel replacement nuts and bolts for the front disc. It should look really nice when it’s all back together.
Later!
Bob
 WOW
WOW Everything looks great.
The surface you put on that disc look superb, Bob !
Thanks guys!
Thanks Dude! I ran through a whole range of techniques before I hit on one I really liked. If I had real shop machinery it would’ve been a snap, so first I tried hand sanding with a block sander. It worked ok ,but very slow.
Then I tried Dico wheels in a drill, and that may have worked but I didn’t have a course enough grit.
What finally worked really nicely was pictured above. A Black and Decker rust removal wheel ( medium grit ) in my cordless drill. I held it at a very shallow angle to the face of the disc and applied light pressure while running it in sweeping motions at a 45 degree angle , constantly rotating the disc. Then I reversed the angle to achieve a cross hatch pattern. It’s hard to photograph.

The surface you put on that disc look superb, Bob !
Thanks Dude! I ran through a whole range of techniques before I hit on one I really liked. If I had real shop machinery it would’ve been a snap, so first I tried hand sanding with a block sander. It worked ok ,but very slow.
Then I tried Dico wheels in a drill, and that may have worked but I didn’t have a course enough grit.
What finally worked really nicely was pictured above. A Black and Decker rust removal wheel ( medium grit ) in my cordless drill. I held it at a very shallow angle to the face of the disc and applied light pressure while running it in sweeping motions at a 45 degree angle , constantly rotating the disc. Then I reversed the angle to achieve a cross hatch pattern. It’s hard to photograph.
Damn Bob....

Awesome Bob !
Haha! Thanks Guys! 
You really are getting awfully good at this Bob.
Dammit, I’m comin' over....just as soon as I can find my glare goggles!
Pete
Dammit, I’m comin' over....just as soon as I can find my glare goggles!
Pete
Last edited:
You really are getting awfully good at this Bob.
Dammit, I’m coming over....just as soon as I can find my glare goggles!
Pete
Haha! Thanks Pete! C’mon down!

Great job. I hate the cleaning part. Just did the same thing with this little RS100. My fingers still hurt.Seems like the majority of people never have cleaned their machines.
Count me in as one of those bike owners who spend as much time cleaning as I do wrenching.
There is something quite satisfying about walking into one's garage to be greeted with a flock of sparkling motorcycles.
It warms the heart.
.
.
There is something quite satisfying about walking into one's garage to be greeted with a flock of sparkling motorcycles.
It warms the heart.
.
.
There is something quite satisfying about walking into one's garage to be greeted with a flock of sparkling motorcycles.
And a wonderful flock you have too!
Is it any wonder that I'm still single ?And a wonderful flock you have too!
My ex-girlfriends likely recognized that extra-special sparkle in my eyes when I was in the garage as a highly challenging competition.
.
.
No kidding. Even last evening my new Super Great girl called and said she'd be late. Home by 8.. I was actually happy Lol ! Then at 7:05 she walked in to the garage.. I felt busted even like I was eyeing another ..Is it any wonder that I am still single ?
Attachments
FRONT WHEEL ASSEMBLY, BRAKE DISC / CARRIER , AND BRAKE CALIPER
MAN, I THINK THIS FRONT END IS WEIRD! It really is an oddball set up, with too many pieces.
This morning I set about to assembly my front disc. On my bike, the disc is separate from the carrier and held on by eight, 6mm bolts, nuts and keepers.


For those of you interested in more detailed photos of the front disc parts, please see my album here.
http://www.xs650.com/media/albums/xs2-disc-brake-detail-photos.3096/
Then I started assembling the disc carrier. It has a bunch of parts. Two bearings, two spacers, metal dust cover, oil seal, disc shaft, special washer and shaft nut, O Ring, bolts , nuts keepers, AND THIS IS ALL JUST FOR THE DISC!!

Once the disc shaft has been installed into the assembled disc, it can now be fastened directly to the right fork leg, using a special square washer and a large nut.


Here you can see how unique this set up is. The disc assembly is now mounted to the fork leg and is independent of the front wheel.


Here is a photo showing the interface between the front wheel and the disc carrier. When you tighten everything up on the front end those two parts sort of lock together and are only held together by pressure from the front axle.

Next I installed the dust seal on the left side of the front wheel and then the speedometer drive, which I have already disassembled ,cleaned and greased.


Continued in next post........
MAN, I THINK THIS FRONT END IS WEIRD! It really is an oddball set up, with too many pieces.
This morning I set about to assembly my front disc. On my bike, the disc is separate from the carrier and held on by eight, 6mm bolts, nuts and keepers.
For those of you interested in more detailed photos of the front disc parts, please see my album here.
http://www.xs650.com/media/albums/xs2-disc-brake-detail-photos.3096/
Then I started assembling the disc carrier. It has a bunch of parts. Two bearings, two spacers, metal dust cover, oil seal, disc shaft, special washer and shaft nut, O Ring, bolts , nuts keepers, AND THIS IS ALL JUST FOR THE DISC!!
Once the disc shaft has been installed into the assembled disc, it can now be fastened directly to the right fork leg, using a special square washer and a large nut.
Here you can see how unique this set up is. The disc assembly is now mounted to the fork leg and is independent of the front wheel.
Here is a photo showing the interface between the front wheel and the disc carrier. When you tighten everything up on the front end those two parts sort of lock together and are only held together by pressure from the front axle.
Next I installed the dust seal on the left side of the front wheel and then the speedometer drive, which I have already disassembled ,cleaned and greased.
Continued in next post........
Last edited:
With the speedometer drive installed, now the front wheel can be lifted and the front axle slid through the left fork, speedo drive, front wheel, the disc carrier, and the right fork. PHEW!! That’s a lot of stuff to support and align while trying to wiggle the axle through!
Now that the axle has been slid through all of that , I give it a few taps to make sure it’s seated fully and install the final nut (FINALLY) the castle nut that holds the axle in place and insert a new cotter key.


( I know you don’t see a cotter key, I did it later)
Let’s talk for a moment here about how I very narrowly averted disaster at this point.
 What is it with me knocking bikes over? Huh?
Here I’ve got my bike up in the air, on my bike jack, and I have two tie down straps holding it on, one on each side at opposite corners. I was tightening that great big nut that holds the brake disc to the fork leg, when suddenly my bike scoots sideways on my bike jack, the tie down strap went slack and it came within a fraction of an inch of falling off the side of the jack and falling to the floor! I quickly got another tie down strap on the other side and managed to scoot my bike back to the center AND THEN fastened the bike with tie down straps on EACH corner.
I just about crapped my pants!


Anyways.......
Then I broke out my new brake caliper and installed it. It was pretty straight foward with no surprises.


This calls for a SPECIAL SHOUT OUT !! To Geedubya, my brother from another mother!
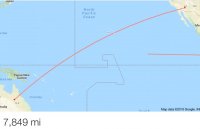
Eight months ago he sent me a new brake caliper decal to be part of my bike. All the way from Queensland Australia , a distance of nearly 8,000 miles! And I just wanted to say thanks GW ( Gary ). You rock!


A little bit from The Land Down Under on my bike!

That pretty much concludes today’s mis adventures. A few parting shots.....


Later,
Bob
Now that the axle has been slid through all of that , I give it a few taps to make sure it’s seated fully and install the final nut (FINALLY) the castle nut that holds the axle in place and insert a new cotter key.
( I know you don’t see a cotter key, I did it later)

Let’s talk for a moment here about how I very narrowly averted disaster at this point.
 What is it with me knocking bikes over? Huh?
Here I’ve got my bike up in the air, on my bike jack, and I have two tie down straps holding it on, one on each side at opposite corners. I was tightening that great big nut that holds the brake disc to the fork leg, when suddenly my bike scoots sideways on my bike jack, the tie down strap went slack and it came within a fraction of an inch of falling off the side of the jack and falling to the floor! I quickly got another tie down strap on the other side and managed to scoot my bike back to the center AND THEN fastened the bike with tie down straps on EACH corner.
I just about crapped my pants!

Anyways.......
Then I broke out my new brake caliper and installed it. It was pretty straight foward with no surprises.
This calls for a SPECIAL SHOUT OUT !! To Geedubya, my brother from another mother!
Eight months ago he sent me a new brake caliper decal to be part of my bike. All the way from Queensland Australia , a distance of nearly 8,000 miles! And I just wanted to say thanks GW ( Gary ). You rock!
A little bit from The Land Down Under on my bike!

That pretty much concludes today’s mis adventures. A few parting shots.....

Later,
Bob
Looking damn good Bob!!!!!! Strangest disc brake and wheel design I've ever seen, but it was an early one.
Scott
Scott

