Beautiful Bob - simply beautiful!

I’m just catching up a bit - so I hope you’ll permit a little flashback question: how did you attach the “Yamaha” decal to the front caliper?

Pete
 
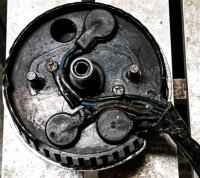
Another tip, the wiring for the instrument lighting.

If the bulb wiring is sufficiently knotted, it'll push the instrument upward, aggravating installation and vibration. Try to get the wiring to lay down as flatly as possible...
XS1B-TachBack02.jpg
 
Yes. A light is shining. I always knew it was the flasher relay, making that “ boingclick” noise when I turned on the ignition. Knowing why it makes the “boingclick” noise is very satisfying. I always imagined the relay being a simple bimetallic type. Thanks for the info, again.

I thought the signal relay was a bimetallic relay also.
 
Ever have one of those days?

I went out to my lair, fully intending to do Something....and all I did was chase my tail for hours. I’d start something and realize it wasn’t ready to install yet. Then I’d mess around with it for a while, then get distracted with something else, then rummage around in my parts and on and on, and in the end, Nothing done, not one thing.
I wasn’t focused and was way easily distracted. I gotta get my head in the game.
1F043A34-BA9B-4164-A309-628ADF531203.jpeg
 
Bob I seem to have had a day like that for the last year or so. Some times I think I spent more time looking through my stash of XS2 parts for your bike than working on my projects! Not that I'm complaining, at least it keeps me familiar with what I have out in the barn.

I have a little excuse as had two cataract surgeries and a rupture tendon surgery on right hand since late summer and now it's time to spend some more quality time with snowblower trying to get access to wood pile before we freeze to death in this cold!

And as soon as I feel up to working on a two or three wheeler I have a GTV300 Vespa that is due for new drive belt and an oil change to keep the wife happy.
 
Hey I just wanted to back up a moment and give a shout out to Machine ( Randy ) from Washington state. A while back when I was rebuilding my original tail light, all of my original rubber was in bad shape and my efforts to restore it fell flat, I wound up improvising with all kinds of cut up grommets and rubber washers.
Well yesterday the mailman delivered a packet
from The Pacific Northwest, guess who?
My buddy Randy robbed all of the rubber bits from a spare tail light assembly he had and sent them to me! What a guy!
857AF804-DCC8-4501-85BF-6F2BF43FBCCF.jpeg


So this morning I broke out my tail light and installed all the correct pieces and mounted up my tail light!
853C9746-F385-4FFC-9F36-A50AFDBCC268.jpeg
6E2EDDBA-22A0-4236-B4C0-0FB776996DC9.jpeg

He even sent me some garage art!
738CD5E5-3E99-4BFC-81B2-27E32B55F907.jpeg

Thanks Randy! You rock buddy! :thumbsup:
 
Last edited:
This bike is a world wide collaboration. Randy, Gary, GW, KS Hansen, Steve (2M).... Daniel. I'm sure there's others. Ya gotta love this place :D

Yourself included in there Jim. You machined my valves for me , received them, machined them, and mailed them back same day! And provided me with a NOS chain guide!

What a community here. Proud to be a part of it.

I know, I am truly humbled that the guys in this forum have so happily pitched in on my project. And others too. The members here root for your success and are so giving. It’s awsome.
 
Hey I’m looking for input here. I want to restrict the size of the openings in my breather to reduce the amount of oil fumes that collect under the bike. I’d like the bike to appear stock. I’m thinking about JB Welding some Machine nuts in there. It would take each opening from 10mm down to 3mm. Too much? Nothing has been done yet, just noodling.
AE87E4F9-B375-48C6-AB61-0E0EBA4A7650.jpeg

74122A87-70E4-48C2-86CB-E5DE00F51EFD.jpeg
 
Last edited:
Back
Top