PICS - The "125 pound engine" has arrived - (Cheney framer streettracker)

Jeeter

XS650 Addict
Messages
226
Reaction score
1
Points
16
Location
desert southwest, az
This engine is the one I bought from a forum member for my Cheney framed rigid frame streettracker. I was all worried because the FedEx tracking information listed the engine with pallet as weighing only 125 pounds (link to that thread here) ....

http://www.xs650.com/forum/showthread.php?t=34318

It showed up this morning at about 8:45am, the crate was re-done at some point in the ride.

Here's how it was crated when it left the seller's location on Monday March 31st 2014 ....

100_1635.jpg

100_1644.jpg

And here's how it showed up here this morning (Friday April 4th, 2014) .......

IMGP1927.jpg

IMGP1934.jpg

I'm guessing it may have been redone because the crate came apart or the engine wasn't properly secured in the crate at some point. No real answers on that one. However since the crate's screws seem to have been reinstalled (look at the lowest-most corners of the crate, see the srews?) it looks as though it was purposely disassembled and then the engine was banded-down with a Band-It tool to properly secure it from rolling about, and the box with the carbs and hardware was then taped to the back of the works.

The exhaust studs seemed to have survived (far better than the spark plugs did) ...

IMGP1947.jpg

IMGP1948.jpg

The carbs look "ok" as well. At least so far.

IMGP1969.jpg

IMGP1971.jpg

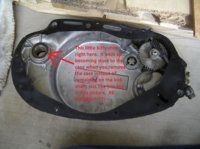
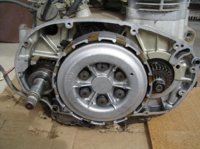
The left case was only secured by one single case screw, and it was loose. So I was able to easily remove the left side to see what lurked beneathe.

IMGP1959.jpg

IMGP1961.jpg

IMGP1963.jpg

IMGP1982.jpg

So far this engine appears to be about what I expected for a 1981 XS650 engine with carbs for $250 (which included shipping). So far, so so. (haahaa).

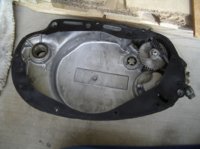
Ok, so since I have yet to obtain an engine manual, I need to go on-line and see what the head removal procedure involves. I'll get the head pulled, shoot more pics, post them here. Before that I'll remove the right side cover, shoot, post.
 
Last edited:
Interesting. Uncrating and strapping that thing down.

Somebody lost money on that deal.

Unless the secret contriband survived the trip.

Any fins bent?
 
Interesting. Uncrating and strapping that thing down.

Somebody lost money on that deal.

Unless the secret contriband survived the trip.

Any fins bent?
Not a single fin is bent or damaged, I looked it over very carefully. I looked in the intake ports and haven't seen the remains of a human hand or a kilo of blow or anything so far. :wtf: ????? :doh: :laugh: :laugh:

I dunno man, I actually may have (knocking on any wood I can find) got a nice deal here. (ducking, looking up, waiting for that lightning bolt to hit...). I mean, yea, there's some work to be done here with it, but still.

Right side looks pretty good. My brother and I are playing with this thing today, and when we went to remove the right cover we pulled the kick shaft out with it, consequently pulling the spring lock and spring hook from their perches. No bigness, I mean it's coming down to it's nickers anyhow.

But yea, check the right side there. Pretty clean, there's a little (very little) black residue in the lowest spots of the right cover (fine grit, very little of it, and it's all very fine with no big chunkies in it). The primary gears aren't sharp edged, and it basically looks about like an operating room in there (aka clean).

Dang man, so far, so good..... (now back to locating head removal info, I've located a PDF manual for $7, but I don't know if it's worth a damn. I know I need to eventually buy the Clymer or Haynes or whatever manual for this engine/bike, but for now I just need head removal info so's I can take a peek at the upper end of this engine. It's all about patience and keep-on-keepin-on, I'll find it!).

:thumbsup:
 

Attachments

  • IMGP1986.jpg
    IMGP1986.jpg
    127.3 KB · Views: 255
  • IMGP1988.jpg
    IMGP1988.jpg
    100.2 KB · Views: 271
Uncrated? Yeah it was uncrated alright.
With a set of forks, after it was pushed into a hole
too small for it to fit in.
Hope you don't find serious damage.
 
Uncrated? Yeah it was uncrated alright.
With a set of forks, after it was pushed into a hole
too small for it to fit in.
Hope you don't find serious damage.
Not a mark so far! :thumbsup:

There aren't even fork lift marks under the pallet, so I'm not sure it even got handled with one. Maybe a pallet jack. In any case, it does not seem to be freight-damaged at all so far.

I personally think it got recrated because it was ~rolling~ around in the seller's crate. Something/everything came apart for whatever reason and was totally put back together in a different manner than the seller set up.

Meh ... for all the info we have on this it may as well be an airliner lost over the Indian Ocean. I'm just taking it for what it is, face value, realtime. It's here, now. Whatever it has going on with it is my problem now, regardless of what may or may not have happened to it en route here. Y'know whut I mean, Vern?

:thumbsup:
 
The biker.net link is for a downloadable copy of a factory manual.
Leo
 
In your last pic, the one of the right cover, don't lose that shim washer oil clinging to the kick starter shaft hole. The starter gear assembly will have too much in/out play if you do. There's an engine rebuild tip thread here somewhere. Lots of little tips to make the topend job go easier. One I will give you now is to use two 22mm wrenches on the bottom of the oil pipe to break the gland nut loose from the fitting. Leave the top banjo bolts in place until the bottom is loose. Once the pipe is off, the fitting needs to come out too. The flats of it's hex overhang a lip on the cylinder base and will prevent you from lifting the jugs .....

OilPipe.jpg

Excellent information, thanks for posting that. :)

Regarding that starter shim, I caught it right after I took the picture. I placed it back on the shaft before replacing the shaft into the engine before I put that cover back on. But thanks for the mention, it's something any/all of us backyard bike butchers need to be aware of. :)

Let me mess with a photo of that shim and post it here to make things super clear for lurkers. I'll be back shortly. :)
 
Starter shim issue that 5Twins brought into light .....
 

Attachments

  • Kick shaft shim warning-1.jpg
    Kick shaft shim warning-1.jpg
    107.6 KB · Views: 279
  • Kick shaft shim warning-2.jpg
    Kick shaft shim warning-2.jpg
    144.7 KB · Views: 263
Some peeks at the engine. I haven't had much time to work on it today, and we've also been working on making space on my engine bench. I made this nice super-stout bench that has a stainless steel top on it that was once part of a dishwashing system at a local Pizza Hut. The top has these 1.5 inch high edges all the way around the top so it's fantastic for tearing down bleeding engines, carbs, forks and so on. I made wooden work pads that are about 2ft x 2ft to place engines on instead of placing the engine directly on the stainless steel surface. It worked great on the last engine I did which was a 1982 Honda V45, the coolant and oil that was still pooled inside of the engine just collected on the table as I tore it down, and it was a cinch to clean up. So I have this trick bench I built a few years back that's just great for tearing down and rebuilding engines, and here it has been a shit-collector for about six months. So step 1 is to make some room in the bike shop. I have a lot of stuff I need to sell, the pictures may provide some clue of that. :doh: We got us some frames (um, 5), 3 sets of forks, 8 wheels, shelves full of bike parts. Most of which is financing this project. Our newest member of the idiot bike clan is CooCoo, our rescued feral 1 year old Hemmingway Tuxedo cat. She has actual opposable thumbs, like people do. Ernest Hemmingway was known to collect these cats as he felt they brought him good mojo. She's the moto-shop supervisor, end of sentence.

Yea, yea, I know. It looks like a giant motorcycle eating dragon took a massive deuce in there. Believe it or not I know where everything is. I recently bought a lathe and a mill so we're still in the process of getting things arranged properly. Those two machines took up a lot of space when everything needed is included (working space, tool chests, the machines themselves, storage for tooling, power considerations, and so on) as well as my MIG and TIG welders. So we're still getting things organized. As more of the Honda stuff is sold off of course more room for Yamaha stuff will be created! I should have waited until some of this stuff was sold off before I began buying Yamaha parts, but hells bells guys ... I just couldn't wait! :D

IMGP1990.jpg

IMGP1991.jpg

IMGP1992.jpg

(Below) my brother slavin' on the YZ400 fuel tank we bought from member RacerDave (he's sanding the paint off of it). There's two more Honda frames there in the "welding shed". My lathe in the immediate foreground.

IMGP1999.jpg

So we've been just toying with the engine out on our driveway. We'll get it moved up on to that bench ~hopefully~ tomorrow. I haven't been feeling my best so I can only work when I feel up to it.

Here's a few little nonsense pictures, peeking inside of the valve covers and another spot or two.

RIGHT REAR:

IMGP2022.jpg

RIGHT SIDE:

IMGP2027.jpg

RIGHT FRONT:

IMGP2031.jpg

LEFT FRONT:

IMGP2032.jpg

LEFT SIDE:

IMGP2035.jpg

LEFT REAR:

IMGP2038.jpg

I'll see if I can get a decent shot of the progress on the fuel tank tonight. If not, I'll do it in the morning.

:bike:
 
Dang it, I'm a total moron. I thought I was posting this in my project thread. UGH. Sorry.

I may copy the above post into the project thread, just because I'm a lazy punk (and because it's after my bedtime. I have my Charlie Brown "footsie" pajamas on, my hot coco, my night light has been turned on, and I have the May 1988 edition of Penthouse under the covers, so I'm all ready for bed. Erm ... wait. (heheh ..) :)
 
Naw, you could just consider this your 'engine' thread, use the other for the build.

Interesting, points in there. The advancer seems to be okay.

May want to check the engine s/n against 650Skull's VIN ID thread. Also, just for fun, may want to check the casting ID stamps, to ensure they match. There's a pair in the center/front of the head and camcover. Another pair behind the clutch.

Opposible thumbs cat? And I thought I had the only ones, have to tell them about yours...
 
I am curious, if that starter shim were accidentally left out, then what is the result? We have an XS650 that needs to lean a bit to the left or the kick starter won't engage. This shim maybe the culprit?
 
Weaselbeak, if you can move the kickstart shaft in/out more than about a millimeter, then the washer may be missing. But the left lean to engage kickstart may indicate a problem with the drag clip, or a conspiricy to influence your political thinking...
 
Yes, you may have something assembled incorrectly. My bike came to me missing the shim washer on the kicker shaft but the kicker always worked fine. It just had too much in/out play on the shaft. I could push/pull on the shaft and see it moving in and out of the case (seal), more so than I thought it should. And I was right. Once I added the shim washer back on there (swiped from an SR500 parts motor), all was well again.
 
Back
Top