Right Hand (clutch) cover stuck! Help Please.

estcstm3

XS650 Addict
Messages
188
Reaction score
11
Points
16
Location
Space Coast Florida
Right Hand (clutch) cover stuck! Starter Gear Clip Fix

Hi All,

I am attempting the starter gear/clip fix and have removed the rear brake, pedal, kickstarter lever, tach cable, and all allen head bolts (checked twice to make sure had all bolts). I brought out the rubber mallet and gracefuly whacked the cover in various spots hoping to loosen it up and nothing. I can pull and pull and I am not budging it. I started to look closely at the seem and there is this cream rubbery looking substance, very faint. My fear the PO used some sort of gasket sealer.

What options do I have to get this thing off? The cover is in great shape so I dont want to damage it.

will try to post pictures later.
 
Last edited:
Yup, some PO probably used silicone, the most mis-used sealant in the world.

If you have a piece of round stock (even a phillips head screwdriver will work in a pinch) insert one in each of two holes as near to the horizontal midline as you can find and gently rock it up an down a bit to try and break the bond. There are, if I recall correctly, two locating pins so don't overdo it, you'll break something.

You might also try a razor knife around the seam if you can get at it. Again, CAREFULLY.
 
Thanks. Dont have round stock so would have to use the screw driver or maybe my long punches. Not sure I can get a razor into the seam.

Is it worth spraying PB blaster anywhere, heat?
 
Real bad stuck like that; I will tap in a stiff blade putty knife in a few places. once it starts to loosen, work the putty knives toward the tight side of the cover. Use a couple of knives stacked or anything wide and flat you can work into the crack, one top and bottom of the cover. Then use your rubber mallet pound in on the loose side of the cover the flat knives will act as a fulcrum pushing in the loose side will open the tight side. You will need a new gasket and will have a nice hour or so oh so carefully removing all the goop from both surfaces. I like utility knife blades with some duct tape wrapped around the back to protect my fingers for silicone cleaning. You must pull and check both oil filters of any engine that has been attacked by a silicone monster. Would be wise to pull the banjo bolts between the head and oil feed tube, kick it over with oil in to be sure you have oil flow to the head. Or remove the adapter at the feed tube's base, there is an orifice there that can get plugged with silicone.

Good luck! Tell us how it goes?

I have a few putty knifes with the blades ground sharp and the corners rounded so they don't gouge the aluminum on the way in.

Even Yamaha used a bit of sealer on that gasket where the crankcase top and bottom halves join.
 
would you all reccomend that I take off my exhaust pipe? How are you getting the putty knife in through the bottom with the pipe there? So you dont think ill gouge the case by trying to insert a putty knife between the two?
 
Okay so following a combination of advice i have gotten it to loosen up,not off yet but i see day light. I was able to hammer in a razor blade from the top with a rubber mallet. I kept the blade halfway retracted to try and prevent it from breaking in half. I then was able to strike it forward about half inch. I did that in two locations on the top. Then I found a 1.5 wide putty knife (dull edge) and was able to hammer that in and work it along the top. Afew more whacks with the mallet against the case and I was able to get the to p to break free. I should...be good from here. Thanks! I have another gasket so im good there.

Oh when I took the screws out only my right two (middle and the one below middle) had copper washers. Will any coppper washer work that I can get from ACE or Home Depot? I hate to pay shipping just for afew tiny washers.

Thanks
 
Yamaha did and does use a sealant on the case halves as well as the rocker box to head surfaces. This sealer was designed to seal metal to metal surfaces. Not gaskets.
This sealer seals the surfaces but won't "Glue" things together.
Most gasket sealers will "glue" things together.
A lot of us on here don't recommend any gasket sealers. Most use motor oil, grease, or anti-seize.
These will seal the gaskets and allow the parts to come apart with little or no damage.
On your side cover you are going about removing it. I might add using a paint stripper to soak the old gasket, this will help dissolve the old gasket and sealer.
Once removed use the paint stripper to completely remove the oi;ld gasket and sealer.
Leo
 
On the copper washers, IIRC there are only two needed. And yes, pretty much any copper washer that fits will do. It should be quite thick in relation to it's diameter.

It's purpose is to act as an oil seal, it crushes when the bolt is tightened and seals between the bolt shank and the hole in the cover.
 
thanks. I picked up some permetex gasket remover. I also need to do that to my sump plate which has had a super slow leak since I last replaced my sump filter, so this is a good opportunity to clean both the right way.

Xsleo - Since I am newer to this. You said something about putting anti-seize or oil on my "paper athena" gasket is that correct?

Best,
Justin
 
Yes, as Leo said, many of us "lube" our new gaskets with motor oil, grease, or anti-seize. I find brushing them with motor oil to be the easiest and simplest. I brush both sides, let the gasket sit 5 or 10 minutes to let the oil soak in, then install. This allows you to easily remove the part up to several times usually and re-use the gasket. Where you'll benefit most from this is on your oil filters. You may squeeze as many as half a dozen changes on the sump plate, maybe more, and many more than that on the side filter.
 
Actually, 4 copper washers were speced .....

RightSideCover.jpg


Sometimes, many times actually, the washers stick in the case holes. You might want to clean those lower holes and check. Also, check the oil filter cover screws. Many times, two seem to make their way up there onto those screws, even though they're not called for there.
 
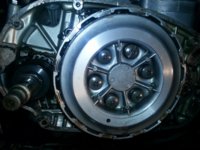
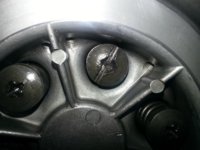
Not sure if I should start a new thread, but how in the world am i going to get this off? I was able to break the other clutch screws free, but this one the PO has RUINED. Where it used to be a phillips it looks like they filed a notch for a flat head? I dont know how I can torque anything in that slot enough to break it free. Its the top screw the pic isnt the best.

Defintely need help here. I dont have a welder or I would maybe try to weld a nut to the screw and then back it out that way.

Please help
 

Attachments

  • 20141025_113856.jpg
    20141025_113856.jpg
    240.1 KB · Views: 184
Those screws got messed up because someone didn't use the right tool.
Get a Hand Impact Tool. It has a set of bits that properly fit screws. You set the tool, hold it snug in the screw, turning slightly in the direction you want the screw to turn. Whack it with a hammer. The force of the hammer pushes the bit solidly into the screw, Then the tool uses the force to turn the bit.
A few whacks gets most anything loose.
This one from Harbor Freight cost around $10. Well worth the money. Other stores sell similar units. This one has a large ring on the handle to help not hit your hand. It comes with the standard 4 bits as well as two long bits.
You can pull the bit holder off and use regular 1/2 inch drive sockets on the tool.
Or use an adapter to use 3/8 sockets.
One of these tools will even get that very mangled screw out.
Leo
 

Attachments

  • image_17210.jpg
    image_17210.jpg
    5.5 KB · Views: 115
first time I used that hf one, it flew apart. Took it back, replacement did the same. Shit canned it got online and bought a vessel for 10 bucks. Bits and case.
Monster.com has a replacement set that uses capscrews instead of Phillips.
 
thanks Leo. I have the other HF impact driver its a skinnier metal one, but it only came with Phillipsh #2 bits. It was pretty ineffective.... I was able to get all of the other screws off with my trusty 18v Ryobi impact driver with a #3 bit (without stripping).

The stripped one in the pic there is no philips x left at all so my power impact driver will just make it worse. Are you saying a "better" hand impact driver could get that out because it will make an impression of the phillips head and then I can work it loose? Anything I can do off of the notch?
 
use a regular bit in your impact. cut the slot deeper, though. looks kinda shallow. Get the replacement kit. Those bolts u got are trashed. might as well get heavy duty springs whilst inthere, and mic your clutch disks.
 
What you might try is a drill bit. That screw is shot. Put the others back in snug. This will hold the pressure plate then use a drill bit, a 1/4 inch should do it. Drill the screw deep enough for an easy out.
Yes a thin coat of grease oil or anti-seize on both sides of a gasket helps remove things without destroying the gasket.
Leo
 
speaking of which what ft/lb should these screws be torqued too? How are you all measuring the torque? I have torque wrench but not any phillips heads that fit it.
 
Back
Top