Solid Bushings

Uncle Bryan

XS650 Addict
Messages
161
Reaction score
5
Points
18
Location
Las Vegas, Nv
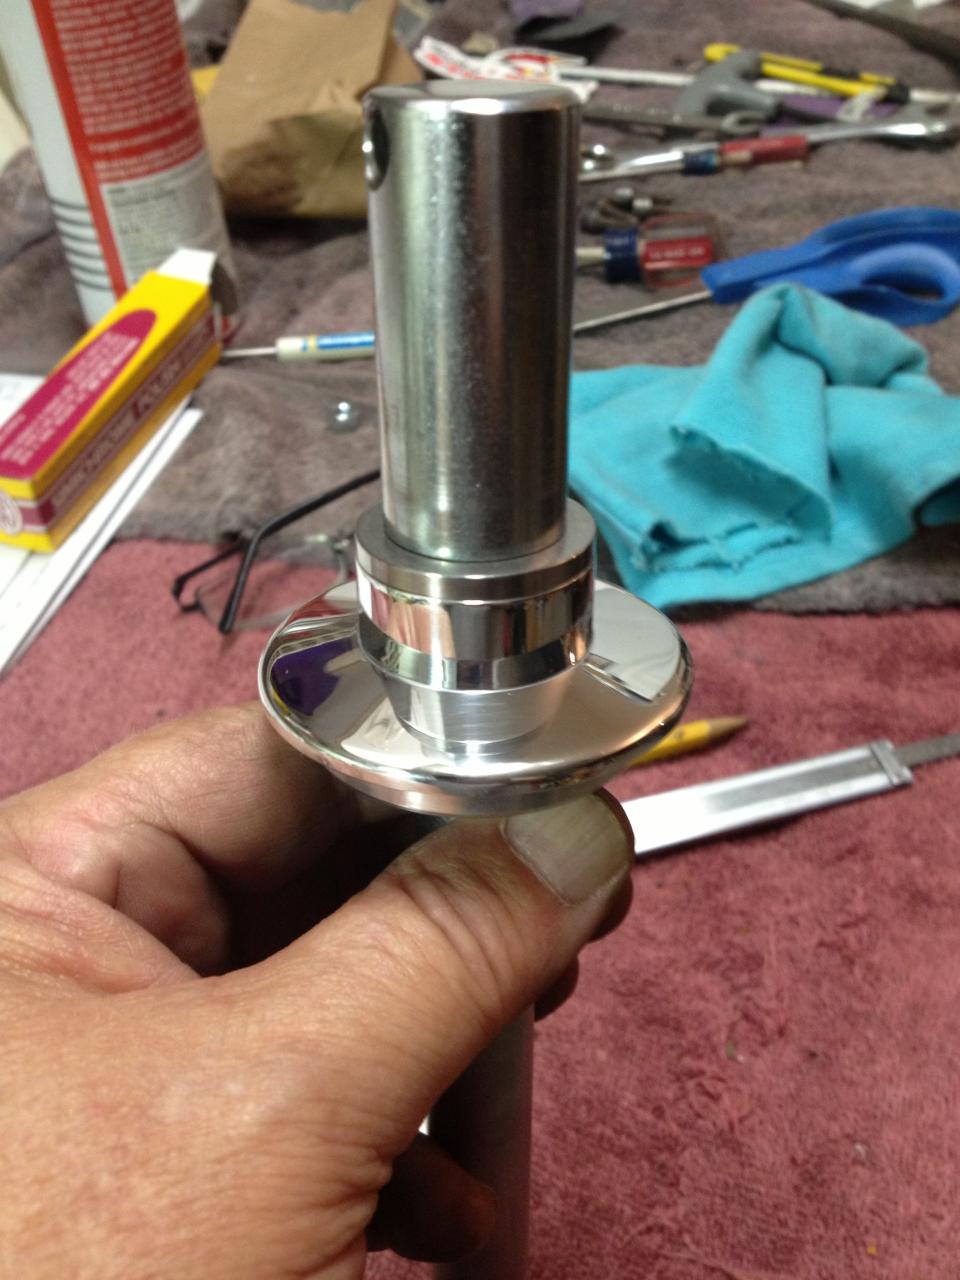
So I decided to make a set solid handlebar bushings. Go ahead, be honest, how'd they turn out?

full
 
full


They seem a bit....errm...fluffy........:confused:
Probably would work well with reducing vibes, but I'm not so sure how you will mount them..............:shrug:

Love the "wool effect" you got going on them!:laugh::D:thumbsup:
 
OK OK, here's a few more shots.

Once the smaller dimensions are finished, I grab the hacksaw and cut the work piece off of the spinning bar-stock. You have to have a good hold on the saw because if you let the lathe grab it, things get real interesting real fast.
After it's cut off, I flip it around and put it back in the lathe, finish machining it and bore the hole.

full


I love it when a plan comes together.

full


Installed.

full


Getting rid of the rubber bushings, those effing rototiller bars and adding the tapered roller bearings really tightened up the front end.
Up next are the front wheel spacers and new bearings.
 
Spin the top of the work AWAY from you when using the hacksaw for a parting tool. That way the wall gets it instead of you if you snag up or otherwise lose control. Install the blade backward on the frame so you still get the handle.
 
Spin the top of the work AWAY from you when using the hacksaw for a parting tool. That way the wall gets it instead of you if you snag up or otherwise lose control. Install the blade backward on the frame so you still get the handle.

That's what I was thinking... Same idea as deburring with a file.
 
Not many of us left anymore using rocker posts, a dying skill. How do you tighten that chuck?

Pack that swarf in your ridin' gloves to handle vibration...
 
Spin the top of the work AWAY from you when using the hacksaw for a parting tool. That way the wall gets it instead of you if you snag up or otherwise lose control. Install the blade backward on the frame so you still get the handle.
Yup, that's how I was taught to do it too. However, my reflexes aren't what they used to be so my hands tend to forget to let go of the hacksaw and I have found that I don't like getting sucked into the lathe as much as I used to.
Doesn't really matter, Buddy. There's more then one way to skin a cat. :wink2:
 
Not many of us left anymore using rocker posts, a dying skill. How do you tighten that chuck?....
For those that don't know, this is a "rocker post". It's how the lathe holds the cutting bit. It saddens me to realize that 2Many is right and they just don't use these anymore because it takes too much time to set them up, but they allow you almost infinite cutting angles and bit sharping angles too.

full


As far as the chuck goes, I think it's pretty standard, just a square drive Tee handle.
It has a "scroll gear" behind the jaws.

full
 
So I went ahead and made my wheel spacer (speedo delete)
Before we proceed, I'll freely admit that my old friends say that I did too much acid when I was a kid.
Here's the inside, nothing special here...

full


So we go to the outside...wut...what is this sorcery?

full


full


full
 
Hahaha, you spaced out and slipped into 'lathe land'. If anybody asks, tell them you dual-purposed the spacer as an emergency oil funnel...

Nice polishing...
 
BTW, there are only two angles on this. One is parallel to the axle and the other is 12 degrees left of 90 to the axle. :)

I had to take a dozen shots before I got one that wasn't reflecting on itself.

full
 
Nice work! Cool illusion too.
My inherited South Bend 9" is still "rocker post" but I did buy it carbide insert tool holders.
 
Back
Top