Spending too much time on my timing! HELP!

WannabeMike96

xs650 birdbox challenge. help me.
Messages
31
Reaction score
47
Points
18
Location
NYC
Guys, please help me. I’m completely at a loss and don’t know what’s going on. After I static timed my motor it started right up and ran strong. I took it around town a couple of times in a couple of days as a testers (mainly cause I was waiting to time it dynamically to ensure I’m running within spec)
Ok let’s start the brain scratching.

1978 XS650 special

Today I got it up to temp (ripped around the side blocks for 15 mins) and planned on setting the dwell on the points and dialing the ignition dynamically.
My dwell was pretty close from the start, I got both points to 22.5 with no problems.
I used my timing gun on the flywheel and it was showing that I was sparking in the middle of the full advance mark and the Fire mark.. it was running real nice where it was at but I dont really have anything to compare it to.
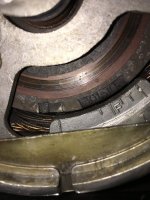
I went to adjust my timing plate but the plate was maxed in the direction I needed to go. The backing plate (right cylinder) was maxed in the counter clock direction. When I tried moving it the other way it ran like crap and actually stalled.
I didn’t know what to do, I checked the cam chain tensioner and it was good (center pin was flush)
I started to static time it again to see if I can fix or find something.
Pulled the exhaust valve covers off to make sure I was working on the compression stroke.
I set up my test light and everything to static time and I can’t get it to light anywhere near the fire mark... I get a light when I’m between the fire and full advance mark..
WTF!
There’s nowhere to move the plate, I really don’t know what I’m missing, I dont think that this plate should ever have to be maxed in one direction.
PLEASE hit me with everything you got, I’m a novice at timing it might be simple and obvious to you (I hope) but please just point me in a direction, thanks guys!

It was running fine at this setting (plate maxed counter clock)
DB92388A-9ACF-494B-8C81-6CAE9AD44BF1.jpegFA330665-0F00-46B9-AFBB-B25553952CF1.jpeg

And this is the plate maxed clockwise
14A5799E-3364-49CF-9620-F403F19F8EF1.jpeg D57661F5-FA7E-4BAE-98C7-0A9E27A708A8.jpeg
 
I'd guess either cam chain stretched too much and/or worn/stuck advance mechanism. Pull the right cover and give us some closeups of the advance.
 
0BE93B9B-575F-43E4-B85F-493058CCEAB0.jpeg
I'd guess either cam chain stretched too much and/or worn/stuck advance mechanism. Pull the right cover and give us some closeups of the advance.
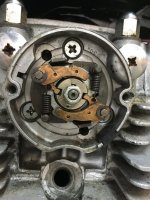
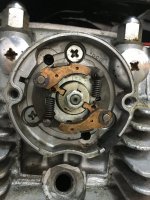
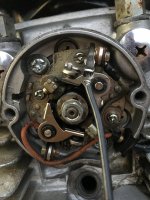
Happy to hear from you Jim, here’s the advance
 
Does the advance rotate smoothly?
 
Does the advance rotate smoothly?
Do you mean the little bit of “play” in the cam on the points side? I can rotate it a little bit back and forth (clock and counter clockwise) without the cam moving, that is it’s purpose right?
 
Remove the left valve covers.
Rotate the engine normally until the left exhaust valve is almost closed.
The left intake valve should be starting to open.
This is at the valve overlap position.
Rotate the engine back/forth a little until you get to a point where both valves are equally opened.
Take a pic of the rotor timing mark, like you did above, and post it...
 
Hey @TwoManyXS1Bs ! This is the position of the flywheel with the left cyl valves at overlap (as centered as I could possibly get).
025DF014-D00C-470E-9E40-6A57371C1991.jpeg
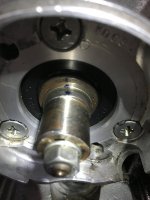
Here’s the cam journal at resting position to full advance (marked to show distance traveled).
78A1C02F-0AAE-4F9B-BD04-5EE43BD8327B.jpeg 962B1E4C-1BFB-4C03-8132-47AD779DA949.jpeg
Same thing for the advance mechanism, full rest to full advance.
4E5E31DA-9AC8-4D6D-A0F2-6017A61F3E39.jpeg 5B35A454-C092-47F3-8431-66E577B8A61B.jpeg

I hope this helps guys, thanks for all your help!
 
From the pic, your advance appears to be working. Wouldn't hurt to remove it and give a good clean and lube though.... as most people never bother.
Reading back through this, I'm not sure you really have a problem. Maybe dry time it again and then shoot a video of what the timing light shows?
I used my timing gun on the flywheel and it was showing that I was sparking in the middle of the full advance mark and the Fire mark.. it was running real nice where it was at but I dont really have anything to compare it to.
You won't show full advance until you rev it to about 2500-3000rpm. Like I said... a good video would help.
 
Was the bike idling properly in the 1100-1200 RPM range when you took the timing light reading? If it was higher, say 1500 to 1800, the advance unit would already be starting to advance the timing and you would get a reading between the "F" and full advance marks like you did.

I'm not sure what 2M was looking to see with his test about cylinder valve overlaps, maybe a way to verify cam timing is correct. You probably should do that anyway, but the usual method is to place the rotor mark on the stator TDC mark then check the locating pin hole in the cam for the advance unit. It should be pointing straight up or straight down depending on which cylinder happens to be at TDC on their compression stroke. Another issue might possibly be with the rotor mounting. It mounts on the end of the crank using a woodruff key to properly "time" it, lock it in the right position so it's timing slash mark correctly aligns with the stator timing marks. If someone mounted it without the key, it could be off.

If everything is mounted and aligned properly then that brings you back to a badly stretched out timing chain. Short of replacing the chain, your options would be to grind the slots longer in the timing plate to get more adjustment or close up the points gaps. I'd try the smaller points gaps first. Set them around 24° on the dwell meter instead of 22°. Don't run the bike much like it is. With idle timing where it is, full advance is going to be way over where it should be. That can hole a piston.
 
First off thanks for the time guys! @5twins @Jim the photos I took of the points plate maxed out in both directions was me static timing it with a test bulb and slowly rotating the crank by hand with plugs removed (started to static time after the dynamic time went south)
Making sure that I pull back far enough to account for the advance I would spin the crank in only one direction and the first light I got (I moved very slowly to get as accurate as possible) is the pictures that I posted up above.

This is all so weird because I static timed it before I rebuilt the carbs and before I ran the motor at all, I was able to get the bulb to light precisely on the F mark for both cylinders with the points properly gapped. I rebuilt the carbs and she ran damn good based on the static timing.
I obviously wanted to time it dynamically to make sure This motor is running at its healthiest state.
Could the cam chain have worn that much in that amount of time? I ran the bike a total of maybe 8 times over 2 weeks to give it some cycles, I found all of this with my timing light while the motor was running. The flash at idle (around 8-900 rpm) flashed in between the full advance and the F mark.
WTF!
 
Ok, Mike. I see a few things in your pics.

- Your camchain is seriously stretched, making the camshaft about 12°-13° retarded.
- Your advance mechanism's backing plate appears to be somewhat advanced.
- Your advance mechanism's notched retaining nut appears to be on backwards.

I'd recommend disassembling and removing the advancer unit. Inspect the backside where it engages the cam's indexing pin. Note that the notched retaining nut needs to have its little shoulder facing outward, NOT against the advancer backplate.

A good reference thread:

Posts #47 to #56, and follow the imbedded links.
http://www.xs650.com/threads/getting-started-again-72-xs2.43413/page-3#post-438061
 
The flash at idle (around 8-900 rpm) flashed in between the full advance and the F mark.
And that's pretty much normal..... although it should be closer to the F mark than full advance.. As you rev the engine, it should smoothly move towards full advance and stop just before the mark.
I'll suggest it again.... start over. Regap your points, dry time it and get it back to what you called "running real nice." Idle should be set to about 1200-1500. Lets get it running good again and go from there. :)
 
Besides lubing the advance unit parts you also need to lube the advance rod that passes through the cam. Since you will be pulling the advance unit off to inspect it's locating pin slot, this is the perfect time. You will need to pull the advance rod out of the cam. You can pull it out from the points side with the points cam still on it. Look in the ends of the cam and you'll see a bushing with grooves cut into it's I.D. Those grooves are there to hold a supply of grease for the rod. Most have not been serviced and re-greased since the bikes were assembled at the factory 30 some years ago. They're due, lol. Here's a pic of mine from the last time I serviced it. I think it was run for 5 or 6 years since the previous service. There was some grease left but I took the opportunity to replenish the lube supply .....

dhXcM3V.jpg


cc8H22E.jpg


This is a common issue. Nowhere in any of the manuals I've seen is it mentioned that this needs to be serviced and lubed occasionally so I guess you can't fault owners over the years for not doing it. It doesn't need to be done often, maybe every 5 years or so, but it does need to be done. The only place the shop manual mentions it is in the engine rebuild section, during the reassembly process. They call for a grease with moly in it to be used.
 
Thanks a lot all of you, a lot of valuable info here! Going to hit the drawing board this week and prep for next weekend when I’ll be back at the garage. Living away from my garage is killing me haha I’ll definitely let you all know what happens after I do all these steps! Thanks again!
 
When you rotate the advance rod to open the weights on the advance and release it, does it snap back to the retard position?
This could be part of it. When you initially timed it the rod was where it should be. When you started the engine the rod turned a bit and stuck there instead of returning fully.
Cleaning and lubing the rod and bushings should take care of that. If not there are ways to fix it.
Leo
 
Back
Top