Visual Impact BRAT KITS

Nope,,, swingarm stays the same length so the chain stays the same as the factory one,,, only change is the shock length from swingarm to the new top shock mount location...

I hope that helps :)
 
My vi brat kit showed up a couple days ago, about a week earlier than promised. Under promise and over deliver, awesome. Nice craftsmanship, stoked to get it together and rolling down the street.

I'm building it with rebel shocks, anybody have suggestions as to what bolts and spacers to use since the shock eyes are narrower that he mount?

I'll post pics after its together.

Posted via Mobile
 
Hey glad you are happy with your pre welded kit. You can make spacers to take up that room. You can use washers or pretty much anything to take that space up. I make the top mounts wider in case you upgrade or want to change to different shocks. Many have different width eyes so it makes swapping easier.
 
Since I said this thread needs more pics ages ago here ya go!

531616_4229075684296_801253080_n.jpg


375606_4229137285836_128685837_n.jpg
 
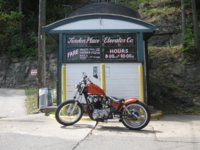
Here's the progress on this brat kitted '78. We ended up using 10.5" Burly Slammers made for Sportsters. It's a good choice for the XS650 Brat conversion for a few reasons. It is more or less bolt-in with essentially no modification required. In addition, it's a pretty solid and reputable shock if you're trying to get lowww. Lastly, there is probably a good amount of used shocks available if you decide that new isn't essential.

xRQpg.jpg


In order to run them you need to create an additional sleeve so the mounting bolts of your XS650 will fit in the eye of the shock. You can make them by sourcing some materials from your local hardware store; I have a write up on the build thread for this bike.

Or, I am offering a kit to adapt the Burly Slammer Sportster shocks to your XS650 brat kit project, or any metric bike where the shock mounting bolts are ~10mm (M10) in diameter.

The kit will include:

2 x Grade 8 M10 x 45mm bolts (for top shock mount on Visual Impact Brat Kit)
2 x steel washers
2 x steel serrated flanged nuts
2 x stainless sleeves cut to fit top mount of Visual Impact Brat Kit
2 x stainless sleeves cut to fit XS650 swingarm shock mount

Will be launching a paysite shortly, but if you would like to pre-order please send me a PM with your request and email.

Anybody have any suggestions on how much to shorten kickstand with the brat kit installed?

Posted via Mobile

Two ways to go about it. You can cut it and either reattach the old foot or make a new foot. Or you could also use an oxyacetylene torch to heat up the kickstand and then a leverage bar to bend it out slightly, no cutting required.
 
Are you selling these through my shop? The info in the thread is great to see but if you plan to sell stuff there needs to be a new thread with your shop and your offerings unless you are selling them thru my place...
 
Stock shocks are about 12.75", so you will end up dropping the rear 2.25" with the 10.5" Burlys. To keep the original balance geometry you will need to drop the front by the corresponding amount.

But realize that these numbers are on the stock frame. The Brat kit's shock mounts may actually sit even lower than the stock shock mounts, so the drop may end up being more around 3" in reality.

Using the Burly Slammers and Brat kit on my build, we lowered the front 3" using Hugh's spacers and the bike looks very balanced to me.
 
Ive went back and forth between this kit and monsters but finally settles on vis impacts kit. I like the way monsters kit looks but it puts the seat at an odd angle which i think wouldnt be as comfortable for long rides. Not only does the vis impact kit put the seat more flat but you can easily set it up with a shock under the seat for an even nicer ride.
 
Frankly, I don't think monster should even refer to their kit as brat style. It's a rear loop design, I've never seen that on a brat bike...or any Japanese chopper for that matter
 
The best I can say about Monsters kit....uninspiring.

VI is where its at unless you make your own but you're gonna pay through the nose to get your rails bent properly. Most places quoted me $100 just to set up the machine even if they have the right size dyes. Then you'll also have to find something to plug the pipes that looks good. VI does it all for you at an affordable price.

Eventually I found a little shop that did the bends for me for a good price but I was calling around for a good 2 weeks before I found them.
 
Thanks for the good words fellas. Affordability for the do it yourself crowd was the whole reason we started making the kit. It wasnt about making as much as we could. It was about getting in the game and doing something in the xs 650 aftermarket. The fact that the price is still the same after 2 years should tell you we arent about screwing guys out of their hard earned money just to turn a quick buck. The kit has been a huge success over the past two years and our prewelded version has been a great addition as well for over a half a year now.
Things will be changing big time in the coming month with a whole new store and many of the new products will be items that are made in the U.S.A We have already added a really nice american made seat to our line up and also a really nice DIY weld on seat adjuster also made in the U.S.A . In the next week or so we will have the bolt kits up on the site for sale for anyone planning to run the burly shocks and we have some seriously sweet( made in america )aluminum pegs for a killer price coming as well. Things are going to be changing big time and we plan to give the same super fast email responses and support as we always have as well as the cheapest prices we can. Please keep checking back in the coming months for our all new store, with tons of new products. Chopem if you got em! VIZ www.visualimpact2.com
 
Back
Top