What have you done to your XS today?

Did a full oil filter change today. Good lord the sump filter gasket was molecularly bonded to the plate. I've never in all my years of wrenching encountered a gasket bonded so well to metal.
 
Well I didn’t really do anything but I did get something to put on. I got these on eBay. Not sure how to mount them but I will figure it out.
 

Attachments

  • 46F5D904-CB63-46A2-A452-4675ECBA5C9F.jpeg
    46F5D904-CB63-46A2-A452-4675ECBA5C9F.jpeg
    166.7 KB · Views: 239
Adjusted the air fuel screws to correct the popping on decel, 1/4 turn in seemed to do the trick. I also checked the plugs and seems its running a tad lean, light gray on the electrodes. This bike is factory origanal, correct me if i'm wrong but air fuel screw in should relate to richer mixture. I know these things ran lean from the factory so not expecting the 1/4 turn in to correct the lean condition. looks like I'll be rejetting soon.
 
Adjusted the air fuel screws to correct the popping on decel, 1/4 turn in seemed to do the trick. I also checked the plugs and seems its running a tad lean, light gray on the electrodes. This bike is factory origanal, correct me if i'm wrong but air fuel screw in should relate to richer mixture. I know these things ran lean from the factory so not expecting the 1/4 turn in to correct the lean condition. looks like I'll be rejetting soon.
I think the "running lean from the factory" is an Internet meme that has not been around as long as these machines. Maybe 80 and onward.
 
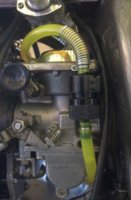
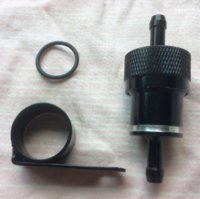
Blocked my fuel filter a week or two ago but could not access it easily due to is location between the carbs. Tried several relocations but kept suffering from vapor locks in the carbs due to the fuel lines getting too hot - hot enough for bubbling to occur. Finally settled on the following:
Parts.jpg
Cut a groove into the filter to accept an O-ring. Made a bracket with an internal groove to mate with the O-ring.
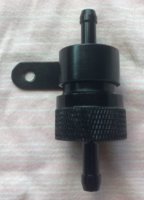
Assembled.jpg
Assembled unit where the O-ring secures the filter in the bracket.
Placement.jpg
The bracket is secured to the left carb using one of the unused M5 threaded bolt holes on the back of the left carburetor. The fuel line leads from the fuel cock to the filter and exits the filter and passes behind the left carb bowl where it connects to the T-connector which has been adjusted to face down. The fuel lines are now shielded from the engine heat and the filter is very easily released for emergency roadside cleaning. The filter is tucked in very close to the carb well away from my leg.

I am happy for now!!!!
 
Finished sandblasting yesterday. Got my heardtail aligned and tack welded into position. Measurements worked out perfect. And dropped her off to my welder to clean up some old welds and tig the new ones.
 

Attachments

  • 710CA2F5-854B-4B61-9982-37BDC54CD268.png
    710CA2F5-854B-4B61-9982-37BDC54CD268.png
    1.3 MB · Views: 236
Replaced the starter case gasket on madness chasing a "when hot" oil drip that seemed to be from that cover.
Also went through the vacuum petcock again. I had assembled the standpipe backward so got to push it to a gas station. (it fit more snugly that way....) used a bit of pop can to make a tightening shim, fingers crossed. Petcock also had a slow drip when off. Someone on here suggested lightly tapping the back of the aluminum disk that pushes the vacuum o-ring against the seat to improve the pressure on the seat. BRILLIANT! I had a pack of new o-rings I had marked as for that seal so installed one. Then set it to watch for leaks, it dripped a bit for a bit, but sat overnight and now it's good. :bike:
 
Back
Top