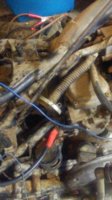
Yup - the headlight bucket is where all the action is!
-
Enjoy XS650.com? Consider making a donation to help support the site.
XS650.com receives a small share of sales from some links on this page, but direct donations have a much greater impact on keeping this site going.
You are using an out of date browser. It may not display this or other websites correctly.
You should upgrade or use an alternative browser.
You should upgrade or use an alternative browser.
delete this
- Thread starter ron bayless
- Start date
...and then Satan said "I'm going to invent electricity!" I have a Clymer's manual. In it are all the wiring diagrams for 1970-1982. They may be intimidating, but if you study them long enough, they will start to make sense. If you stare at them long enough, and start to see swimming dolphins, you've stared at them too long.
Positive identification of your year bike, and a good meter are crucial. That you are keeping/restoring your bike to stock specs, you will be dealing with all the "correct" colors and connectors. A custom gives you the flexibility of designing your own wiring harness that makes sense to you. Best luck!
Positive identification of your year bike, and a good meter are crucial. That you are keeping/restoring your bike to stock specs, you will be dealing with all the "correct" colors and connectors. A custom gives you the flexibility of designing your own wiring harness that makes sense to you. Best luck!
ron bayless
XS650 Addict
...and then Satan said "I'm going to invent electricity!" I have a Clymer's manual. In it are all the wiring diagrams for 1970-1982. They may be intimidating, but if you study them long enough, they will start to make sense. If you stare at them long enough, and start to see swimming dolphins, you've stared at them too long.
Positive identification of your year bike, and a good meter are crucial. That you are keeping/restoring your bike to stock specs, you will be dealing with all the "correct" colors and connectors. A custom gives you the flexibility of designing your own wiring harness that makes sense to you. Best luck!
thanks.I agree.
ron bayless
XS650 Addict
mr twowheel! Take the seat off you said.It will make it easier you said. I just took the seat off.3 of the 4 bolts snapped off,leaving the threaded portion in the seat.Which will of course make for countless hours of trying to extract them.Thanks a lot ese.
ron bayless
XS650 Addict
I thought maybe the brand new battery was low,it is not.I connected the left handlebar controls since they were dangling in the breeze.2 problems,the ignition switch is fubar.the right handlebar assembly has the kill switch sheared off,therefore making it most likely in the kill position.So electricity plus wiring plus greek diagrams plus a previous owners rigging is a bad combination. The ign switch,positions are? all the way left for park,midpoint is what,and should it turn all the way to the right to turn the key on> My switch is stiff like concrete.And it wont turn past the 12 oclock position.I dont kinow if spraying wd40 or penetrant would help.thanks.I agree.
ron bayless
XS650 Addict
There was a fuse box on top of the battery originally. Somebody yanked it. I see in one of your pics, they added a couple in-line glass fuse holders instead, but it only looks like 2. There were 4 fuses originally. Looks like they eliminated 2 and just connected their wires together directly. Here's how an original fuse box was connected up .....

You need to start looking at some wiring diagrams. Above is an excerpt from one. Look at several because some show things better than others. Not all will have the fuse box labeled as well as the above pic.
You have 2 heavy wires running to the starter solenoid but there are 2 smaller wires as well. Those are the ones that trigger it when you push the starter button. The blue/white wire runs up to the button. It provides the ground for the circuit when you press the button. But, for it to make that ground, the left switch assembly will need to be in place. It provides the ground through the handlebars over to the right switch and the starter button. Also, it could be as simple as a bad, dirty, rusty connection of the big cable down on the starter motor. That's all that was wrong with mine. Starter didn't work when I got it, nothing, nada when you pushed the button. I cleaned that connection up and it's worked fine ever since.
Once again you are right.He replaced the fuse box with 2 inline fuses.Those fuses are good i just checked.But as you said only 2,not 4.
I've relocated my ignition switches to the right side of the bike, below the front of the tank. All threes positioning is- left is off.
Ist turn to the right is on.....12:00 high, you might say.
When they were located between the clocks there's a third position which is the steering lock and parking lights, if I'm not mistaken. Having relocated mine there's no steering lock...of course. Never much put them in park.
So, again, left is off, 12:00 high is start and the third position may not even go unless you have the wheel turned to engage the steering lock.
I'll add that I believe the third position is engaged by having e wheel turned to the correct angle for the lock and then pushing the key in while turning.iirc.
ron bayless
XS650 Addict
sounds right
mr twowheel! Take the seat off you said.It will make it easier you said. I just took the seat off.3 of the 4 bolts snapped off,leaving the threaded portion in the seat.Which will of course make for countless hours of trying to extract them.Thanks a lot ese.
Ha, definitely not the worse thing that's going to happen here. Face it now, ALL of these old bikes would still be running if it was easy.
Scott
Might have been easier on you to just remove the hinge pins?I just took the seat off.3 of the 4 bolts snapped off,leaving the threaded portion in the seat.
hmusket
CBMMA Member
Live and learn, learn and live.Might have been easier on you to just remove the hinge pins?
Time......Looking at the bike and understanding how it was designed, and how it was assembled will do you more good than time spent on the forum. When I get a new barn find/ non-runner, I have most of this sorted while washing the bike for the first time, Yamahas' take me just a little longer.
Besides, you need the tank and seat off to check wiring and sort out the carbs etc., etc., etc.
Can I get an amen from the choir?
Scott
Besides, you need the tank and seat off to check wiring and sort out the carbs etc., etc., etc.
Can I get an amen from the choir?
Scott
ron bayless
XS650 Addict
ok,mr2wheel.I did not know about the pins ok? I guess technically it isnt your fault i will spend a week getting the broken bolts out.Satisfied? I am trying now to get the ignition switch out.I loosened and set aside the tach speedo and headlight bucket.The bolts holding the switch are a bitch to get t nce I get those out i should be able to pull the switch out and disconnect its connector from the harness correct? it is frozen up to where the key barely turns in the lock.I need to take it out clean it,spray lube inside it.If its works after that ok if not replace it.The bolt on the right side as you sit on the bike is easier to get to than the other one.I got the easy one out and it didnt snap off. Progress.The guy took all the signal lights off. Now I have to figure out which wires make which signal work.But first i have to fix the ignition and start circuit.I was going for a restomod on this bike. shortstalked signals and possibly treemounted front signals.I bought a headlight off ebay that has signals built into it.But the xs bucket is where all the wiring is hidden.I dont see a way around that.I want the bike to look restored pretty much.
nce I get those out i should be able to pull the switch out and disconnect its connector from the harness correct? it is frozen up to where the key barely turns in the lock.I need to take it out clean it,spray lube inside it.If its works after that ok if not replace it.The bolt on the right side as you sit on the bike is easier to get to than the other one.I got the easy one out and it didnt snap off. Progress.The guy took all the signal lights off. Now I have to figure out which wires make which signal work.But first i have to fix the ignition and start circuit.I was going for a restomod on this bike. shortstalked signals and possibly treemounted front signals.I bought a headlight off ebay that has signals built into it.But the xs bucket is where all the wiring is hidden.I dont see a way around that.I want the bike to look restored pretty much.Time......Looking at the bike and understanding how it was designed, and how it was assembled will do you more good than time spent on the forum. When I get a new barn find/ non-runner, I have most of this sorted while washing the bike for the first time, Yamahas' take me just a little longer.
Besides, you need the tank and seat off to check wiring and sort out the carbs etc., etc., etc.
Can I get an amen from the choir?
Scott
AMEN!!!!

Spraying into the switch may free it up, WD40 or Walmarts spray lubricant. You should see (insert friendly, helpful emoticon here) that there is a way to further disassemble the switch to clean the electrical contacts inside that are probably, most definitely corroded. Spraying from the outside will NOT clean these contacts. I use electric contact cleaner and Scotch-Brite on the metal contacts, grease where parts bear on other parts, but no grease on the metal contacts. Sometimes these contacts need a slight bend to do their job. The final area of contact is usually the size of a pin head, you will see this blackened area on the contacts. I like to save the old switches and harness. Never had a switch or harness beat me yet.
Scott
Scott
Last edited:
ron bayless
XS650 Addict
I am happy for both of you.How does that help my situation?Yes, I was thinking the same thing. I just serviced my hinge pins after many years in use. All cleaned up and greased, the seat goes up and down nice and quiet now. No more squeaks, lol.
ron bayless
XS650 Addict
hmusket
CBMMA Member
Blue and yellow should run back to the tail light, the black wire with the red on it, l'm thinking is the positive battery connection. Are you looking at the wiring diagram for the '78 SE? If I have time today l'll take some pics of mine and post them.
As noted above by someone else, I think that the round silver-coloured thing on the end of the hose is a crankcase breather - but it is not an XS650 part. That large diameter hose with the spring kink-preventer (there are usually two in my experience) is supposed to run from a breather box on the top-rear of the cylinder head to the air box.
It looks like your P/O removed the air box - perhaps in search of more performance (that won't likely work) - and then got tired of the gooey mess coming out of the hose and so he put that little round filter on. Maybe he installed pod filters and that is why he needed something on the end of that hose - but then youll need to determine if he did anything to the carb jets as, from what the carb Gurus tell us, changes to the intake tract such as installing pod filters normally require jet changes.
Overall Ron, I think you got a live one here - but you'all spend some time getting her up and running again.
Pete