XS650 Clutch Worm Actuator experiment & tidbits

As I was making the entry hole cutter tool, a thought kept pinging in the back of my head. This thing looked familiar, then it dawned on me:

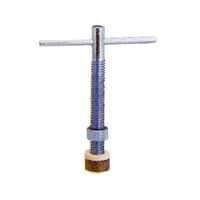
I was re-inventing the faucet seat recutting tool !!!

Found the Mintcraft #T1533L repair tool, with the 9/16" cutter head, ordered 2.

Now, just need to make the 4" long pilots for it...
 

Attachments

  • Mintcraft-T1533L.jpg
    Mintcraft-T1533L.jpg
    1.9 KB · Views: 227
Okay, I did the welded mod cutting stuff up Sunday and with half day off today welded it, drilled ground it, etc. I have it at made up at 1.65" center to center, 7 degrees to point to the hole and re-indexed to the magic 4.35"

I got the hole angle corrector in the mail today form Dogbunny ... thanks to the two of you!!

The worm screw needs some filing. I thought you mentioned that TwoMany but couldn't find what you mentioned. More tomorrow and a few pics maybe.

Thanks!!!
 
The worm screw needs some filing. I thought you mentioned that TwoMany but couldn't find what you mentioned. More tomorrow and a few pics maybe.

Hey Glennpm, welcome to 'worm destruction labs'! Anxious to hear your findings. The screw filing was mentioned at the end of DogBunny's mod routine, in the other thread. Yes, the screwthreads at the end are sharp and easily bent, can gouge into the nylon.

One thing I forgot to mention here, but DogBunny has implemented, is the adjustment procedure. Since the clutch cable is too short to begin with, the adjuster at the handlebar is left fully screwed-in, and the sidecover adjuster only is adjusted, to get the lever free-play.
 
Okay here are some of my pictures. I have to use the "Seat re-surfacing loaner" tool today. It will be a while before I'm going to actually measure results. Need to finish polishing and re-assembling my wheels and get this together.
 

Attachments

  • DSCN3076.JPG
    DSCN3076.JPG
    109.9 KB · Views: 302
  • DSCN3079.JPG
    DSCN3079.JPG
    107.4 KB · Views: 312
  • DSCN3087.JPG
    DSCN3087.JPG
    109 KB · Views: 304
  • DSCN3088.JPG
    DSCN3088.JPG
    107.6 KB · Views: 327
  • DSCN3093.JPG
    DSCN3093.JPG
    109.6 KB · Views: 297
Finally got two more casecutters made up. These use hardened 9/16" faucet seat cutters and should last awhile. They don't really cut, more like scrape. So there's less chance of overzealous cutting. I tried one, it's slower going. Just don't use too much pressure, and occasionally pick aluminum chips from the teeth.

These will be going to DogBunny tomorrow, so he will be the curator of the clutch worm mod tools.
 

Attachments

  • CaseCutB02.jpg
    CaseCutB02.jpg
    164.7 KB · Views: 312
  • CaseCutB01.jpg
    CaseCutB01.jpg
    161 KB · Views: 266
I used the first casecutter the TwoMany created and ran it in a portable drill, i.e., slow speed. I did not have to put much pressure on to make the surfacing cuts. I did a little at a time and cleaned the flutes of the cutter out with a small SS wire brush between each surfacing. It worked great!
 
I received the package from TwoMany, and I now have two new casecutter sets available to any one who wants them. I also have a couple sets of the worm gear arm bending tool sets for anyone who wants to try that mod.

It occurred to me that when we tested the case cutter tool, we failed to use cutting oil. Using it should make the cutting edges last longer. Motor oil will substitute, and any oil, even olive oil would be better than nothing.

Postage for the worm gear re-bending tool is $2.75, and then you can ship it to the next person who wants to try it.
The casecutter cable entry seat re-surfacing tool weighs less, so if anyone wants to try that mod, the cost of postage is $2.07, and then you can ship it to the next person who wants to try it.

I also got something else really cool from TwoMany. I hope to try it soon, and will post results with pictures in a different thread.
 
DogBunny, thank you so much for your efforts and assistance in this project!

Will soon enter another phase, so here's a spoiler pic of the next mystery mechanism of the month:
 

Attachments

  • NewMech.jpg
    NewMech.jpg
    127.9 KB · Views: 272
Well, while goofing around with the clutch cable experiments, noticed something that may be of interest to the members. The clearance between the clutch worm seal cup and the bulge/protrusion of the case forward of the pushrod is close. Fully seated, the seal cup clears the case protrusion about 1/8", 0.125" (3mm). Not a problem in normal use, but if the worm were to be overextended (like from a too short cable, and/or improper adjustment), the seal cup will contact the case protrusion, and possibly cause binding and reduced worm travel.

Pic #1 - My worm seal cup has always shown this mysterious sign of abrasion, seen as the brighter section of the upper edge of the seal cup. This shows that the worm has had a history of overtravel, protruding more than necessary, contacting the case protrusion.

Pic #2 - The case bulge/protrusion, left of the pushrod, which is just forward of the pushrod.
 

Attachments

  • WormX01a.jpg
    WormX01a.jpg
    51.2 KB · Views: 271
  • WormX02a.jpg
    WormX02a.jpg
    80 KB · Views: 288
Last edited:
Interesting! Looks like the correct cable length is even more important. Do you think the case should get a little local arched grinding too?
 
Looks like the correct cable length is even more important.

Yes! Best to check cable free length, or measure the arm's clevis hole position when the cable is fitted, before mounting the sidecover.

Do you think the case should get a little local arched grinding too?

There's an oil gallery there, see the pic. So, caution...

I wonder if anybody else has that 'telltale' sign on the seal cup?
 

Attachments

  • CrankCaseView.jpg
    CrankCaseView.jpg
    75.2 KB · Views: 285
Last edited:
I had the pleasure of visiting with TwoMany this weekend. We've met before, but this was the first time I saw his XS650.
He absolutely has the easiest pulling clutch I have ever felt. The easiest on any bike, not just an XS650. Until know, the easiest pull on an XS650 was on my own bike, the Bug Killer. TwoMany's is an order of magnitude easier. It is an insanely easy pull.
I'm not really sure how he's done it -- I already thought that I had done all of the tricks and mods. I think maybe part of it is where his cable attaches to the worm gear arm. I don't know where TwoMany's attaches, but I like to keep my attachment arm length short, which gives a harder pull but more cable movement and plate separation, and hence an easy-to-find neutral.
Anyways, TwoMany has done the research and testing, and I encourage anyone who has a hard clutch pull to read this and TwoMany's other threads on the subject:
http://www.xs650.com/forum/showthread.php?t=32945
http://www.xs650.com/forum/showthread.php?t=32267
 
Yes he has done a fantastic job in research and implementation! Hi notes and photos are awesome. ... a great asset to this forum!!
 
DogBunny, Glennpm, thanx so much for the kind words.

The clutch configuration is the same as the last (March-April) posts in the cable and bimetal pushrod threads.

Configuration #A - Ultimate XS worm, 1.65" clevis hole distance, modified cable entry angle, shortened/modified Motion Pro cable, anti-arch guide with protector sleeve, version 1 bimetal rod.

Now that I have more miles on it, it's time to go out there and take some measurements to see if it's settled-in any more, see if the protector sleeve is still there, see if any adjuster dimpling has occurred, check the pushrod, swap in the 7075 rod, post the findings...
 
Hi Peanut, great to see your behind that youtube vid. Thats a nice one ive enjoyed watching. Thanks

the basic design isn't necessarily bad as a clutch operating mechanism . its just clear that it is one of the parts that the Yamaha 'bean counters' got to to save a few yen.

It might be interesting to look to see how other bike manufactures have solved this problem of mechanically operating the clutch.

Its a pity but this is would be a difficult part to re-manufacture on a DIY basis in the shed other than small numbers for own use I should have thought.

I threw up a youtube video of my clutch worm mechanism installation back in September . I found that I couldn't even tighten my worm gear fixing screws at all without the arm becoming too stiff to operate. I thought at first it was a hydraulic effect of too much grease but from what 5twins has said it looks like the fixings are distorting the body somehow.

I'll need to find a cure pdq as the bike is nearly ready to use and the worm drive is still only finger tight.
Excuse the hyjack twomany but I thought this problem was sort of relevant and could effect other owners
 
thank you vsop-dk ...( peanut puffs his chest out a little further ...):D

I have learnt soooooo much on this forum from all you guys ,..... its rewarding when our personal experiences can sometimes shed a little light on something for somebody else. :wink2:
 
Back
Top