Ignition switch & charging issue

Fabricator

XS650 Member
Messages
23
Reaction score
36
Points
13
Location
NC.
Hello all...
I have a 1980 XS650SG
Charging system stopped.
Battery is new & holds charge at
12.7 volts. Headlight also comes
On at engine start.
Checked system at +3k rpm...
No chargey chargey!
Feeler gauge test side of case... yes it sticks.
Bypassed green wire on regulator to ground. Still no chargey.
Voltage at brush 10.2v also brown
Wire at switch 10.2v.
Red wire going to ignition switch from battery/fuse box has
12.7 v YAY !!! ;~)
Out of switch 10.2v
So based on this...
Please correct me if I'm wrong. Ignition switch is the problem?
If so are there any ways to repair it?
Or if I replace it do I have to rekey?
Thanks in advance.
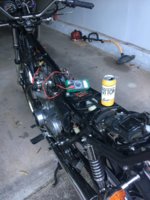
I cracked the cold one after I was done working in it ;-) IMG_4733.JPG
 
Some key switches can be taken apart and the contacts cleaned. Depends on the switch. I'm not sure on your bike.
Easy way to tell is to take the switch out of the bike and look at it. If it is held together with screws then it can be taken apart.
Some have the sides crimped to hold them together. Getting them apart isn't hard, getting them to stay back together is.
After taking the switch apart, clean the contacts. Bright and shiny is good.
Leo
 
Yep... she has screws !!! :)
I'll give that a whirl...
I really appreciate the help.
Have a good evening.
 
You can take the switch apart, at least if it's a Special. The voltage drop you see means either the switch itself is dirty, or maybe more likely the crimp to the connector is bad. Should be practically nothing across the switch. Probably will take a long extension and a 10mm socket to undo the bolts from underneath. Once out, I think I remember a couple of Phillips screws on the bottom holding it together. After it's clean, coat the contacts with grease, silicone dielectric grease if you have it. Grease won't affect the conduction of the switch. There's a metal shaft that fits into an oblong slot in plastic. I wouldn't grease that part if it was me. I think you can get to the electrical part from the bottom without removing the cylinder. I think. If you do have to remove the cylinder, leaving the key in it during will probably help keep the tumblers in place.
 
It's out... I will attack it tomorrow.
Thank you for the help...
hopefully it will be up and running soon.
 
Open it up carefully, small parts. Sweep the floor before starting, you may be looking for those small parts on the floor. I use a soup can box/tray in case some parts get away. I haven't had a switch beat me yet.

Scott
 
Nice thread reference Peanut, that switch is just like the one on my SH. I found that the parts are machined in such a way that they only go back in one specific order. This was very good because I dropped it and everything came out of place. After a contact polish and regrease all switch functions were restored where as in the past the Park Light position was not working. Also the voltage drop before cleaning the contacts was 0.4V and this dropped to 0V when cleaned.

Fabricator, the biggest voltage drop I found was about 0.9V. This occurred at the connector by the RH air filter where the red wire from the battery (Approx. 10 inches long) plugs into the Harness to feed power up to the ignition switch. Then there were a couple of smaller drops down the line to the alternator field winding.

PS: Peanut - MOT went well. The only criticism was the bike is too clean and shiny. Must do something about that tomorrow!
 
PS: Peanut - MOT went well. The only criticism was the bike is too clean and shiny. Must do something about that tomorrow!

great news and a big relief no doubt. Its a good time of the year to have your MOT I guess as it doesn't come right in the middle of your riding season like mine.
My XS650 is in June and the Lambretta in July which is a pretty fraught time .

I wish i could spend some more time on my bike as I know there are numerous voltage drops on mine. i've had to replace and repair the bar switches several times. I am seriously beginning to question the sense of sticking to original equipment for everyday riding.
I think it might be a more reliable solution to use some modern switches fitted with some Yamaha connectors and put the old stock switches in a box for if / when I come to sell it.

I've already fitted a fully electronic Boyer and foam filters and I am in the process of fitting a standard seat

I like the critisism about being too clean and shiny ,mine is the opposite.The MOT guy handles my bike with his fingertips like he was going to catch some nasty disease from the bike :)
 
I wish i could spend some more time on my bike as I know there are numerous voltage drops on mine. i've had to replace and repair the bar switches several times. I am seriously beginning to question the sense of sticking to original equipment for everyday riding.
I have the same problem with drops, or at least know the potential is for one to start at any time. I haven't had a problem with switches so much, they're repairable, but I think the biggest problem is the connectors, and specifically the crimps to the wires and loose-fitting female lugs.

The connector shells are hardened and deformed from age so that the lugs won't come out. That means it's not practical to re-crimp every wire. Not practical to tighten female connectors either, for same reason. What I would do is buy a new harness from gdaddy or Mike's. That would give you nice, new connectors, crimps, and shells. Then I would just cut the shells off the components, recrimp, tighten. and use new shells. I know Mike's sell some of the shells, not sure which.
 
. What I would do is buy a new harness from gdaddy or Mike's. That would give you nice, new connectors, crimps, and shells. Then I would just cut the shells off the components, recrimp, tighten. and use new shells. I know Mike's sell some of the shells, not sure which.

mmm I do have a new wiring loom which i bought in a fit of madness 4 years ago when I bought the bike . Its still in the box getting dirty and corroded lol.

If I replace the loom I am then faced with the dilemma do I restore the bike or just conserve or some sort of half way house where I touch up the rust on the frame etc etc ..............................thats why the loom is still in the box ...I'm one of lifes great procrastinators. Why do today what you can put off until tomorrow :D
 
Thanks for all the help!

Peanut.... I already found your thread
On the switch. Thanks!!
I rebuilt it but now I have a 11.2v
Instead of 10.2v
It's better but not quite there.
I plug it in and the red & brown wire after the switch are 11.2v
I got 12.7v going in.
And the system is charging at a little over 13v. Now.
The contacts aren't getting any cleaner
Than they are right now. Springs seemed to be plenty stiff too.
Any one recommended a quality ignition
Switch?
 
You should measure the resistance of the rotor from slip ring to slip ring, and from slip ring to the rotor frame. If part of the rotor windings are shorted out, or if there is a partial short to the rotor frame, there will be a much higher current flow than normal. The higher current flow will show up as a higher voltage drop across the ignition switch.

The fact that you are only charging at 13 volts (should be 14 volts @ >2500 rpm) could also indicate that some of the rotor windings are shorted out, making for a weak magnetic field.
 
Measure the resistance of the switch, Should now be same as equivalent length of wire. If not...it's the crimpz.
 
Some contacts need a little bend in them, or stronger spring, for better conductivity. How slathered up with dielectric grease are the contacts? That all could be the factor, not enough pressure contact to contact, AND THE GREASE. You could try getting the contact to contact pressure better and do away with the grease.

Just sayin', take a new switch, lessen the pressure of the contacts, slather with dielectric grease and you have the same weak connections as you have now.

Scott
 
Last edited:
Thanks for all the info...
I will clean the switch again and check
The resistance.
I will also check the rotor.
I'm starting to suspect it's a little bit of everything. I gained a volt back on the
Switch.
I will update ! Thanks all !!
 
Ding....ding...ding.... we have a winner!
retiredgentleman !!!
Checked the switch.... 0.0 ohms.
I guess I got that right :) so I didn't tear it back apart.
I removed the brown wire at the brush & the voltage went to 12.7v.
;-( checked slip rings 1.0 ohms.:-(
Checked slip rings to ground & found no continuity ;-)
I'm tearing the bike down for a rebuild this winter so I was planning on changing the charging system anyway.
I was just hoping for a few more rides
Before it got cold...
Wanted to thank everyone for all the help!!!
 
Yes, on these old bikes when they don't charge, the brushes and the rotor winding resistance is the first thing to check, because they are such common failures. With only 1 ohm, that rotor was drawing 12 amps of current. 12 amps of current flowing through even a small amount of resistance, will cause a large voltage drop. Its a simple example of Ohm's Law.

When this happens, sometimes the old glass fuse holders/fuses will start to heat up severely.

The stock alternator/charging system is the best for these bikes. Have your rotor rewound by Custom Rewind in Alabama. Don't get drawn in by the PMA marketing
hyperbole.
 
Back
Top