Sorry, been MIA for a bit, had a friend visiting from the great white north.
One thing I'm curious about is the weight of the rotor and stator vs. the stock rotor and stator.
Actually they weight was real close to the same .5.6 lb.the stock one with no wires or mounting hardware , the Vape measured the same.
How about the rotors themselves? I notice that they are advertised as being heavier than the earlier systems.
As I've said elsewhere I think these PMA/CDi systems are the best option for the 650. The self powered CDI is the best ignition system on a bike. If it turns it sparks.
Weighed parts tonight and Gary H is right, weights match, both rotors were the same weight and stators within 1/2 oz. of the factory parts.
I am more than satisfied with appearance and initial fit up to the engine of rotor and stator.


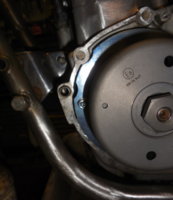
Removed parts from bags and packing, wiped off the taper ID, with a bit of thinner.
The pin that located the factory stator must be removed.

Installed stator, instructions note and I found that the wire bundle from the stator is a TIGHT fit where it goes under that plate and out towards the grommet at the rear of the cavity.

I pulled back the sheath and checked no wires crossed each other in the critical close to the crankshaft area, slid the sheath back and installed the stator plate.

It fit with close tolerance, no side to side movement, supplied screws with flat washers threaded easily and were of proper length, plenty of threads engaged, they did not bottom. rubber plug at rear cavity partition fit well and trimmed easily to "squishes a bit when fitting cover" depth.

Manual suggests you can use the stock rubber grommet instead if yours is good.
My crankshaft taper was rusty

I cleaned it up with 400 grit and mineral spirits.
I cleaned and chased threads on end of crank. The new nut (27mm hex, like the oil drain plugs) was a bit "stiff" to thread on. I cleaned and chased threads then it ran on freely. There are two washers supplied use them both

The nut turning freely makes the job easier, setting rotor to match timing mark is a bit fussy. If the nut turns hard the crank will spin, (there's no way to keep it from turning) possibly moving the timing as you tighten.

Note; the new rotor does not have a milled keyway, timing is maintained solely with the taper fit and nut tension. To adjust timing; remove nut, loosen rotor with included puller (it works good) rotate rotor on crank, retighten. I'm thinking about how to making the stator adjustable and adding a set of marks to check idle and advanced timing. But that'll be later.
That was it for tonight.