1976 XS650 restoration and rebuild, advice and help welcomed!

Uh Oh George. If you're idle is fluctuating up sometimes, down sometimes like you say. Try some things Bob (Mailman) and I have been through.

When you get it in your shop while idling, spray some carb cleaner or WD40 at:
  • All ends of throttle shafts
  • Choke housings
  • Carb side of carb manifolds
  • Engine side of carb manifolds
See if it has any effect.
 
Here's a question... Having watched a adjusted the clutch based on a nice video from iamcarbon initially, and now having read a bunch of clutch adjustment threads... Is there a way to bring the barrel adjuster back in from max, without shortening the cable (cutting, and adding new ball end at the lever)?
 
Cool! Here are some suggestions to make things easier:
  1. Do a clutch adjustment as detailed on the forum. This involves adjusting the handlebar adjuster in all the way and THEN adjusting the screw under the chrome cover the LH engine case - and THEN making a final adjustment back at the bar. The other thing is that neutral is usually MUCH easier to find while you're still rolling, just before you stop - so go for the green as you slow down. It is actually better practice to sit at traffic signals in first rather than neutral IMO - just in case you need to jump out of the way.
  2. The idle: spec is 1200 rpm but mine wanders from 1000 to 16-1800 RPM - and I suspect that many others do as well. I've decided to not fuss about it. These are pretty primitive carbs and there are no sensors on the engine to adjust mixture or idle setting with atmospheric temperature or pressure variations. The bike starts reliably (now that I have replaced the alternator brushes) and it runs well, and so....others may disagree, but as far as I'm concerned,...to heck with it
  3. I recommend you get a tail bag rather than using a knapsack for commuting. The tailbag will strap onto your seat and they're great for hauling small items and papers etc. - way more comfortable than a bag on your back IMO - especially in LA heat and traffic. The bag I use is a Motocentric (around $70 from MC Superstore). Its built-in bungees and strong plastic hooks enable it to clip, in seconds, onto the rear turn signals and the frame loops on which the passenger pegs are mounted, totally without damage to Lucille. It also functions as a bit of a back / bum rest - very slick!
IMG_1769.JPG


Have fun and be safe!

Pete
 
Last edited:
@robinc So, finally was able get into it with the WD40. Started the bike up, let it run for about a minute. As typical of late, as things warmed up, the idle climbed up to about 1800-2000 from 1200. I adjusted the idle screw down so that it was back at 1200-1300. I sprayed the engine side manifolds with a light amount of WD40. The RPMs immediately went up to about nearly 2k.

I am going to guess that I need to snug up the fasteners for the manifolds. If the rpm level went up, would that mean that less air and more fuel was hitting the cylinder? Or, was I adding more fuel in the form of WD40 to the mix! ha?!
 
Last edited:
Yes - thats it. Basically, you were adding fuel - and coupled with the air leaking in, the engine sped up.

Try giving the manifolds a little snug up - but not too tight, you don't want to distort them. '

I so glad you';re finally able to enjoy riding the bike though George. Those chilly wiring sessions with the iPad in the garage seem so far off now don't they (although I don't suppose it was actually that chilly for you in LA ;)).

Pete

PS - those beautiful header pipes and the shiny fender and stays look superb on Lucille - thanks again!
 
+1^
Snugging them up as Pete suggested may work George. Let's hope. I think I torqued my manifolds to 78 in/lbs - 6.5 ft/lbs.

If they still leak you will have to remove the manifolds and check for cracks in the rubber. Bob (mailman) and I have both found dried out cracked manifolds which had to be replaced. If the manifolds look OK, suspect bad gaskets. You might be able to reuse the gaskets if they're not too bad by resealing with gasket sealer on the engine side and something like Hylomar Blue on the carb side of the gasket/manifold joint so they will come off easily. If that doesn't work you're pulling the carbs and manifolds again to install new gaskets.

I'll pull for ya that a re torque works!
 
+1 on Hylomar Blue - amazing stuff.

It was developed by Rolls Royce for use on aircraft engines. I have never seen it in a store but you can easily buy a tube on-line or possibly at a small airport that services airplanes. A tube is a bit pricey - but should last a loooonnggg time.

Pete
 
What a great looking bike. I really like the white bodywork.

The first commute is always a nervous one. Always happy when I make it to work on time without having to pull over and take a couple tools out of my backpack, showing up with black greasy hands haha.

Tail bags are nice, magnetic tank bags are my favorite. I appear to have developed a thing for bikes with plastic gas tanks though, as the last 3 I've brought home have all had one, and I haven't been able to use my magnetic bag in years. I get paranoid with tail bags and stuff strapped to my back seat, I spend half of my ride feeling behind me to make sure it's still there. The backpack is nice for keeping everything on you, and now that I wear one to work every day, I don't even notice it's there anymore. It also doubles as rain protection since my rear fender isn't long enough to stop all the water on wet days. I'll get to work with water and mud splattered all over my bag, but I'm nice and dry/clean haha.
 
Yes - thats it. Basically, you were adding fuel - and coupled with the air leaking in, the engine sped up.

Try giving the manifolds a little snug up - but not too tight, you don't want to distort them. '

I so glad you';re finally able to enjoy riding the bike though George. Those chilly wiring sessions with the iPad in the garage seem so far off now don't they (although I don't suppose it was actually that chilly for you in LA ;)).

Pete

PS - those beautiful header pipes and the shiny fender and stays look superb on Lucille - thanks again!
Thank you Pete! Your help with that wiring direction was instrumental. Pun intended! ha! Chilly, in LA? We'd be so lucky. The garage is getting mighty hot these days... Glad the pipes and fender are working well!
 
+1 on Hylomar Blue - amazing stuff.

It was developed by Rolls Royce for use on aircraft engines. I have never seen it in a store but you can easily buy a tube on-line or possibly at a small airport that services airplanes. A tube is a bit pricey - but should last a loooonnggg time.

Pete
Luckily I still have ample supply from my right case cover sealing job. Which has held thankfully!:thumbsup:
 
Did my first real tune up after roughly 60miles if initial break in. The main issue I wanted to address was the climbing idle. But also cold starts seemed to take more hits on the button than i'd prefer...

- Pulled the tank, airbox, cam adj nut, to access the carbs. Pulled them, inspected the manifolds. No cracks, per memory during the rebuild, but made sure the mating surfaces were clean along with gaskets. Ran a small bead of Hylomar on the engine side of the gasket and torqued the manifolds back down. Reinstalled the carbs after adding a little WD40 to the housings.
- Oil change. No particles hanging on to the magnets of either oil plug. Woohoo!
- Cam chain adj.
- Checked torque on the all the head bolts
- With the tank off, decided to really take a close look at the upper engine mount grounding ability. Got the dremel out and polished an absolutely sure clean path from where the frame contacts the mount, and where the mounts pieces touch each other. Bolted it all back up.
- Greased all the chassis grease fitting points
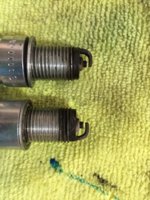
- Adjusted plug gap from .028 to .034.

I think that covers this weekend's activity... Only managed a 30min quick run after, to test things. But the idle seemed to be more stable, and the engine fired up seemingly a little easier. I'll take it cautiously as a small win.

I do have one question for all the experts. Here's a shot of my plugs. How do they look? From a quick google search on spark plug inspection, it's possible they might be functioning as 'normal.' Famous last words! :cheers:
 

Attachments

  • IMG_1263.JPG
    IMG_1263.JPG
    209.4 KB · Views: 235
Last edited:
Your plugs look OK, maybe a bit sooty. A light chocolate color is ideal.
I have chart of about 50 photos of actual spark plugs with labels ranging from very lean to very rich, and frankly, the middle 20 are indicated to be "Good", but vary in color a good deal. I've stopped looking at it; it gives me a neck-ache.

Thank you Yamadude, much appreciated. Is the chart you mentioned easily accessible?

Thanks!
 
Mine is very old. I think that Champion was handing them out at a Camel GT sportscar race at Watkins Glen.
But there are many available on Google images like this one:

sparkplugcolors.jpg
 
As that chart indicates, you want to look down into the plug, at the porcelain, for a proper reading. Your pic from the side doesn't really show enough. Yours don't look terribly bad though from what I can see. They may be a little black from your cold start using the choke. That will blacken the plugs right up and it takes a fair amount of running down the road, maybe 10 miles or better, to burn them clean again.
 
Yup - we really need an end-on view to tell for sure, but those look about right to me George.

The other thing that can affect plug condition is your riding habits. As you gain experience, you'll likely use a little more power and any snootiness may decrease as a result.

Pete
 
As that chart indicates, you want to look down into the plug, at the porcelain, for a proper reading. Your pic from the side doesn't really show enough. Yours don't look terribly bad though from what I can see. They may be a little black from your cold start using the choke. That will blacken the plugs right up and it takes a fair amount of running down the road, maybe 10 miles or better, to burn them clean again.

Yup - we really need an end-on view to tell for sure, but those look about right to me George.

The other thing that can affect plug condition is your riding habits. As you gain experience, you'll likely use a little more power and any snootiness may decrease as a result.

Pete
Pete, Gary, as always thanks for the feedback, and encouragement. Looking forward to the next cruise...!
 
Back
Top