ATX Cafe Build

QWERTYMage

XS650 Addict
Messages
186
Reaction score
16
Points
18
Location
Austin, TX
So it begins.

After a near draw trying to get the oil plugs out, I'm finally about to pull the engine for a good scrubbing and rebuild by my local XS mechanic.

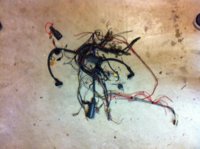
Once I got at it I discovered the harness a tangle of splices and ghetto-rigged rework. So I cut the thing out (sorry, PO), since it's gonna need a new harness anyway. I did my best to leave a good amount of leads on the dash (I plan on selling it off and upgrading to small guages and lights.

Pulled the rear fender and removed the original tail light. To sell.

Called it a day.

The end. QUESTION MARK!?
 

Attachments

  • photo.jpg
    photo.jpg
    146 KB · Views: 144
Engine out and cleaned. Dropping off at the shop this Friday.

Frame and whatnots torn down. Time to figure out paint.

Should I paint the wheels.

Decisions.
 
Post more pics. No offense, but no one is gunna be interested in your build thread if there aren't any build pics.
 
Shoot. I didn't think there was anyone that would read this anyway. Posting for myself more than anything. The pics are pretty typical so far. Dirt and rust. Engine removal. Messy garage. Etc. Other than the small blinkers I ordered, there's not much to show. I will post up pics of the signals though.

When I get into sanding, cleaning and rebuilding, there will be things to look at.

m
 
So, in the year since I tore this down I decided to make a few direction changes.

My first thought was to make it a cafe/brat resomod. Minimal cutting as I like that idea of survivor bikes retaining their essence and most of their metal. Cleaner seat. Lowered forks. XS750 tank. Norman Hyde M Bars (I like the idea of the riser bushings saving my wrists from this notoriously vibration-heavy engine). Rearsets.

Then my back reminded me why I stopped riding BMX and anything else with a stooped forward position. A cafe seemed a bit foolish considering my back problems.

Then the Monstercraftsman Brat Kit came along.

I ordered the brat kit and a Biltwell seat, P-Nut Wassel and fuelguage, and Tank bungs.

Most of my order arrived today.

Finally, I can get this thing going.
 
Be tank bungs are missing. I'll be waiting a bit longer to get this going. (It's always something. It's starting to feel like this build is cursed.)

Fucky fuck fuck.
 
The Bungs were on Backorder. Being shipped straight from Hugh's Handbuilt.

I might have a pile of metal to get welded by this weekend if I'm lucky.
 
I'll post a few shots of my pile of stuff tonight. It's nothing we all haven't seen a thousand times before. My turn/brake signals are most sweet, though.

Peace.
 
So, here we go.

The kit is nice, but it doesn't fit flush in the front. I'll grind the back side of the plugs to get it to drop in correctly. I'll be missing a Rockers v. Mods rally this weekend to get this ready for welding next week. The finish on the kit is nice. The mounts are a little rough. Not too bad, though. I'll also put a polishing wheel on it to deburr a few edges. Easy work. The mounts, I might add, are REALLY thick. I was a bit nervous about torshion twist on these things because they are carrying the weight of the full bike on one side. I will probably replace the tiny locknuts from the kit with nuts that are a bit thicker. We'll see.

The Biltwell seat is really nice too. A lot better than the 2-up pan I was working on. I work as a designer and symmetry and finish are really important to me. The stitching on this saddle are almost pervectly centered. Almost. I'm good with it. The bottom of the seat is beautiful. Sucks that folks can't see it once the seat is mounted.

I also got a Lowbrow Fuel Guage to go with the Wassel P-Nut tank so I don't get surprised and run out of gas. The threads on the guage are tapered and don't go in flush to the guage's mounting bungs... I hope I can get these to seat flush. We shall see.

The plan is to fab up a few tabs for a Gravel-crew style battery box panel under the seat for the battery and electrics.

I'll be running the stock mids and pegs. Not sure about the pipes yet. I kind of want to mock up some Dunstall peashooters in Photoshop to see if it looks like a turd or not. Suggestions welcome. I like short pipes, tracker pipes, and the new pipes Handbuilt Hugh is selling looks nice too.

I also want to figure out how to use these tiny turn signals/brake lights I got from my brother-in-law for Christmas.

I also plan on running a swingarm-mounted fender... yep. Basically a copy of the Monstercfrafted® Bratâ„¢.

Oh, yeah. And I'm trying to get this done before the baby shows up in July.

Peace :thumbsup:
 

Attachments

  • photo-7.jpg
    photo-7.jpg
    118.3 KB · Views: 113
  • photo-6.jpg
    photo-6.jpg
    103.8 KB · Views: 98
  • photo-5.jpg
    photo-5.jpg
    100.3 KB · Views: 90
  • photo-3.jpg
    photo-3.jpg
    94.1 KB · Views: 105
  • photo-1.jpg
    photo-1.jpg
    117.4 KB · Views: 127
  • photo.jpg
    photo.jpg
    153 KB · Views: 88
I got the HHB bungs in Friday. Priority mail to my office straight from HHB (Monstercraftman set that up to speed up delivery and make sure I got out of their hair ASAP.) Great service from them.

I "modded" the Monstercraftsman brat kit by grinding the back side of the frame plugs a bit. Now she sits in just right. I leveled out the frame and checked the level of the shock mounts and seat panel. Looks good.

A few notes for anyone looking to do build up a MC brat kit: The kit will sit a bit straighter to the backbone if you cut as close to the back welds as possible (where the plugs fit). I left about 1/8 inch. If I wanted to line it up super straight, I still have a bit of room to cut the frame. With the tank in place, you can't see the backbone, so it matters not.

The original tank cups on the frame are attached with 3 spot welds. Drill them out to weaken them and a cat paw will remove the cups in easy order (but the cups will be trashed).

Once the cups are removed, the frame gussets are too wide for the tank tunnel where the cups were mounted. I ground on mine until the metal was thin enough to tap in with a hammer. I also smoothed out the birdshit welds from the Japanese fabricators, as they were rubbing the tank tunnel too.

Now, the tank fits, albeit really tight where I have plan to mount it (closer to the neck on the backbone). It would be a bit looser closer to the seat. I am mounting it where the top engine mount bar just barely shows at the petcock end of the tank - the petcocks will hide the bar, but it makes a nice, tidy line with the backbone and the bottom of the tank. And covers a bit of the neck gusset.

The stock top engine mounts will not fit with this tank - I bet the mid-mount or high mount versions would fit, But I'm just guessing.

I will be getting the tank and frame kit welded ASAP if my welding contact has the time in his schedule.

I am still trying to figure out where to mount the rear signals/brake lights.


Peace :thumbsup:
 

Attachments

  • photo-4.JPG
    photo-4.JPG
    71.6 KB · Views: 135
  • photo-9.JPG
    photo-9.JPG
    67 KB · Views: 111
  • photo-11.JPG
    photo-11.JPG
    63.6 KB · Views: 101
  • photo-8.JPG
    photo-8.JPG
    52.4 KB · Views: 88
  • photo-10.JPG
    photo-10.JPG
    98.6 KB · Views: 116
Update: I met with my welder. We decided I need to replace the neck gusset with something a bit more less fugly. I'll be getting some Monstercraftsman Blank gussets, popping a few speed holes in them and getting that ready. I missed my window for him to have an available table, so it doesn't matter. It would be a few weeks until he could get to it anyway. We also figured out where my signal brake lights will go. I'll be order ind some tabs from bung king for the battery box plates to mount to.

That is all.

Peace.
 
I "modded" the Monstercraftsman brat kit by grinding the back side of the frame plugs a bit. Now she sits in just right. I leveled out the frame and checked the level of the shock mounts and seat panel. Looks good.

A few notes for anyone looking to do build up a MC brat kit: The kit will sit a bit straighter to the backbone if you cut as close to the back welds as possible (where the plugs fit). I left about 1/8 inch. If I wanted to line it up super straight, I still have a bit of room to cut the frame. With the tank in place, you can't see the backbone, so it matters not.

I did mine the exact same way. I wanted the straight with the backbone look, even though you don't see it with the tank mounted.

Yours is looking good. I worked on my seat pan a bit today.
 
Back
Top