-
Enjoy XS650.com? Consider making a donation to help support the site.
XS650.com receives a small share of sales from some links on this page, but direct donations have a much greater impact on keeping this site going.
You are using an out of date browser. It may not display this or other websites correctly.
You should upgrade or use an alternative browser.
You should upgrade or use an alternative browser.
Aww Jeeze....('77 Re-Hash)
- Thread starter Beags64
- Start date
Pretty comes later, lol. Get her squared away mechanically and running good, then you can work on the cosmetic bits. Keep an eye on eBay and you may run across better condition replacements for many of the rusted bits. It will take some time but in my eyes, that's part of the fun of it. You'll slowly but surely get the old girl looking better and better.
When it comes to the mechanical aspects of your model, one of the things you should consider doing is upgrading your cam chain tensioner assembly. Your '77 model came with the notorious type D tensioner which may promote faster cam chain wear. Read all about it here, posts 22 and 23 .....
http://www.xs650.com/threads/cam-chain-tensioners.1056/page-2
The upgrade isn't hard or expensive. The upgraded type E tensioners can usually be found on eBay for around $20.
Good info 5T, will put that in the file.
Got both bar switches apart, cleaned, contacts all shined & a fresh coat of dielectric grease on 'em. Few dabs of white lith grease on all the moving bits, so that's off the list.
Ignition switch/horn re-location bracket fabed…
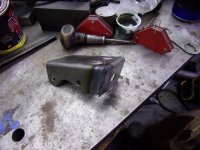
Mocked up to check fit...
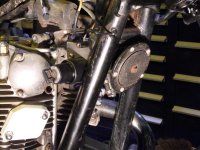
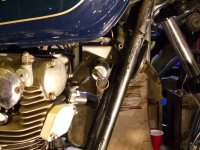
Should pretty much "disappear" once it's painted.
Got both bar switches apart, cleaned, contacts all shined & a fresh coat of dielectric grease on 'em. Few dabs of white lith grease on all the moving bits, so that's off the list.
Ignition switch/horn re-location bracket fabed…

Mocked up to check fit...


Should pretty much "disappear" once it's painted.
Coming along very nicely indeed Beags - but again I ask...why don’t I stumble across these types of deals (except of course for my dear Lucille)?
Pete
Pete
This one was more sh!thouse luck than anything, right place - right time sorta thing. Been kinda eyeballin' this mess but lack of room & 2hr drive  . Would make for quite the treasure trove of parts though.
https://grandrapids.craigslist.org/mcy/6839887097.html
 . Would make for quite the treasure trove of parts though.
https://grandrapids.craigslist.org/mcy/6839887097.html
Hey, that’s not too bad looking a deal.
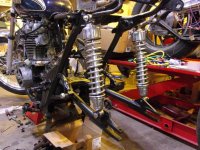
….and this concludes the suspension portion of our program.
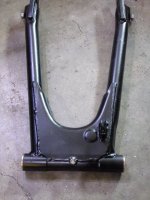
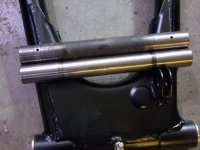
Bronze bushings, installation went smooth like glass. Pulled the pivot tube out of another swingarm, '78 Special I believe, because it was in way better shape. Noticed it didn't have grease zerks on the bolt & no holes in the pivot tube. No worries though, one in the middle (5T) remedied that. '77 bolt's got the ones on the ends so good there too.
13" Harley shocks, garage sale haul from a few years back - shocks & pair of nice mufflers for $50. Had to skin 'bout .160" off the out board side of the lower eyes to fit the swingarm mounts.
And now for my next trick....
Well then, I don't think I'd bother. The TX750 twin swingarm makes a nice swap because it's virtually identical to the 650 arm but with one important difference - the tubes are about 1/4" bigger in diameter.
Interesting, maybe you've stumbled across another possible 650 swingarm swap? Check axle size and tube diameters. If the tube diameters are larger than the 650's, it would be a stiffer arm.
I've messed with the XJ's before, flimsiest swingarm I've ever put my hands on. Those things can be tweeked with your bare hands. They do take the same bushings as the XS.
Scott
Oh, I like those. At the very least, they will nicely center the pipes on the port and make for a strong, leak-free mount. I made some up for mine from the ends of old stock headpipes. There's a step machined into the port for the end of the stock pipe to fit into. Unfortunately, it doesn't stick in far enough to fill it. That leaves a "groove" in the port and that is said to be detrimental to flow. You can see it here in this cutaway pic of Mike's inserts ....

To better fill that step, I placed my insert in the head first, then the seal ring and pipe on top of it .....

Still, the part of my insert that stuck into the head wasn't enough to fill the step, so I made up some pipe filler rings .....

Here's the total "stack" as I have it fitted into the head, filler ring and insert first, then the gasket and pipe .....

I wish I had a lathe, then I may have just been able to thin the lip down on the insert so it stuck into the head more, and not had to fit a filler ring.
To better fill that step, I placed my insert in the head first, then the seal ring and pipe on top of it .....
Still, the part of my insert that stuck into the head wasn't enough to fill the step, so I made up some pipe filler rings .....
Here's the total "stack" as I have it fitted into the head, filler ring and insert first, then the gasket and pipe .....
I wish I had a lathe, then I may have just been able to thin the lip down on the insert so it stuck into the head more, and not had to fit a filler ring.
That step was exactly what I was trying to eliminate. Took a bit of 'cypherin but hopefully once there is a good crush on the gaskets these should be right up to the step. The port end ID is tapered out to match to ex. port dia. as close as possible.
Actually I got the basic dimensions from a link to an Aussie site you had posted a few years back, just tweeked it where needed.
Actually I got the basic dimensions from a link to an Aussie site you had posted a few years back, just tweeked it where needed.
That's why I stuck the insert in first, then you don't have to worry about the crush on the seal ring as a variable. You could make the inserted part the exact length needed to fill the step. I applied a little Yamabond to the "lip" of my insert before sticking it in the head, to seal it in there. I figured carbon build-up would eventually help seal it in there too.
Went back and forth about gasket location myself. Figured might have better luck with gasket in first, I've got some .020" sheet copper so the plan is a ring of that between insert and headpipe flange. Hoping that should be fine between two machined surfaces.
