That sounds (smells) electrical. You might wanna use a meter and see if it's still charging. Did the smoking go away by itself or did you shut it down?
-
Enjoy XS650.com? Consider making a donation to help support the site.
XS650.com receives a small share of sales from some links on this page, but direct donations have a much greater impact on keeping this site going.
You are using an out of date browser. It may not display this or other websites correctly.
You should upgrade or use an alternative browser.
You should upgrade or use an alternative browser.
charging system dead
- Thread starter blank slate
- Start date
blank slate
XS650 Addict
That sounds (smells) electrical. You might wanna use a meter and see if it's still charging. Did the smoking go away by itself or did you shut it down?
When I see smoke I shut it down.
blank slate
XS650 Addict
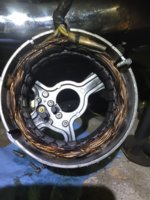
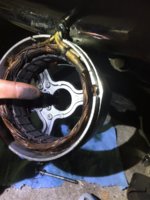
looking inside i notice a lot of black carbon in the rotor cover (1st and last image)
Attachments

Carbon dust is most probably from brushes.... it's normal. Look for overheated/burned marks..... melted wire insulation... stuff like that.
Justa quick observation.
The hold-down clip for the outer brush isn't properly seated.
The stator windings, just above the brushblock, post #177, look cooked.
Post #183, pics 1 and 4, the inner surface of the stator core looks seriously scraped, as though the stator wasn't mounted concentric with the rotor, and the rotor abraded it.
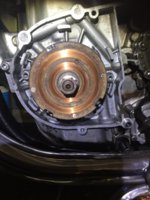
Any matching scrape marks on the rotor?
The hold-down clip for the outer brush isn't properly seated.
The stator windings, just above the brushblock, post #177, look cooked.
Post #183, pics 1 and 4, the inner surface of the stator core looks seriously scraped, as though the stator wasn't mounted concentric with the rotor, and the rotor abraded it.
Any matching scrape marks on the rotor?
Last edited:
blank slate
XS650 Addict
Justa quick observation.
The hold-down clip for the outer brush isn't properly seated.
The stator windings, just above the brushblock, post #177, look cooked.
Post #183, pics 1 and 4, the inner surface of the stator core looks seriously scraped, as though the stator wasn't mounted concentric with the rotor, and the rotor abraded it.
Any matching scrape marks on the rotor?
You are a genius. I can definitely hear scraping. I’ll try to mount it correctly.
ps: Nice use of the word concentric!
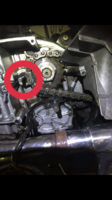
theres a pin in the crankcase at 7 o:clock the stater has a slot the pin fit's in. it's easy to mis-fit.
blank slate
XS650 Addict
Search clutch push rod seal, all will be revealed, an "easy fix".
Here's one how to there are many.
Here's one how to there are many.
blank slate
XS650 Addict
theres a pin in the crankcase at 7 o:clock the stater has a slot the pin fit's in. it's easy to mis-fit.
This was a great tip! Thanks
blank slate
XS650 Addict
the bike is idling beautifully, no smoke. But the oil leak from the pushrod area is pretty bad. I think I had the rod backwards, threaded side in. So I reversed it, put grease around the pushrod (poor man’s leak stopper) but the leak is worse now.
Might have to do the messy job of pulling it all out and installing the one piece pushrod, seal, and ball.
Might have to do the messy job of pulling it all out and installing the one piece pushrod, seal, and ball.
The seal is reportedly not difficult to do - BUT - you will need to de-burr the pocket in which it seats or you'll risk cutting the on the way in.
Many people advocate buying two or three seals juuuusssttt in case you need to do it more than once.
The other potential cause of a leak right in there is a loose nut on the chain drive sprocket. It needs to be torqued to EDIT a significant value (sources disagree but at least 40 ft-lbs is commonly quoted) and then the locking-tab washer needs to be firmly peened over. If the big nut is at all loose - you will have a significant leak that can make quite a mess.
To torque that nut, just pop the bike into first and get someone to hold the rear brake on. You will need a BIG metric socket. I cannot recall the size, but Princess Automotive (Cdn version of HF - but without all those stupid GD%$#@## coupons) stocks all of the relevant sizes.
Just in case you've never shopped there, here are the addresses of the two P-A stores in the Ottawa region:
- 3055 Palladium Dr. in Kanata
- 1111 Ages Dr. in Ottawa
Last edited:
Just a long short... Can you see smoke when the alternator cover is screwed back on? The reason I ask is because directly below the alternator on the inside of the header pipe there is a vent hole. Could the smoke be leaking from this vent due to a hole/leak in the headers inner liner? You would also observe significant smoke from the exhaust pipe.
Changing the pushrod seal: I always buy two seals in case something goes wrong - they are a cheap item. It is easiest to remove the chain and small sprocket to get clear access to the seal. Before removing the chain flatten the locking washer tab and with the bike in gear (3rd or 4th) and foot brake on loosen the nut. MaxPete mentions above the need to de-burr the pocket the seal fits in. The outer edge can be razor sharp and this will take a slice out of the new seal. I packed the space with grease then used a needle file to remove this sharp edge. I did not use a normal filing action, I inserted the file then wiped it around the edge to remove the sharpness. If you have one then a hand de-burring tool will work well. The grease was there to catch any bits of metal and was then cleaned out.
When re-tightening the sprocket nut make sure the washer is correctly fitted over the splines. Then tighten the nut to hand tightness. I refit the chain, sit on the bike in a higher gear (3rd or 4th), apply the foot brake and then tighten the nut to the required torque. There is some debate as to what the torque should be. My Haynes manual gives the following in ftlbs:
XS650 D (US) 72 - 87
XS650 E (US) 36
XS650 Specials (US and UK) 47
Note: Perhaps there was a Service Bulletin regarding the changes in torque setting??
Personally I use the 47ftlb value on my 81 Special and have not observed any leakage, perhaps I am lucky! As MaxPete points out, remember to bend and lock the washer tab. These nuts can come loose and the locking tab is your insurance.
Regarding the pushrod, you mentioned the threaded end. I assume this is your description of the end that has been reduced in diameter from 8mm to approx. 6.5mm. This section sticks out of the oil seal and is reduced in diameter to fit into the worm mechanism. Make sure you squirt oil inside the lips of the seal and oil the pushrods before inserting them. Insert the pushrod very gently and rotate at the same time. If you push it straight in unlubricated you may damage the seal.
Note: I recommend de-burring the edge when replacing any oil seals on the left side of the bike i.e. crank seal, final drive seal behind the sprocket, pushrod and gear change.
My apologies. I initially quoted 90 ft-lbs torque on the countershaft nut - as Paul statesabove, the correct value is more like 40-50 ft-lbs.
I don’t understand why the value differs from year to year because as far as I am aware, none of the relevant parts changed....
In any event, I have edited my earlier post.
Pete
I don’t understand why the value differs from year to year because as far as I am aware, none of the relevant parts changed....
In any event, I have edited my earlier post.
Pete
blank slate
XS650 Addict
Amazing info guys. I have confidence to do this now. Parts will arrive today, and maybe I’ll start to work on it.
Maybe a silly observation but I saw a ball in the adjuster cover but not in the seal. if there is a ball missing in where the seal is, can I try to simply insert a ball in there and see if leak stops?
Maybe a silly observation but I saw a ball in the adjuster cover but not in the seal. if there is a ball missing in where the seal is, can I try to simply insert a ball in there and see if leak stops?
MaxPete, I have seen 90ftlbs quoted by others and this probably comes from the top end of the XS650 D (US) 72 - 87 specification that appears in the Haynes manual. I am sure someone will dig up an old Service Bulletin that will explain the reasons for the wide variation. I do not know what the best value is, I just stick to the Haynes manual which may or may not be correct.
It is important to know absolutely where your balls are. Guessing whether or not they are in place will not give any certainty. When you have the oil seal out you will be able to remove all the pushrod sections and balls with a telescopic magnetic pointing thing except for the mushroom looking pushrod which is deep in the clutch. Working from the clutch out you have:
When you change the seal you first pull out the push rod with the reduced diameter end. Then remove the seal. Now insert the magnet and you will pull out a ball bearing. Reinsert the magnet and out will come another pushrod (Bimetallic or all steel). Insert the magnet again and the last ball bearing will come out.
I picture would be worth a 1000 words here but I do not have one. I am sure that in the last month or two 5twins posted an image showing all the parts laid out. I will try and locate it.
- The mushroom shaped pushrod - looks very much like a little engine valve. Must be removed from the right side of bike.
- Ball bearing - can be removed with magnet.
- Pushrod - possibly all steel construction or bimetallic made from aluminium and steel end caps - also removed with magnet.
- Ball bearing - removable with magnet
- Push rod with a reduced diameter at the external end so it fits into the worm mechanism.
When you change the seal you first pull out the push rod with the reduced diameter end. Then remove the seal. Now insert the magnet and you will pull out a ball bearing. Reinsert the magnet and out will come another pushrod (Bimetallic or all steel). Insert the magnet again and the last ball bearing will come out.
I picture would be worth a 1000 words here but I do not have one. I am sure that in the last month or two 5twins posted an image showing all the parts laid out. I will try and locate it.
Cal Schilling posted a diagram in the following thread at Entry 167:
http://www.xs650.com/threads/82-xs650-starts-then-dies.46643/page-9#post-553262
On the diagram the left most push rod has the reduced diameter section to fit the worm mechanism and the far right pushrod is the mushroom shaped one.
In Entry 171 5twins shows a closeup on the left most push rod.
http://www.xs650.com/threads/82-xs650-starts-then-dies.46643/page-9#post-553262
On the diagram the left most push rod has the reduced diameter section to fit the worm mechanism and the far right pushrod is the mushroom shaped one.
In Entry 171 5twins shows a closeup on the left most push rod.
Yes, the "about 90 ft/lbs" I usually mention for the countershaft sprocket is sort of an average between what I found in the factory '76-'77 supplementary manuals (72-87 ft/lbs) and an early '70-'74 factory manual (13 kg-m or 94 ft/lbs). The early spec is actually 13 ± .1 kg-m, which is about 93-95 ft/lbs. This is one fastener that needs to be really tight to avoid leaks. I totally don't agree with that later lower 36 ft/lb value Yamaha assigned to it, I don't know where they were coming from with that. I'm not crazy about the 47 ft/lb value either. I do mine up at about 90. I've had no issues, leaks or otherwise, using that value for many years.