Charging system not working

Caleb Hurst

XS650 Enthusiast
Messages
43
Reaction score
19
Points
8
Location
Nashville TN
Hey guys!

I am very new to this page but am loving all of the helpful information provided on this site.

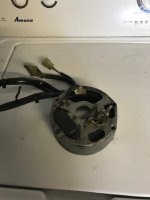
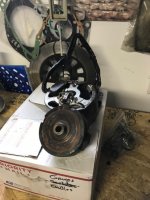
I just finished restoring a 1981 xs650 and installed a new LED headlight as well as a new taillight. I rode around for a couple days with no problems, until the other day I noticed my headlight was puttering in time with the engine. Pulsing along with my RPM’s.

By the time I got home I had no electrical. The lights would only come on if I was riding around 40mph but as soon as I slowed down all the electrical would go out. Bike still would run but no lights.

Anyone have any suggestions to point me in the right direction? I have installed a brand new battery so I doubt that’s the issue
 
You have a volt/ohm meter for troubleshooting?
 
OK... recharge the battery. Write down the voltage when charged. Start the bike and record the voltage at idle. Should be about 12V. Slowly rev the engine and watch voltmeter. Should steadily increase to about 14-14.5V at about 2500-3000rpm. Let us know what you get.

You still have the stock charging system installed?
 
Up near top of page you will see TECH Clicking this takes you to a list of topics, Such as electrical. Scroll down looking for the Charging System Guide. This gives you all the procedures and specs you need to trouble shoot you charging system.
Quite often it's something simple, like bad brushes, dirty connections or switches.
Leo
 
Howdy Caleb and welcome from Canada's sunny southern coast in Windsor, Ontario.

Below is a picture of your alternator and the little bracket on the left that holds the two alternator brushes in place.

NOTE: they don't like like a real "brush" - they are actually small rectangular blocks of carbon with a spring to press them against the spinning alternator rotor that you can see inside the engine case in the photo.

They are held in by two or three little JIS screws (they look like Phillips - but they are NOT Phillips - they are Japan Industrial Standard head screws and you need a JIS screwdriver to work on them).
maxresdefault.jpg


Here is a photo of the late model (1980-84) brushes like yours removed from the housing.
D2166C9D-EE73-44AB-A1F8-A2FACF4CC434.jpeg


When an XS650 stops charging the battery, the problem is usually that the brushes have worn down (they must be 7 mm or longer to work properly). They are cheap and easy to buy and replace - but you must buy the ones for your year of bike - the earlier brushes are different from those on the 1980 and later bikes.

When you're replacing the brushes - clean the slip rings on the rotor. The slip rings are the circular surfaces on which the brushes rub when the engine is running. Most of the time, that cures the problem.

If it doesn't - report back and we'll have some more suggestions.

Pete
 
Last edited:
The brushes in the pic MaxPete posted are the early type. You see one has a long bent strap on it and the other doesn't.
The later, both brushes look like the brush on the right. A short strap.
Leo
 
The brushes in the pic MaxPete posted are the early type. You see one has a long bent strap on it and the other doesn't.
The later, both brushes look like the brush on the right. A short strap.
Leo

Oops - my mistake. I just inserted a photo of the correct later model brushes.

Thanks Leo - good catch.

Pete
 
wow! thanks so much guys!! I'll order the brushes right away!

also I did hook a voltmeter up to my battery and rev up the engine for a bit and there was no noticeable change in voltage on the meter. So I'll start with the brushes

thanks
- Caleb
 
A few notes on brush install as it can be rather fiddly. First, the wire is attached to the top of the bracket so it must be wrapped around to the under side. Wrap it towards the outside of the bracket (as shown in Pete's pic). There is a groove cut into the brush block for the wire to pass through on the outside edge (also shown in Pete's pic). Last thing - the insulation plate is not square, it's rectangular, and it only fits down into the brush block correctly one way. In Pete's second pic of the brushes themselves, the top brush has the insulation plate turned the right way, the bottom brush does not. One more thing - place the brush into the brush holder first then put the wire on top of it. Placing the wire connector under the brush bracket will hold the bracket out of the holder too much.
 
Hey guys, sorry for the delay I have been out of town. I replaced the brushes, and charged up my battery, when I rev the engine my voltage will climb from 12.3v to 12.5 but no more. No matter how high I rev It up.

It also left me stranded yesterday, which is the first time it has done that. My battery died, most likely because it wasn't charging. I could get it started from a friendly guy on the side of the road via jumper cables from his car (I know this is generally not a good Idea but I had no other options). brought it back home and charged up the battery again, still getting the same readings. Anyone have any suggestions?
 
Tech section + electrical + How to guide charging diagnotics + read entire thread. Plenty of things to look and test. Be patient an do not assume anything. You need to ensure you test all cause if you dont problems will keep draining your battery and kill something else. Dont buy cheap rotors if that is the problem, talk to Jim he is the rebuild man! ;) Little plug for ya Jim!
 
Well now you got to figure out what of the three may it be
I have had in the past a bad rotor that stopped it from charging
Bad Reg/Rec bad from charging
Bad Alternator bad that kept it from charging
Have you done the slap test with a screw driver to see if it sticks to alternator when you turn key on.?
Ok good luck on the testing and if you need parts I got tested Alternators and rotors
 

Attachments

  • elect1.jpg
    elect1.jpg
    33.8 KB · Views: 179
  • alt.jpg
    alt.jpg
    69.2 KB · Views: 176
I haven't done the screwdriver test just yet. I've never heard of that, how would I go about doing it? thanks for the info!!
 
my bike is also a 1981 model and from what I know don't I need to convert the ignition to something different? I'm not very educated on the ignition system of either models would love some information on that as well if anyone knows anything!
 
just gave it a shot and had no luck. Not even the slightest bit of tug on my feeler gauge:( does that mean I need a new alternator?
It means you're not charging.... ;)
This isn't a one piece alternator that you just replace as a unit like you do in a car. It's bits and pieces... Could be the rotor, reg/rec, brushes or associated wiring. Have a go at the troubleshooting guide.
I've also copied and expanded slightly on the guide. It starts at comment #2
 
I wouldn't do that. Your ignition pick-up is mounted on your current alternator and it is triggered by your current rotor. If you change to that charging system you're looking at, you'll need a new ignition too. That would be another $100+ on top of the charging system cost. You can fix what you've got for much less. Time to start testing charging system components. 1st up should probably be the rotor. Measure the resistance between the slip rings. Good ones usually read in the 4 to 5 ohm range.
 
Back
Top