TimeMachine
SeventyEighte
Amazing how you put that all together Pete ! And I don't mean Lucille , I mean that whole Article !! Fine Work 

he lower fork s
SPRINGS & THINGS
View attachment 101916
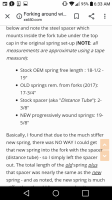
Basically, I found that due to the much stiffer new spring, there was NO WAY I could get that new spring into the fork with the spacer (distance tube) - so I simply left the spacer out. The total length of the old spring plus that spacer was nearly the same as the new spring - and as noted, the new spring is much stiffer than the old linear wound unit.
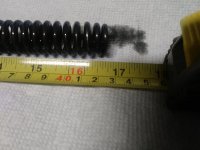
- Stock OEM spring free length : 18-1/2 - 19"
- OLD springs rem. from forks (2017): 17-3/4"
- Stock spacer (aka "Distance Tube"): 2-3/8"
- NEW progressively wound springs: 19-5/8"
Once you have the new spring installed, pull the inner fork tube "up" and your fork should look like the photo below.
View attachment 101917
Finally, you will add the fork oil. We could get into a huge long "oil" debate here- but I hate that sort of thing and so here is what I noted from my research on forks and fork oil:
So - taking all of that into account, plus the fact that I am...ahem...perhaps, not as svelte as I once was...I made some choices - and I will live with them for now. The under-sprung issue is looked after by the new stiffer spring. The manual suggests 155cc of either 10W30 motor oil or simple 10W fork oil - and so I poured 160cc of 20W Lucas fork oil into my forks to increase the damping coefficient.
- the XS650 forks are felt to be under-damped (too bouncy) and under-sprung (too soft);
- many people have added more oil and thicker (more viscous) oil to the forks;
- some people have modified their damper rods (the Minton Mods) - but there is little or no data on doing this to 34mm forks from what I can tell. All of that work appeared to be on later 35mm forks which are a different design.
My initial riding shows that this works well: the bike feels much steadier and corners better with no bobbing and weaving. I am happy and if I want to change the oil later - that would be a simple 30-60 minute job.
Once the fork oil is in place (I used a kitchen measuring cup - but do not tell Mrs. MaxPete), you set that spring seat / top hat looking washer on the top of the spring (with the little protruding part facing down into the spring) and then push down on the spring with the fork cap while turning the fork tube until the threads in the cap start to engage. I would keep screwing the cap in by hand until you cannot turn it anymore - and then finish tightening the fork cap once the legs are back on the bike and you can secure them with the lower (ONLY) triple-tree pinch bolts.
NOTE: I suggest doing this "by-hand" so that if you get it started cross-threaded, you don't power-on and wreck the components.
 again..
Once again. 5T's wisdom speaks loud and clear. I agree this is how springs go south, otherwise how could me and Pete be over an inch difference while my bike has not been in service for a few years.Just a little note on all these sacked out fork springs we seem to encounter and my theory as to the cause. I'm a big fan of centerstands and use them whenever my bikes are parked for more than just a short time. But, many people don't use them. They'll store the bike all winter or maybe even for years parked on the sidestand. This puts more weight on the forks and compresses them more, and I think this is a big contributor to the sacked spring problem.
Maybe as a one time tool you could file down a broom handle to a appropriate shape and then hammer it in. Then flip the fork over stand it on the protruding wood with weight and hit the Allen head bolt with an impact or even better air impact?Well unfortumately i am unable to make a tool like the one Pete fabbed up, to dismantle my 76 forks.
It might be cheaper just to cut a slot in an old socket.
I will also try cutting up a socket, Pete can i get poctures of your tool from the front view.
The socket used needs to be small enough its perimeter dosnt go "around" the desired points of interior contact.
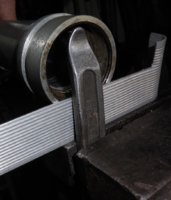
Yea, thats good but ultimately the final tool will be determined by gentle trial and error, no sharp edges!Here is another photo Norton - does it show the detail you need? The photo shows the tool (below) mating with the damper rod.
View attachment 151910