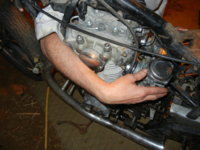
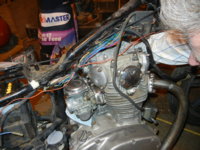
Please help...can't get bike to start after a long period in storage!!

Arnold111

XS650 Member
Messages
25
Reaction score
0
Points
1
Location
Los Angeles
Hello everyone, I have just joined this group, although I have been visiting it from time to time over the past year and a half.

I have a 1983 Yamaha XS 650 Heritage Special with 14,000 miles that was primarily ridden by my ex-girlfriend. After our relationship ended, I had to put the bike into storage. It was supposed to be short term storage, but ended up being for about 13 years. Yes, I made the mistake of storing it with some gas in the tank, and without any preparation for long term storage! I'm not very knowledgeable about the mechanics of bikes, but am keen to learn.

In 2013 I was able to get all my bikes out of storage and attempted to get the Yamaha running. I used the internet, YouTube and this forum for information and guidance.

The first things I did was to remove the carbs and clean them - well, I thought I had cleaned them, but I don't think I did a very good job! After putting it back together, the bike did not start - not surprised! I was unable to work on the bike again until recently (March 2015). This time, I took off the carbs again and did what I think was a thorough clean and rebuild. I ordered 2 rebuild kits from Mikes XS which contains a Push-in Float Valve assembly with O-Ring, Carb rubber passage Plug & Float bowl Gasket. I cleaned the carbs well with carb cleaner. I removed all the jets and made sure they were clean. I put it all together carefully and still the bike would not start. If I squirted some carb cleaner into the carbs, it would run for a few seconds and then die.

So I figured the diaphragms were bad as even though they didn't have holes, one was dropping down too fast in the chamber when I tested it. I ordered two new diaphragms from JBM Industries, installed them today, but still the bike won't start. Before starting it, I drained all the gas from the tank with the intention of doing a vinegar tank clean, but the gas came out very clean. I removed the petcock and looked inside the tank for signs of rust or debris and there was nothing- it looked pretty clean, just a tiny amount of surface rust in one spot of the tank - and the petcock screen filter was clean.

In addition to the above, I also did the following work since March:

1. Removed petcock and rebuilt it with a petcock rebuild kit (it was leaking fuel when I filled it with gas in 2013)
2. Drained engine oil and replaced. Oil filter was clean.
3. Bled the front brakes - there was a lot of gunk in the master cylinder.
4. Replaced the spark plugs with the correct size NGK plugs. Also replaced the spark plug caps with new ones from Mikes XS, as one had a small crack. There apparently is a spark - I know this because a mechanic who came over to help me get my Harley started, tested it and found there was a spark.
5. Fitted a new battery
6. Put on new tires on both wheels

When I squirt carb cleaner into the carbs, the bike starts up, runs for a few seconds and then dies. If I put a lot of carb cleaner in (i.o.w. a good longish squirt), it will run for about 5 seconds. Just to clarify, I have stock air boxes, but whilst doing all of this work, I have left them off, as they are a pain to work with. So when I try to start the bike, I do so with the air filers off.

Gentlemen and ladies, what am I doing wrong here? I would appreciate some direction as to what I should do to check what's preventing the bike from starting?

Thank you very much in advance - I know that the knowledgeable and generous members of this forum will help me get my bike going!
 
did you read the carb guide? you choke feed sounds blocked. Look at the float bowl. There is a small hole along the edge. It should be clean. Spat some carb cleaner in it. Wear eye protection! don't ask.
 
While you did probably clean the jets well enough the passages may still be blocked.
You will need to remove them again, remove the pilot jet.
Use aerosol or spray can carb cleaner with the tube attached to the cans nozzle.
Use a small check of wood or plastic to block open the throttle plates.
Inside the bore of the carb right where the top of the throttle plates sits are three holes.
The one closest to you is the hole that the mix screw feeds. This is the hole that feeds the gas at idle. The other two come into play as you open the throttle.
Push the tube (on the can of cleaner) as far in the pilot jet hole as you can.
As you spray look down in the carb at the three holes to see if they are passing gas.
If not you can probe the holes with a piece of wire. Preferably soft wire. Some, me included have used the thinnest guitar strings. The holes are metered and a specific size so don't hawg'em out with over size wire or going in a circular motion in the hole.
Do use eye protection like angus67 mentioned, Carb cleaner will blind you.
Follow up the carb cleaner with compressed air.
If you have the time to let them sit you can use Sea Foam to soften the varnish but it will take a day or so of soaking. The reason for using Sea Foam is carb cleaner and rubbing alcohol(good for breaking down gas tank varnish) will evaporate before it can soften the varnish.
Also pay attention to the choke passage like angus said. Using carb cleaner and compressed air no probe wire. There is a small jet pressed in there(thanks 5twins) that is metered and once buggered not fixable.
Hope this helps.
 
Thank you very much Angus67 and weekendrider for your replies - it is much appreciated! I am going to try cleaning the choke hole first, as I can probably do so without having to remove the carbs from the bike - am I correct on this?

Also, weekendrider you said there is a small jet pressed ino the jet passage which is not fixable if messed up. Should I be attempting to remove this small jet to clean that passage way or not? It doesn't sound like I should be doing that, but I just wanted to check.

Final question to weekendrider - do you agree that I should first attempt to clean the choke hole, or do you strongly feel that I should remove the pilot jet first?

Thank you!
 
The choke jet is not removable/replaceable/fixable. You can clean the varnish or debris out with compressed air and a fluid that dissolves gas varnish.
I strongly feel like I would want every passage clear before I re-installed the carbs.
 
Yes, you can clean the choke jet without removing the carbs, just pull the bowls off. You'll have to do both because each one has a choke jet. It's easy to miss this one when cleaning because you can't really see it in the bowl .....

ChokeJet.jpg


To insure you got it cleared, do this check .....

ChokeJet2.jpg


The jet is way down in that bored passageway, near the bottom. I use a needle tip attachment on my blow gun. This allows me to place the tip right over the hole in the jet and blast it clear .....

BlowGuns.jpg
 
5twins, thank you for coming in on this.

So here is what I did today:

1. I read the carb guide a few times and removed the carbs from the bike.

2. I cleaned the hole on the edge of the float bowl (as suggested by angus67) by squirting carb cleaner into the hole (the carb cleaner can has a thin plastic tube on it, so I could insert it deep into the hole). I was careful how I held it to avoid squirting in my face. I also squirted carb cleaner into the other hole in the float bowl - I did this on both float bowls and then squirted compressed air into both holes from a can of compressed air, which also has a thin red tube attached to it.

3. I removed the pilot air jets and cleaned them again and also the pilot jets that are beneath the two rubber tabs - I used carb cleaner and air.

4. I also squirted carb cleaner into the pilot jet hole and observed the carb cleaner flowing through the top of the 3 small holes in the bore - couldn't tell if it was flowing through the bottom two.

5. I removed the diaphragms again, shot some carb cleaner inside (not on the diaphragms) and blew it out with air and then replaced.

6. I then set about reinstalling the carbs onto the bike and battled with it for two hours. I removed the left side manifold to get the carb body into the tight space, then replaced the manifold, but still couldn't get the carbs seated into both manifolds. When I got one side to "pop" in, the other side dislodged slightly. (I did loosen the screws of the clamps on both sides). I lubed the manifold boots with silicone and also the edge of the carb that slides inside. I have pushed and pulled and tried different angles, even removing the left manifold and trying to install the carbs onto it and then trying to install the manifold with the carb attached, but all to no avail - those puppies aint going on for some reason....

7. When I got 5twins post, I removed the carbs from the bike again and took off the float bowls again. My bowls do not look the same as the photos on 5twins's post, but they do have a hole on the rim and another hole inside the bowl near the bottom and directly below the top hole. I cleaned them again with carb cleaner and air and did the light test suggested by 5twins, but I could not see any light coming through. I cannot see much inside that top hole, even when holding the bowl in the direct sunlight - I don't know how 5twins took thse photos. I used a very thin piece of wire from a wire brush to gently probe inside the top hole to try and dislodge anything there, but that didn't work and I still cannot not see any light.

You gotta admit I'm trying, right!! So after all this, I have two more questions:

1. Is it possible that the top holes in both float bowls are blocked and if so, how do I get them unblocked? My carbs BTW, are quite clean inside and do not have any visible varnish or gunk.

2. What's the secret to getting the carbs to attach to the manifolds? Whats have I been doing wrong?

Thanks again fellows!
 
Try shooting carb cleaner in those holes till they are full. It's not easy but can be done. Let it soak.
those spray cans of air are not really enough for carb cleaning. An air compressor with blow guns is better.
The compressor doesn't need to be very big. Harbor Freight sells a small one for around 50 to 70 bucks, depending on coupon. They have two. One has a round tank the other is a cylinder shape tank.
I bought the Cylinder tanked one, it's 1/3 hp, 3 gallon. Just plugs in to the wall. It's handy to have. My big compressor out in the shed is far from the vehicles and sometimes I'm too lazy or the lawn to wet to move the vehicles to the shed. This small compressor is great when checking tire pressure and you need a little air.
Leo
 
If you use the carb cleaner with the small red tube the cleaner should spray out through the other hole. If it does, the hole is clear. If it doesn't, spray into the other hole swap back and forth. Your bowls will not look like 5twins first photo but the 2 holes we are concerned with are about the same in your BS34 carbs.
Just to cover basics; your handle bar choke cable is hooked up and you can see it pull the choke plungers open?
 
Carb reinstall; get them angled up into the manifolds (you know what I mean :wink2:), kneel on the right side of the bike. Now slide your right arm above the exhaust pipe, behind the frame down tubes and across the front of the cylinder, go all the way to your armpit so you can reach back and grasp the far (RH) side of the carbs. Grab with both hands, pull up and forward at the same time. The carbs will go right in, because you now have some leverage. Sounds goofy but it really works. I do this on many bikes to get carbs back into the manifolds. My arms are long so I can even do reluctant 4 cylinder bikes this way. This is much easier with the bike on the lift but can be done on the floor also.
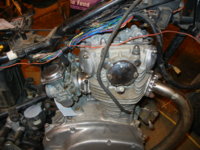
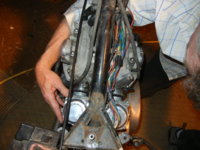
See photos 2 posts down this thread.
 
Last edited:
Discovery!!! I sprayed carb cleaner in the holes as suggested by gggGary and found that it's flowing through both holes in one carb only. As per XSLeo's suggestion, I have sprayed some carb cleaner in the hole that seems to be blocked and am letting it soak...

How long should I let it soak for? Overnight? I presume that after that, I hit it with some compressed air and see if it clears? I may have to get a stronger airsource.

Any suggestions about how to get the carbs mounted back onto the manifolds as previously described?

Thank you!
 
Note post above is revised, arm goes above the exhaust.

carb mounting 004.JPG carb mounting 005.JPG

carb mounting 006.JPG carb mounting 007.JPG

This bike is missing the RH down tube, it went to live with a member in New York.

PS intake "hose clamps" need to be very loose, screw threads just through the nut.

Yes this is one pretty XS650!
But it has 155 both sides and ran on starter fluid now to see if it will really be a runner, ODO showed just over 12K when it was smashed.
 
gggGary, thank you for the info about the carb resinstall. When you say I should kneel on the left side and slide my right arm around the front of the cylinder and then reach back, I tried this - do you mean use my left arm? I've got short arms BTW, I'm only 5'5"...
 
well, it should still run on one cylinder, but ti wasn't. with all the very thorough cleaning you have done, I bet you got what ever it is that was blocking. Do you use fuel filters? the ones in the tank are not good enuf. good enuf 40 years ago, but not now.
You need a air compressor. Even a airbrush compressor blows harder than a can-o-air. I find canned air isn't even good enuf for computers. I use my compressor at 100psi once ayear just befor summer to clear out my pcs.
 
Switch the hole that you blow the air through, back and forth from top to bottom often loosens the junk.
 
I'm going to have another shot at cleaning out the float bowl in the morning. Since I don't have an air compressor, I may have to take the bowl in to a local shop for a quick blow job....

In the meantime, while the carbs are off, I think it's a smart idea to fit a fuel filter as Angus has suggested. Where can I see a picture of a fuel filter that has been fitted and what it looks like? From what I can see, the best place to locate it would be on the right side, as there is a bit more space? Correct or not? Should I replace the existing fuel line with a longer one, or simply cut it to add a filter? If I cut it, I think the line will be too short, as the existing fuel line is just long enough to reach the petcock without much play.

What do you think?
 
Hi Arnold,
nobody's said or asked, are the EPA-mandated brass plugs that stop you adjusting the slow running needles still there?
If yes, dig the bastards out so you can remove the needles, springs, washers and o-rings and clean those tiny passages because that ain't been done since the bike left the factory.
 
Yes, you can't do a proper cleaning of the idle circuit with the mix screw still installed. These are the 4 holes you're concerned with when it comes to the idle circuit. The 3 clustered together by where the butterfly plate closes flow directly from the pilot jet. You were probably able to clear those. The 4th hole, the one by itself and slightly ahead of the others, flows from the pilot jet to the mix screw, then out into the main bore. With the mix screw in place, you won't be able to clear it .....

OutletHoles.jpg


These 4 holes are on the top side of the main bore. There are none pertaining to the idle circuit on the bottom.
 
A quick progress report...I topped up the hole on the float bowl with carb cleaner last night and let them soak overnight. When I came back this morning, the carb cleaner had evaporated. I then squirted fresh carb cleaner through both holes and it squirted out in both directions. That was good to see - it seems that the carb cleaner dissolved whatever debris was in there and the passageways are clear. I'm pleased about that...

Thank you Fredintoon and 5twins for your comments about the fuel screw. As you suggested, I drilled out the brass covers and removed them with a self tapping screw. The carb guide written by 5twins states that the fuel screws have been turned in a certain number of turns as it controls the richness or leaness of the mixture. After I've removed the mixture screw, spring, o-ring and washer, I'm going to flush out the area with carb cleaner as per the guide. Then I'm going to replace the mixture screws, screw them in until they just touch the bottom, then turn them out 3 full turns. I presume that this is what I should be doing....if not, please let me know ASAP, as I'm quite a newbie at all of this...

Final question - I reassembled the carbs this morning before learning about the fuel mixture screws. In order to clean out the fuel screw ports, do I have to remove the diaphrams and needle and also the float bowls?

Thank you!
 
you can use any small fuel filter for even a lawn mower. cutting the line wont make it shorter when you put the filter between the two. Got to have a filter on mc's.
 
Back
Top