Yes, for your weight, stock springs may be just the ticket. I never found any of the sets I tried stiff enough but I'm a good 50 or 60 pounds heavier than you. Stock '77 springs may be hard to come by because they were only used that one year. '78 and later springs would be easier to find and they will fit OK. They are a little longer but still fit fine. Here's the fork specs compared .....

 
Last edited:
Thanks 5twins.

Last night's test run went well.

All in all, in comparison to how it felt before the fork oil change, I'd say it has life now. The thing moves smoothly and predictively. Not too much brake dive, soaks up road bumps that used to put me on notice.

The little bit of fork rattle upon takeoff has dissipated.

I've got another half quart of fork oil, so I'll probably run it as is for a short bit and do another change soon to flush all the old junk. At that time I'll reinstall with the 1" spacers I left out on this go. A little A/B comparison to see which I like better.

Tracking on my rears show them out for delivery. Looks like I'll get to install those on Monday.

Also out for delivery are the carb clamps, finally! This one was definitely the fault of USPS.
 
If you do get some stock springs and find they are still too stiff, another option might be SR500 springs. They are shorter than both the 650 ones, and softer too. The SR500 forks were virtually the same as those used on the 650 so the springs would swap right in .....

 
Well, the new rear shocks are installed.

First, the bushings supplied with the shocks needed about a 1/32" ground off the ends to fit inside the bottom mount. Both sides, same amount. No big deal.

In removing the old ones, I remember thinking how lightly torqued the R top mount was. Also, the R side had a very thin steel washer, as opposed to the thick chrome washer on the left.

Upon install of the new ones, I found that the acorn nut acted like a worn out press fitting for the first 1/4". With a washer, it wouldn't bite at all. Without, I was able to get two turns on decent threads.

Coincidentally, on Tuesday I'll be working with the gent who first helped me with Stella by doing the test ride and hauling her back to town with his truck. I had planned to ask him to look at her now, after the work I've done. Added to that conversation will be a request for him to replace the top mount stud/s. He's got the tools and experience to do it well.

Any ideas other than replacing the stud? Any suggestions to keep in mind if replacing it is the way to go? I'm a bit nervous doing something to the frame.
 
I'm pretty happy with my new suspension. It could be better I'm sure, but 100% better than the unserviced fronts and original rears. The last piece of the puzzle will be the seat I'm anxiously waiting on.

With a little thought and research, I'm going to attempt to tap the stripped top shock mount one size down. Much less invasive than a complete stud replacement and that nut is only holding the shock on the solid shaft behind the threads.
 
Hi DB/All: on the matter of the stripped stud - isn't there a helicon like-type device that could be used to beef up the threads on the stripped stud?

If not, you could simply cut the stud off flush, and carefully centre-punch and drill a clearance hole for an M10 bolt (choose the correct pitch to match the suspension acorn nut obviously) and then just put the bolt in from the back side. You would likely have to grind a little flat area to accommodate the bolt head. Then, just put a little tack weld to secure the bolt head in place and Wah-La... a stud is born.

Just a thought....
 
Thanks Gents, my colleague is happy to take of this little problem of a stripped stud for me. We're going with re-tapping first, if that doesn't work something along Pete's suggestion.

Last night I installed Mike's clamp bands. Yeah, PM sent to gggGary. They're tight, but I had to put a washer on one of them because the screw head pulled right through.

I haven't tuned her with the tightened clamps yet, but I did turn the screws in 1/4 turn and was answered with an increase of idle RPM. I had had them out 3/4 to combat a decel pop I'm attributing to loose bands creating a leak. This morning she started with only two good kicks, I'm hopeful for a single-kick start once I do a fresh tune on good tight bands.

I also heard from Craven, my rack is now in the post and should arrive by the 28th. Hope so, as I head out of town on the 30th and won't be back until after Christmas.
 
If you're running your mix screws at only 1/2 to 3/4 turns out, I think that's a bit lean for your carb set. The factory recommended setting is 1 1/2 ± 1/2 turns out which is somewhere in the range of 1 to 2 turns out. The mix screws usually dial in pretty close to the factory spec, if not right at it, even with slightly larger pilot jets for mods. But keep in mind, this factory setting spec is meant to be just a starting point, an initial setting that you fine tune from to find the best setting.

I suggest that when you do get around to setting the mix screws again, you start with both set to the factory 1.5 turns out spec. Then adjust one side at a time. Pick a direction, in or out, and start adjusting the screw in 1/4 turn increments. Wait a few seconds between each quarter turn to let it have an effect. Keep going until the idle falters or begins to slow. Note what setting you're at. Go back to the 1.5 setting and work the screw in the other direction in the same manner. What you're looking to find is what's called the "sweet spot", a range of a half turn or so where the engine will idle fastest and smoothest. Best mix screw setting is somewhere in that range. If you are getting lots of popping on decel, staying towards the richer (screw more open) side of the range can help.

Adjusting the mix screw may seem to have little, if any, effect if your idle speed is set too high, like at 1500. Have it dialed down to at least the recommended setting of 1100 to 1200, and it may work even better if you turn it down still lower to like 1000.
 
Thank you, 5twins. I was unclear and should clarify, my figures were referencing spec. With the loose bands and decel pop, the screws were 3/4 turn out from spec. This solved the decel pop, And with tightened bands I turned them in 1/4, so 1/2 out from spec.

I know you favor tuning with both cylinders running, but I'm going to use the dead cylinder method. I do believe this is one of those instances where experience helps you discern subtle differences in sound that a less experienced ear might not. I have my alligator clip handy to ground the dead side's plug.
 
I've got an appointment in the morning to see the seat maker and test ride the new foam before he covers it. Very excited about that.

I'm also in the process of tuning now that the bands are tight. Tonight, I checked the cam chain tension and pulled the various covers needed to do valves and timing in the morning.

With the valve covers off the bike and my wife at work for the night, I'm settling in to some polishing.

IMG_20161116_202553957.jpg
 
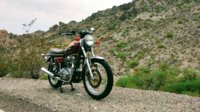
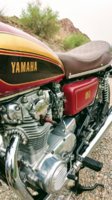
With the seat delivered, I am calling Phase I of this resto-mod essentially complete. The major systems other than clutch and motor have been largely torn down, cleaned, greased, reassembled, adjusted, and brought close to tuned.

Riding home with my new seat, I brought her past 70 for the first extended time. Up to 80-82 she felt great. Vibes were present, subtle, and pleasing. No wobble, scary noises, or dropped pieces. Plenty of horse left in the barn.

I still have an intermittent stalling upon stopping and every once in a while gently coming off idle and a few other nitpick items, but the major jobs are complete.

Phase II, this January will be new wiring including the solid state regulator and rectifier, a few retouches for the seat maker, bringing the paint back up to lustre, and the rack/luggage solution.

Phase III & IV, sometime further down the line, will be the clutch and motor.

You all are truly an invaluable resource, and I thank you from the bottom of my heart for helping me learn the little bit that has taken me this far.
 

Attachments

  • IMG_20161120_140827845~2.jpg
    IMG_20161120_140827845~2.jpg
    233.8 KB · Views: 198
  • IMG_20161120_135851355_HDR~2.jpg
    IMG_20161120_135851355_HDR~2.jpg
    287.4 KB · Views: 163
  • IMG_20161120_140409388_HDR~2.jpg
    IMG_20161120_140409388_HDR~2.jpg
    204.1 KB · Views: 187
Last edited:
Beautifully done Daniel - a really beautiful motorcycle which must be a blast to ride.

Pete
 
Back
Top