Tracker Extraordinaire rescue

IMG_6558.jpeg

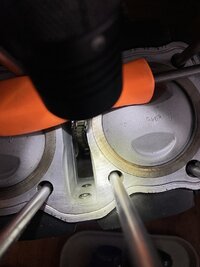
Remember reading about that darn green base gasket? that’s mostly why the top end was disassembled, And to check over what this engine is about.
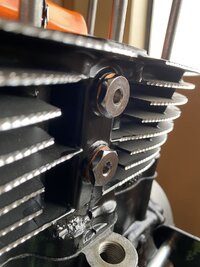
👍 now having seen the components such as rings, bore, con rods, chain guides etc… the cylinders are honed and oiled and back on a more proper base gasket.
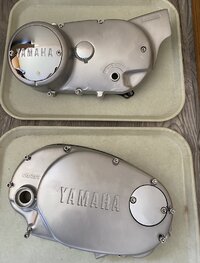
Incidentally, the front chain guide and mounts seem to be new MikesXS items not surprising at all. Those front chrome mounts are and have been noticed in other threads (Bob) to be slightly longer that original. I looked at this… discovered that the appropriate copper gaskets were in fact the same dimensionally as a neutral indicator switch gasket, except the neutral switch gasket is thicker. So I doubled up a neutral gasket with a chain guide gasket and wala, called it good.
Improvising is necessary on Your project!
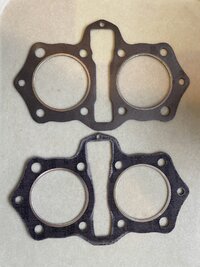
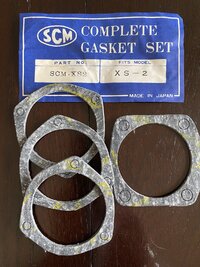
Now I’m looking at both of my in hand head gaskets. I seem to have an Athena and a SCM which are visibly different in thickness. Of course my battery is dead in my digital caliper, Dead battery! It’s normal for the times.
Im so tempted to get copper spray sealer like Jim suggests and use the thinner head gasket in hand.
And L👀
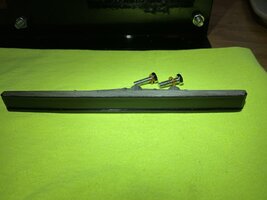
k at the Cam , best XS650 cam in appearance that I’ve had!
I was told this top end is “low mileage” and see nothing to doubt that statemen.
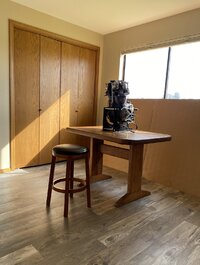
Anyway, that’s where it is currently. Pics~
 

Attachments

  • IMG_6554.jpeg
    IMG_6554.jpeg
    251.5 KB · Views: 32
  • IMG_6556.jpeg
    IMG_6556.jpeg
    240.9 KB · Views: 31
  • IMG_6557.jpeg
    IMG_6557.jpeg
    388.7 KB · Views: 28
  • IMG_6559.jpeg
    IMG_6559.jpeg
    362.5 KB · Views: 30
  • IMG_6555.jpeg
    IMG_6555.jpeg
    279.9 KB · Views: 30
  • IMG_6548.jpeg
    IMG_6548.jpeg
    235.3 KB · Views: 31
Enjoying the top end assembly 👍
Dog time 🐶 
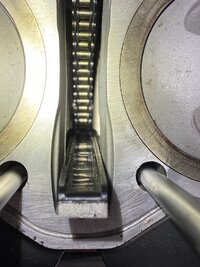
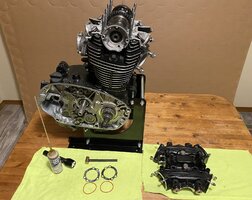
interrupted the assembly this evening but it was fun to center the camshaft using the cam end covers in place, tapping components with a small brass hammer too. Vibes are good to float everything in to position.
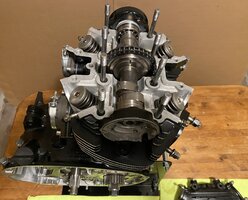
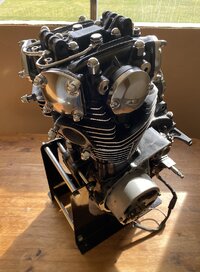
Hoping to get the top end mostly assembled this weekend.
 

Attachments

  • IMG_6574.jpeg
    IMG_6574.jpeg
    325.2 KB · Views: 30
  • IMG_6573.jpeg
    IMG_6573.jpeg
    381.7 KB · Views: 28
Last edited:
IMG_6580.jpeg
Saturday completed my top end loose test fit. The cam end covers have gasket sealer drying on one side in this all aligned and assembled state. The yet dry tappet cover is in good true position with all the valve adj covers snug and aligned. Camshaft seems to be well centered.
This was my first XS650 top end assembly. Similar to other motorcycle engines in the far past. I’m content with the trial assembly. Feeling confident that when I disassemble to seal the tappet cover with Yamabond, which never let me down in the past, and torque the head, it’s going to be fine
👍
Um, all this fresh clean chrome and stainless hardware has me looking at the silver painted engine side covers and not liking the paint. Looks like my day to actually polish side covers, which I’ve always avoided, is in the future..
 

Attachments

  • IMG_6585.jpeg
    IMG_6585.jpeg
    291.7 KB · Views: 23
  • IMG_6584.jpeg
    IMG_6584.jpeg
    309.2 KB · Views: 23
  • IMG_6581.jpeg
    IMG_6581.jpeg
    316 KB · Views: 23
  • IMG_6583.jpeg
    IMG_6583.jpeg
    305.2 KB · Views: 21
I absolutely love the way you keep your work area so neat and organized!
Engine room lol 👍
by the way that extra room needs the window replaced (behind the cardboard) and needs insulation too.
I should be working on my home, not a motorcycle! But that is who we motorcycle hobbyists are
😁👍😉
 
I don't think you want sealer on you tappet covers. My tappet covers may be different but they rely on an o-ring. There is a little bit oil droplets splashing around in there but no real pressure. Plus, about once a season you will be in there to check and adjust the clearance. My 2 cents.
 
I don't think you want sealer on you tappet covers. My tappet covers may be different but they rely on an o-ring. There is a little bit oil droplets splashing around in there but no real pressure. Plus, about once a season you will be in there to check and adjust the clearance. My 2 cents.
I think he is talking about the big cam/rocker cover. Not the 4 tappet covers.
 
I think he is talking about the big cam/rocker cover. Not the 4 tappet covers.
Correct GLJ , my intention is to seal the big cover with Yamabond. The 4 adjustment covers probably need just the Orings ? Perhaps a gasket as well but the SCM gaskets for that application are physically very thick.
I believe the thinner Athena gaskets would be better on that application
 

Attachments

  • IMG_6586.jpeg
    IMG_6586.jpeg
    505.5 KB · Views: 12
I think he is talking about the big cam/rocker cover. Not the 4 tappet covers.

Correct GLJ , my intention is to seal the big cover with Yamabond. The 4 adjustment covers probably need just the Orings ? Perhaps a gasket as well but the SCM gaskets for that application are physically very thick.
I believe the thinner Athena gaskets would be better on that application
Right... Carry on.
 
Correct GLJ , my intention is to seal the big cover with Yamabond. The 4 adjustment covers probably need just the Orings ? Perhaps a gasket as well but the SCM gaskets for that application are physically very thick.
I believe the thinner Athena gaskets would be better on that application
If you can use the O-rings that's all you should need. If you can't the thicker gaskets work better.
 
Top End assembly is completed ✔️
I put a lot of thought and extra time in the tapper cover sealing and subsequent torquing of the head !
Went around the head bolt pattern in a proper sequence in intervals of about 5 to 10 ft lb increases until the final 27 ft lb felt right. New clean chrome head nuts on cleaned studs without oil. That’s how it was.
Then I started rotating the engine over watching the cam chain plunger movement and made my best bench top estimate of proper movement. Then came the valve clearance adjustments. I enjoy the precision measuring, so round and round I spun the engine crankshaft (clutch side) watching and closing in on setting adjustments until those vale clearances repeated and felt right set on the tight side of .004 intake and .006 exhaust which is only an engine start up guess state as the valves are cleaned, seats are cleaned. I’m not sure what the clearances will do as the break in happens? I’ll be checking on that day..
Engine is properly oiled and tight and feels great manually rotating.
Clutch is disassembled and on the to do list.
Maybe it’s best to install the ignition rod, points and advancer mechanisms next? Dunno what sequence matters but it feels great to have the top end buttoned up tight !
IMG_6600.jpeg
 
Last edited:
Maybe it’s best to install the ignition rod, points and advancer mechanisms next?

I hate to say this but I think you may have the cam in backwards.
That's what he other side of the engine should look like.
1709640805116.png

The cam should protrude and have threads for the advance. This is a pic of a 81 engine so there is no bushing in the cam for a advance rod.
1709641156661.png
 
Last edited:
I hate to say this but I think you may have the cam in backwards.
That's what he other side of the engine should look like.
View attachment 263070
The cam should protrude and have threads for the advance. This is a pic of a 81 engine so there is no bushing in the cam for a advance rod.
View attachment 263071
didn't even knew you could put it in wrong 1
 
O My Groaning! 😰😖
Cam backwards of course. Who’d have thought. So bummed. This is the worst mechanical task disappointment in recent times. To me this is like watching the Falcon explode on lift off. I was so focused on figment I missed such an obvious error.
Base gasket will be fine ? Just remove the head and replace head gasket ? I’m gonna take a break here..
-RT
 
Back
Top