-
Enjoy XS650.com? Consider making a donation to help support the site.
XS650.com receives a small share of sales from some links on this page, but direct donations have a much greater impact on keeping this site going.
You are using an out of date browser. It may not display this or other websites correctly.
You should upgrade or use an alternative browser.
You should upgrade or use an alternative browser.
What have you done to your XS today?
- Thread starter I am Carbon
- Start date
-
- Tags
- maintenance
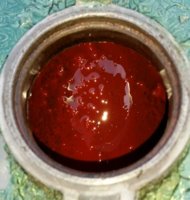
Step #10, of a 20+ step process.
View attachment 110092
MAJOR FAIL!
Looks like the MEK leached under the wrap and prep-seal.
Oh, well. Will continue with the Caswell seal.
And contemplate in agony...
Ah, that sucks 2M. I'm so sorry to see that.
What a PITA!
Bummer...Looks like the MEK leached under the wrap and prep-seal.
That looks like the chocolate eggs you buy at Easter.......ummmm
You used MEK? I read the label and the 8 MSDS pages and whew, too lethal for me.
Aw crap, that sucks!contemplate in agony...


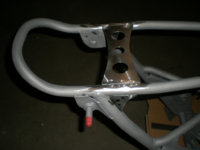
Now here's a guy who understands stress risers and gussets.Today I tacked in the neck gussets and seat rail cross brace and upright to seat rail gusset. I`ll TIG it all together next week after I make a few more tabs.View attachment 110105 View attachment 110106

Denisesewa
XS650 Addict
That's a real bummer, I've used caswells many times with great results but have always washed with soapy water and drywall screws, then dry washed with rubbing alcohol to absorb excess moisture, then air-dry, this for painted tanks , for tanks I am going to paint I use acetone.Step #10, of a 20+ step process.
View attachment 110092
MAJOR FAIL!
Looks like the MEK leached under the wrap and prep-seal.
Oh, well. Will continue with the Caswell seal.
And contemplate in agony...
Really feeling bad for you and the paint job.
Step #10, of a 20+ step process.
View attachment 110092
MAJOR FAIL!
Looks like the MEK leached under the wrap and prep-seal.
Oh, well. Will continue with the Caswell seal.
And contemplate in agony...
Oh man, that really sucks! I'm sorry to see that man.
You are awesome!
Made some axle spacers, clamped long straight edges on front and rear sprockets then lined them up to get a good wheel center and straight position. For a bike a few old timers here may recognize. (not much to go on,  )
)


Was just using it to get some wheel dimensions for the star mags but couldn't stand the crap spacers the PO had in there. And just maybe an excuse to play with the lathe.
 )
)


Was just using it to get some wheel dimensions for the star mags but couldn't stand the crap spacers the PO had in there. And just maybe an excuse to play with the lathe.
Last edited:
Yes I just found tonight that you can move the handle to all four 90's any time the tool holder is off the post. I am really scratching my head over the trigon insert holders grizzly supplies with the lathe. In order to use them the tool post has to be set off of a perfect 90 which kind of defeats the qctp idea.GggGary, is that your QCTP locking handle in the pic?
View attachment 110132
If so, did you know that if you re-index it 90° clockwise, then it won't interfere with the forward dovetail tool insertion?

 Prolly going to get some different holders with a better angle. The whole carbide insert dealy is a deep end of the pool learning curve! Didn't have the QC parting tool here yet so finagled a ground 3/8" tool into the holder, it worked well.
these guys have lots of info, http://www.carbidedepot.com/Inserts-C1.aspx still scratching my head a lot.
think there is a lathe thread coming soon to a forum near us.
Last edited:
Not sure why they sell em that way, but the QC I bought for the Atlas came the same way. It's a pain when using a boring tool. I re-indexed mine.GggGary, is that your QCTP locking handle in the pic?
... I am really scratching my head over the trigon insert holders...
... The whole carbide insert dealy is a deep end of the pool learning curve!
think there is a lathe thread coming soon to a forum near us.
A high-speed steel insert alternative to add to your list.
http://www.arwarnerco.com
Doug79
XS650 Addict
I pulled the transmission out of the old case and got it installed in the new case. For as much as I was agonizing over the job, it turned out to be relatively easy. The two gear sets just lift right out, the shift forks came out and went back in surprising easy. Now i just have to wait for another $250.00 parts order to get here and I will button the thing up.

Step #14 in a (God know how many) step process.
Caswell's Dragon's Blood tank seal.

Not sure if I care for all them bubbles. They weren't there when I mixed it up.
The motorcycle tank kit comes with a total of 750cc of epoxy-based filler. I did the whole process within the recommended temp range, at 72°F. This stuff is thick, like honey, Karo syrup, 90wt gear oil. After you pour it in you can't just slosh it around, you have to slooooowly rotate the tank, giving the blob a chance to ooze its way over all the inner surfaces. 10 minutes is barely enuff time to get full coverage.
Then you drain the residue into a catch bucket.

About half of the goo stays in the tank. Fair warning, not printed in the instructions, is that the residue will cook-off after about an hour, maybe sooner, and gets *really* hot. It almost melted my plastic mixing/catch bucket.
This is some really sticky, stout, hard stuff. Thinking afterward on this, and by planning ahead, I may have come up with an additional use for the residue...
Caswell's Dragon's Blood tank seal.

Not sure if I care for all them bubbles. They weren't there when I mixed it up.
The motorcycle tank kit comes with a total of 750cc of epoxy-based filler. I did the whole process within the recommended temp range, at 72°F. This stuff is thick, like honey, Karo syrup, 90wt gear oil. After you pour it in you can't just slosh it around, you have to slooooowly rotate the tank, giving the blob a chance to ooze its way over all the inner surfaces. 10 minutes is barely enuff time to get full coverage.
Then you drain the residue into a catch bucket.

About half of the goo stays in the tank. Fair warning, not printed in the instructions, is that the residue will cook-off after about an hour, maybe sooner, and gets *really* hot. It almost melted my plastic mixing/catch bucket.
This is some really sticky, stout, hard stuff. Thinking afterward on this, and by planning ahead, I may have come up with an additional use for the residue...
That looks strangely familiar.

Hal, I don’t like the look of all those bubbles. Remove the bubbles Hal.

Hal, I don’t like the look of all those bubbles. Remove the bubbles Hal.
Step #10, of a 20+ step process.
View attachment 110092
MAJOR FAIL!
Looks like the MEK leached under the wrap and prep-seal.
Oh, well. Will continue with the Caswell seal.
And contemplate in agony...
Oh bloody hell!!!
Sort of looks like Mortitia Addams chose the decor.....
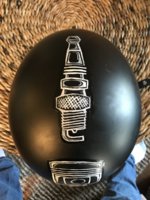
Not so much as what I did to the 650, but while my wife was wrapping Christmas presents for the kids last night I did a little helmet art. It’s a Bell Custom 500 3/4 helmet in all flat black and I have found it boring since the day I brought it home two years ago. I started doodling on it with a piece of chalk and then just decided to get out the oil paints from my wife’s art stash. I used to be very artistic growing up, but as I got older it’s just one of those things I don’t make time for anymore. Anyway, I just freehanded it for fun. I’m not done yet but it takes quite a while for the oil paint to dry. I just ran it down the middle of the crown and still have two large areas on the sides to work on later. No idea what will go there though.


Last edited:
Valves and a cam lobe?No idea what will go there though.
Looks good.
Hey Willis - how’s that beautiful new workshop progressing?
Pete
Pete
Similar threads
- Replies
- 32
- Views
- 2K


