1980G Build

suiteo

XS650 Enthusiast
Messages
83
Reaction score
0
Points
6
Location
Phoenix, AZ. U.S.A
Ok. Here we go. Tore down the bike last weekend and finally got some paint on the frame and triple trees last night. Again... Used black wheel paint thinking it would be durable, but I don't recommend using it. After 2 weeks of curing, I could still dent the paint with a fingernail. Re-did the paint last night using appliance epoxy, and can already tell it's going to work a lot better. Doing a mild bratstyle/bobber build without chopping the frame. Just clean up the seat rails and front down tubes a bit. Don't have a whole lot of time to build, but trying to get it done prior to my 40th B-day so I can do a nice long trip with my brothers. More to come...
 

Attachments

  • DSCF0031.JPG
    DSCF0031.JPG
    97.9 KB · Views: 247
  • DSCF0032.JPG
    DSCF0032.JPG
    79.5 KB · Views: 268
  • DSCF0033.JPG
    DSCF0033.JPG
    70.8 KB · Views: 249
Finally got some time to put into the build this week. Got the forks rebuilt, and put back on the bike. Got the new rear shocks put on, but forgot to take pics. Scored a rear fender and a seat at the salvage yard for $50, so I'm almost done with the parts buying phase. For now anyway... :) Doing some of the tedious painting of smaller parts, and hitting all of the bolts and washers with a wire wheel to clean them up. Ordered an engine stand today, since the one I built pointed out how crappy my welding skills really are. So I hope to tear into the motor in the next couple of weeks. Got the tank painted too. Just need to seal it and it should be good to go.
 

Attachments

  • IMG00079-20100614-2316.jpg
    IMG00079-20100614-2316.jpg
    24.6 KB · Views: 234
  • IMG00036-20100320-1534.jpg
    IMG00036-20100320-1534.jpg
    17 KB · Views: 241
  • IMG00080-20100614-2317.jpg
    IMG00080-20100614-2317.jpg
    20.6 KB · Views: 224
  • IMG00081-20100614-2317.jpg
    IMG00081-20100614-2317.jpg
    23.6 KB · Views: 237
Last edited:
I haven't gotten a whole lot of photos of the work yet, but I've been slowly chipping away at it. After having it out with my ex, I had to hastily remove the bike from my old house and move it over to my brother's house to continue working on it.:mad: Engine is back in the frame, and I decided to line-x the tank, rear fender, side covers, and engine side covers. So far the epoxy paint has held up ok. I got a few chips in the paint getting the engine back in the frame (heavy son of a gun) that I'll have to touch up, and where I've been setting the seat pan off and on the seat rails test fitting. Other than that, it's pretty good. I'll try to get some photos up next week. In the wiring phase right now and am about 60% done with that. Took my time designing the harness and used fuel injection hose to run all of the wiring up the backbone. Also made a bracket for my mini speedo to set it down low near the headlight. I reversed the stock headlight brackets to drop the light down a few inches to clean up that area a bit. So far so good.
 
Finally getting somewhere on this build. This is my first build, so I didn't want to get too complicated, but at least spend what little cash I had towards the right parts. Still in the wiring phase, and I'm almost done with the new harness. Used the really nice GM style Weatherpack connectors so I don't have to do it again. Was mocking up some of the painted parts last night just to see what it's going to look like. Attached photos give a rough idea of the final look. Don't have a name for the build like some do, but my son said it kind of looks like a Batman bike. Maybe call it "Bat-mo-bob"? Meh... kind of lame, but made him laugh anyway... Hoping to be in final assembly this weekend, but working in 100+ degree heat, even after the sun goes down calls for frequent beer breaks, and slows down progress a bit. :cheers:

J
 

Attachments

  • IMG00016-20100719-2157.jpg
    IMG00016-20100719-2157.jpg
    22.3 KB · Views: 324
  • IMG00012-20100719-2156.jpg
    IMG00012-20100719-2156.jpg
    21.2 KB · Views: 251
  • IMG00009-20100719-2155.jpg
    IMG00009-20100719-2155.jpg
    21.1 KB · Views: 263
  • IMG00008-20100719-2154.jpg
    IMG00008-20100719-2154.jpg
    20 KB · Views: 261
  • IMG00007-20100719-2154.jpg
    IMG00007-20100719-2154.jpg
    22.3 KB · Views: 283
  • IMG00006-20100719-2154.jpg
    IMG00006-20100719-2154.jpg
    21 KB · Views: 261
Last edited:
Looking good. I did the same with the headlight ears. but reversed them so they are even a bit lower. Tell us more about this appliance/epoxy paint. Where did you get it and is there a good color selction?
 
I got the appliance epoxy at ACE Hardware. Basically used for repainting washers and dryers and the like. Only 3 colors there to choose from though. Black, white, and bone. Typical appliance colors. Still chips a bit, but I think that has more to do with my prep work than the paint itself. The frame was painted with wheel paint first, and I think I could have done a better job with the prep before re-coating with the appliance epoxy. The triple trees however were not painted first, and the finish is holding up quite nicely, even with mocking things up multiple times.

gmj - how did you reverse the headlight ears even lower? I switched them around from stock, but don't see a way to lower the headlight bucket any further than I have. Ran across this pic that I forgot I had. They day I brought the XS home as a non-runner on a trailer. Rusty basket case. See the headlight ears in the photo? I'm having a hard time envisioning being able to lower the headlight even more, because that is what I would like to do as well. I flipped them the only way my brain could figure it out. :laugh:

J
 

Attachments

  • Bike - first day.jpg
    Bike - first day.jpg
    129.5 KB · Views: 292
My appologies after looking at my bike they are the same as yours. Must have had a brain fart. ACE is the place for me as well lots of Stainless Steel fasteners. I've swapped out the steel with SS. They are mighty proud of them though prices are crazy. I've found internet sources that are bargained prices, but in a pinch I'll go see John Madden.
 
Never heard of Weatherpack connectors before so I googled it. Wow. They look to be a bit pricey, but well worth it, I'm thinking. I was thinking about using Bosch-style connectors like the ones used on my Volvo, but the Weatherpacks look like they'll do a better job. I'll be doing the wiring on my bike soon enough, so I appreciate the heads-up.
 
gmj - I agree about the SS fasteners. Anything metric and stainless seem to command big prices at local stores. The steel fasteners are cleaning up ok for now, but I'd like to swap to stainless eventually as time and money permit. I've sunk more than I care to admit as far as time and money goes, but it's still cheaper than buying a new bike, and can be paid for over time. Will all be worth it to get it back on the road and take my first real trip.

cooltouch - Yeah, the connectors are awesome, and I'll never have to worry about water, road grime and the like getting in my new connections. Was a bit pricey, but worth it to do it right IMO. I found a kit online with 80+ pieces with the crimp tool for about $100. I'll post a link if its not against forum rules, or PM me for the link if you like.

J
 
Well, I'm finally getting to the finishing stages of this project. I've run into a few bugs I'm still working out, but here's a shot of the close to finished product.

I've run into a no spark issue that maybe some of you could shed some light on. Here's what I've looked at so far:

Have power at the rotor. 12V with the key on. Have power at the coil, and power to the TCI box on the red/white wire. Measured resistance cap to cap and have 22.8K. New coil and wiring. New plugs, wires and caps. New battery. I'm suspecting the TCI at this point but I'm not sure. Pulled a spark plug and grounded to the engine and no spark at all when kicking.

Also, I've been doing some reading on LED tail lights and turn signals. I've got an all in one brake light, turn signal unit. 5 wire set up. I've tried several electronic flashers, but none that seem to work with the low draw from the LED turn signals. They come on but no flashy-flashy. Has anyone had any luck with any particular brand or model?

Thanks,

J
 

Attachments

  • 7-25-10.jpg
    7-25-10.jpg
    38 KB · Views: 278
Well it looks like you've done your homework pretty well. I guess if it were me, I'd be suspecting the TCI also. There's a guy -- maybe over at the Garage? -- who repairs those things. It's usually a power transistor that fails, if memory serves. That or go with a Pamco and an advance rod from Mikes, or a Boyer.

Good question about the LEDs. You might try these guys and see if they can answer your question regarding a flasher that will work:

http://www.superbrightleds.com/cgi-bin/store/index.cgi?action=DispPage&Page2Disp=/led_prods.htm

Looks like you've got a decent looking bobber/brat going on. What are you planning for pipes? Dunno if you plan to or not, but I'd recommend you consider a front fork brace if you're not gonna be running a front fender with its barely adequate brace.
 
I found that old thread at the 650rider site. I'm going to order the replacement transistor today, since mine didn't check out according to the tests. Soldering on a 30 year old PCB makes me a bit nervous, but I've done this type of work before. For anyone else curious about this possible fix, here is the thread.

http://www.650rider.com/index.php?name=Forums&file=viewtopic&t=1015

I'd like to eventually go with a Pamco unit, but I'm getting a little strapped for cash trying to buy a new house and all. I may order a few transistors, and get some old TCI units at the boneyard to repair as well. Maybe offer them up for sale on ebay to offset some of the money I've dumped into this bike.

As far as pipes, I'm going to be running some 2"in/2"out 12" long cherry bomb mufflers, but I'm having some clearance issues with the brake pedal. May have to "clearance" the right side muffler (read as hit with a BFH) to get it to mount up. Had a muffler shop make an adapter and weld to the inner pipe to fit the 2" inlet so it fits the pipe, just not the bike at this point.

I hate the look of a front fender, but I know some bracing will be needed at some point. I may either cut down the stock chrome fender to match the cuts made on the rear and line-x it as well. Haven't really decided what to do there yet. I don't ride hard, so for the time being, it seems to be ok. At least the last time I rode it anyway.

Thanks for the input.

J
 
Front-fenderless can look cool, but you might just wish you had something down there, first time you ride through a mud puddle. I rode my BMW R90 for quite a while w/o a front fender cuz I was running a slightly oversize front tire, and would get pretty well soaked even if it was a fairly small patch of water I had to ride through. And if it was muddy, the whole front of my bike got covered in it. 1/2 second splash and an hour detailing the bike afterward.
 
When you do get the bike running again. Try riding it with out the fender, ride it a bit on the agressive side in the twisties. Do the same ride with the fender. You will see that the fender does more than keep you dry.
I put the front fender off an XS1100 on my 650, The one that looks like the later 650 ones. It didn't have the heavy bracing built in like a 650 fender. The bike handled badly. Got a later model 650 fender and put it on. Bike handles much better.
If you don't like a front fender i would suggest cutting down the stock so you have the bracing or add a fork brace.
You might not need it in regular riding. In an emergency the better handling may prove to be a life saver.
 
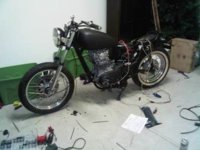
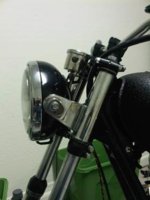
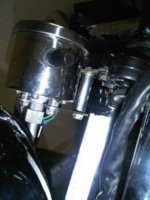
Good news. The new transistor in the TCI seems to have worked. Fired the bike up for the first time in about a year last night. Not running right at all, so I've got some things to check out. It's hard to kick start, and doesn't want to stay running for long. For some reason, I'm having some difficulty setting the cam chain tension. No matter where I set it, I'm not seeing any movement from the plunger. Too tight, and the bike is really hard to kick, and won't start. Loose, the bike will start some of the time, but is noisy. I've set the valves per spec for now just to get them close, but it looks like I need to tear into the tensioner to see if there is anything missing. Also smells like the bike is running rich, so I've got some carb work to do. I have a set of xsjohns (rip) needles, and running pods and the cherry bomb mufflers. However, I am not able to get one of the mufflers to clear the brake pedal or kickstarter, so I may have to come up with something else now. Bummer because I really liked the sound.

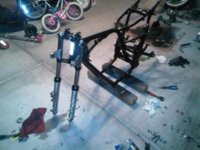
xsleo: good point about needing the stability in an emergency situation. Since I haven't ridden much its not something I had in mind when envisioning the final product. May cut down the stocker and coat with line-x to match then to be on the safe side. Bad thing is a bolt is stuck and broken off in one of the fender mounts in the fork leg, so I've got some work to do to get the fender mounted again. Always something...
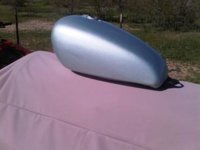
 
Did a search for this, but all that comes up are copper washers for the heads.

I've got a pretty substantial oil leak from the side filter in the clutch cover. The left screw (as you're looking at it) has oil leaking out of it while the bike is running. The copper washer is there, but there is still a leak. I've read somewhere that folks have run without the copper washers here and had no leaks. Anyone have any ideas why I might be getting leaks through this screw? Want to set up and sync my carbs tonight after adjusting the valves, but don't want to keep starting the bike with this leak.

Thanks,

J

Also, has anyone found a local source for these copper washers instead of having to order them?
 
Last edited:
Back
Top