74 Running Super Rich

Dreads, some seriously bad misinformation has been dished out by the unknowing, and the following may help you to work more effectively. In these carburetors, everything impacts everything else, and there are no hard boundaries for component effects: pilot jet selection affects mixture screw adjustment, and jet needle position often forces a change in pilot jet selection. Yep, needle position has a strong effect on the idle mixture, even though needle jet and jet needle are main circuit components. Even at idle, with the throttle plate nearly closed and the slide all the way down, the needle jet and needle are contributing fuel to the mix through the slide cutaway.

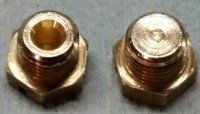
Good stuff as always, 2M! But I've found it very tricky at best to modify a float bowl plug to hold a piece of tubing. I think it was gggGary who recommended using a 6mm. metric grease zerk with the spring and ball removed.
 
2M I've shyed away from the clear tube test because I've read on here that people have cracked their bowls by installing a brass fitting to attach the clear tube to. Is the grease zerk a better way to do that test where I'm not running that risk of cracking the bowl by screwing in a foreign object? From my understanding the plug is slightly tapered and putting a straight fitting in it is whats cracking the bowl. Correct me if I'm wrong there.

I went ahead and bought 2 rebuild kits online and probably buying an ultrasonic cleaner from harbor freight. I already know the main jet is the wrong size based on the item description and that the needle is a y22 so I'll work around that. I'm tired of diddling and playing with them so I'll get them super clean inside and out and put them all back together from the specs on here and not from my Haynes manual (which you guys have pointed out is wrong in a couple of different places).

And griz, thanks for the advice. I have the needle set to the leanest position, jets to stock sizes and mix screws are 3/4 turn out from bottom.
 
Dreads, there's no need to screw the zerk in tight and tear things up. Wrap the threads with Teflon tape and screw it in just enough to hold fuel; finger tight or a little past will do it.
 
I feel like I could turn one on a lathe out of aluminum rather easily plus that won't cost me anything considering there's a whole boat load of scrap pieces at school. No worry of using something not intended and damaging the bowl. If all goes well and I'll make a little stock of them to have laying around or to give to friends working on their bikes.
 
Sure, since you have the machine, the time, and the skill, that would be an easy job. The plug is 6x1.0 mm.
 
Last edited:
The BS38 drain plug is M8x1.0mm, made from brass, easily machined and soldered, available from MikesXS.
71XS1B-Carbs-DrainScrews.jpg

M8x1.0 metric bolts can be found at Napa, but they're steel, not quite fully threaded to the bolt head (would need o-ring there), and (of the ones I found) are 25mm long.

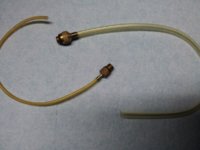
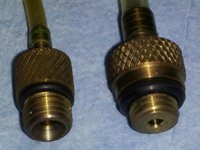
I made my adapters from brass, they use o-rings.
Barbs-0.jpg Barbs-2.jpg

But, for the price and convenience, I'd strongly recommend a pair of those eBay adapters listed by 5twins in post #63...
 
Last edited:
The idle speed spec for these bikes is 1200 RPM...

The XS650 has a rather aggressive cam profile, compared to V8 auto engines, similar to what we called a "3/4 race cam". Difficult and lopey idle with those. Plus, the XS650 flywheel angular momentum is low, what folks called "small crank flywheels", which exacerbates low idle instability. Makes them rev fast, tho'.

For reference, here's a sound/video of my XS1B idling at 1100 rpm. About as low as I'd like to go. It rises to 1200 rpm after it's fully warmed up...

 
...Does anyone have any thoughts on why one cylinder will fire alone with only one plug in but both cylinders won't fire when both plugs are in?

It takes energy to cycle a cylinder thru its strokes, much less if the plug is removed and that cylinder doesn't have to do compression. If the other cylinder is doing the work, it makes it easier to run with the plug out...
 
This is totally out of left field and may have nothing to do with your problems...........

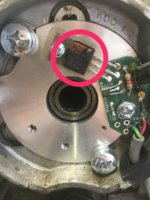
Pic of your pamco.......Not real clear......could you transistor board guys have a look................

IMG_4292 crop.jpg
 
Could the board be contributing to the assumption it is all carb problems...........maybe the pamco should be replaced first????
 
Seemed to be chasing your tail so i looked at your previous thread to see if there maybe be something overlooked........if the Pamco has been sorted then i have nothing to add.........
 
Skull, yes, looks a bit cooked, and an unusual solder blob.
That deserves a much closer look...

What part needs a closer look?

The transistor was replaced and I did that simply by cutting the old one at the three prongs and used a soldering iron on the prongs and small needle noses to pull them out. Cut the new prongs to size and bent at 90 degrees and simply heated the prongs and pushed them in once i the solder was heated up. I added absolutely no solder at all and didn't mess with anything other than the transistor. The very top part of the board between the holes and the top of the board got slightly darker from the heat but the rest stayed normal.

I'd personally rule it out because it was running fine except for the fouling problem up until I removed the gaskets on the carbs and now it's not running even halfway the same. I had the bike dialed in timing wise that one kick two max would start the bike up. I'd find it a possibility if the problem carried by the engine temp but from working with the bike it's not dependent on temp.

I say all this but you guys have definitely been doing this stuff longer than myself. What part of my pamco seems to be a cause for concern?

Sorry this is getting long.

Also over the weekend I've worked a lot so all I've got done is hook a old battery tender hooked up to the junk battery pumping 2amps of current to the batter and that's given me enough juice to turn the motor over with the starter motor a couple times before the battery is drained again. Bike will fire and run got like 3 seconds and then dies out. Still getting a good blue spark and seems to be getting the necessary fuel/air to at least fire and run for a second but I'm suspecting it is a leak somewhere in the carbs because removing the gaskets everything went down hill. Ordered rebuild kits and hope it works. And 2M, I punched the needle jet out with a piece of ABS plastic I machined down to a punch. Worked great.
 
Rehashed thru your older posts on your Pamco fix. The TIP120 is a general purpose linear with a 60v rating, not suitable for a transistor controlled ignition. It would need something ignition rated, 300v, and matching base currents.

Electronics has a nasty stepchild called "root cause". Something caused the failure, the original transistor took the hit, root cause wasn't fixed.

You claim that it's producing spark, that it's showing correct timing, and that it's run for up to several minutes a few times. But, I, personally, am not getting warm fuzzies here...
 
So you think the pamco is cooked? It's weird because I even talked to pamcopete pertaining the matter and he wouldn't give me any information on what transistor to buy to replace, and I ust that I would have to buy a new pamco board for $60.

I mean I feel like it's BS because it was the first time installed first half ass kick of the bike and pop, whiz of plastic and smoke from the ignition. Had no idea at first what happened just that I was getting no spark. I made sure everything was hooked up per instructions and everything was wired correctly, stator hooked up to the capacitor and battery to the bike just as Pete has suggested in literally every thread on here pertaining to the pamco. So I took everything back apart to find this... (circled on picture) I even sent it to Pete and his response is that every unit is tested before leaving the facility and that it's not covered under warranty. When asked about what transistor should I buy to replace it is when he told me I'd have to go online and buy a new board.

So if it is the pamco I think I'll end up buying a different brand next go around because that left me a little bitter.

Does anyone know of what part number I can buy in order to fix the current pamco I have?
 

Attachments

  • IMG_3994.JPG
    IMG_3994.JPG
    163.8 KB · Views: 144
Is this what you're talking about?
gb14c40l-jpg.89715


$6 shipped to my house so I went ahead and bought the IRGB14C40L. Not sure if that will fix my problem but guess we will wait and find out.
 
Last edited:
Back
Top