One Dakota.... XS1 fix, restore labor of love SoDak

Yeah it’s time consuming for sure. I know with my XS2, there were days that I spent as much time photographing and doing daily write ups as I did wrenching! 😄
But for me the blogging was part of the fun, plus it’s fun for forum members. Not to mention I really benefitted from the deep pool of experience that hangs around here.
This really is a great forum. The best I’ve ever been a part of for sure! 😉
Part of my doing this is to help fill the vacuum cuz mailman isn't laboring on an XS project..........
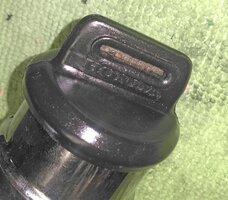
Anyone ever see a key cozy like this?
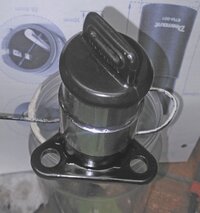
KIMG3122.JPG KIMG3123.JPG
Sez honda but the original Yammy key is inside. Great at keeping water out of the lock!

Found one marked polaris on Amazon
https://www.amazon.com/Custom-Insta...hvlocphy=&hvtargid=pla-4583795273862405&psc=1
 
Yeah it’s time consuming for sure. I know with my XS2, there were days that I spent as much time photographing and doing daily write ups as I did wrenching! 😄
But for me the blogging was part of the fun, plus it’s fun for forum members. Not to mention I really benefitted from the deep pool of experience that hangs around here.
This really is a great forum. The best I’ve ever been a part of for sure! 😉
...and thank you for the pics. Us amateurs are best served by actually taking pics because there are eagle eyes on this forum that catch our failings or note difficulties and steer us forward.
 
Columbia Coatings:
CURING
1. Single Coats
Light Parts: 385ºF for 20-25 minutes (ie. Pulleys, brackets and other small
parts)
Heavy Parts: 385-400ºF for 25-30 minutes (ie. Wheels, intakes, manifolds)
Heavier part=higher temperature
2. Multiple Coats
Chrome/Silver base coat with a translucent and/or clear top coat
Satin White base coat with Red Fluorescent
Primer base coat
Dormant base coat with a clear top coat
Solid Colors: Partial cure for 5-10 minutes.
Metallics: Full cure at 385-400ºF for 25-30 minutes. Let parts cool down to less than
100ºF before adding a top coat.
NOTE: These are just general guidelines. Follow the exact cure schedule for each
powder found on the respective Tech Data Sheet.;)🤙
 
Like most of them, the headlight jewel for the brights indicator had gone opaque
Had some of these around.
1680478824057.png


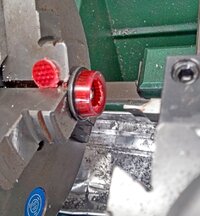
Easy to chuck in the lath and cut a disk out of the middle. Spritzed a bit of mineral spirits as I cut the groove, helped it cut nice, smooth, and easy.
headlight jewel.jpg
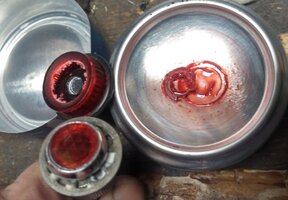
Drilled through the old "jewel", let it sit in acetone for a while.
Then it just pushed out of the chrome bezel. Sanded the back of the new reflector so it would recess into the bezel a bit,
KIMG3404.JPG
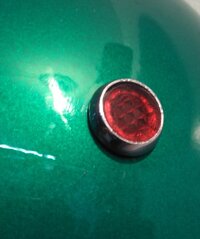
A bit of super glue and nice and bright again.
KIMG3413.JPG
 
Last edited:
Like most of them the headlight jewel for the brights indicator had gone opaque
Had some of these around.
View attachment 239601

Easy to chuck in the lath and cut a disk out of the middle. Spritzed a bit of mineral spirits as I cut the groove, helped it cut nice, smooth, and easy.
View attachment 239599
Drilled through the old "jewel", let it sit in acetone for a while.
Then it just pushed out of the chrome bezel. Sanded the back of the new reflector so it would recess into the bezel a bit,
View attachment 239600
A bit of super glue and nice and bright again.
View attachment 239603
Could have saved you some time. I have a couple of NOS ones. Just saying.
I do like what you did.:thumbsup:
 
Like most of them, the headlight jewel for the brights indicator had gone opaque
Had some of these around.
View attachment 239601


Easy to chuck in the lath and cut a disk out of the middle. Spritzed a bit of mineral spirits as I cut the groove, helped it cut nice, smooth, and easy.
View attachment 239599
Drilled through the old "jewel", let it sit in acetone for a while.
Then it just pushed out of the chrome bezel. Sanded the back of the new reflector so it would recess into the bezel a bit,
View attachment 239600
A bit of super glue and nice and bright again.
View attachment 239603

Very nice!!!
 
Like most of them, the headlight jewel for the brights indicator had gone opaque
Had some of these around.
View attachment 239601

Easy to chuck in the lath and cut a disk out of the middle. Spritzed a bit of mineral spirits as I cut the groove, helped it cut nice, smooth, and easy.
View attachment 239599
Drilled through the old "jewel", let it sit in acetone for a while.
Then it just pushed out of the chrome bezel. Sanded the back of the new reflector so it would recess into the bezel a bit,
View attachment 239600
A bit of super glue and nice and bright again.
View attachment 239603
That is “Sweet”!🧐👍
 
Like most of them, the headlight jewel for the brights indicator had gone opaque
Had some of these around.


Easy to chuck in the lath and cut a disk out of the middle. Spritzed a bit of mineral spirits as I cut the groove, helped it cut nice, smooth, and easy.

Drilled through the old "jewel", let it sit in acetone for a while.
Then it just pushed out of the chrome bezel. Sanded the back of the new reflector so it would recess into the bezel a bit,

A bit of super glue and nice and bright again.
View attachment 239603
That's pretty awesome ingenuity there. Glad to see your success on your own stuff after battling a certain frustrating CR:thumbsup:
 
Reviving this thread. Sodak just arrived at it's new home in Northern California. I'm really excited to get this rather special XS1 with a very low serial number. About a year ago, Gary asked me if I was interested in buying Sodak, but the timing just wasn't right (wife, cancer). I kept thinking about it and thinking about it, and finally my wife told me that I should just buy it. She's always been supportive of my hobbies (though sometimes suspicious of how much money was getting spent), and she knew it would make me happy and give me a project to keep me occupied/focused. Therefore, this will be special build/restoration for me.

I going to spend some time just thinking over the approach, but I think this bike deserves a full restoration. That's what I really enjoy; returning something to how it looked leaving the factory. Overall, the bike seems to be in surprisingly good condition all things considered, and the work Gary has done so far is top notch. I'm planning to document progress in this thread as I get going.
Sodak1.jpg
 
Today I decided to pressure test the oil filter cover. This is one of the very early covers with the O-ring, and because it's original to the bike I wanted to use it if possible. Gary noticed that it was slightly bulged and possibly cracked, maybe due to incorrect installation. I made up a plate from some sheet steel to mount it to, and added a tire valve to add some air pressure. I also added a small bit of soapy water tinted with red dye inside the cover so it would be easier to see if any seeped out through a crack. I gradually added air pressure up to 30 psi and then let it sit for a hour or so. Good news is that I didn't see any seepage. The one thing this didn't address is whether when the engine gets hot and the aluminum expands a bit, if any "crack" could open up a bit. In any event, I'm going to use it. I'll just keep an eye on it; the worse that can happen is it start to weep a little oil.
20241105_110538.jpg
20241105_110253.jpg
20241105_110247.jpg
20241105_110116.jpg
 
Been doing some thinking on how I want to approach this build. I've decided to do a complete "frame off" restoration of this bike. However, since this is such a low serial number XS1, I want to reuse as many of the original parts as necessary. That will take a lot of cleaning, polishing, painting, re-plating, etc., and invariably there will be a few scratches and such that won't completely disappear. So, what I want to end up with is a bike that looks like it would have in 1970 with 4K miles on it. As Gary said before, I'm no Mailman, but I'll try to post as much as I can.

I can't completely disassemble the bike yet (waiting on paperwork), so I've been trying to work on discreet items that can easily be removed. I started in on the wiring loom. The wires in the loom are in good shape, but many of the terminals were dirty or corroded, and the associated insulators were hard and cracked. Most of the connectors were in poor shape and the taped potions had some frayed areas.
20241106_093421.jpg
 
Back
Top