RD 400 fuel tank

mddawg

XS650 Member
Messages
19
Reaction score
4
Points
3
Location
hamilton, mt.
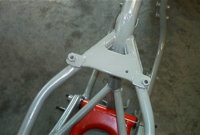
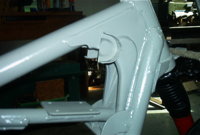
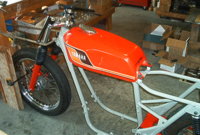
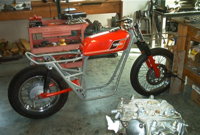
Howdy my name is Mike , just starting a street tracker build, you guys really have some great ideas and nice scoots, built lotsa hotrods and race cars over the years, but got rid of my HD a while ago and this looked like a fun deal, anyway bought a 77 xs 650 good runner with a lot of new stuff the guy was gonna build a café racer , not goin there . got the bike completely stripped bare frame and have started removing brackets etc. My main question for now is has anyone ever used a RD 400 tank on a tracker with a track style seat. Just getting started so I will post some pics as soon as I figure out how , got lotsa questions on tires wire wheels etc, thanks in advance for any help you might have. By the way I have the tank although Im open to other options.
 
here is a couple, sorry Im not quite sure how to get these in the original message
 

Attachments

  • DSC01285.jpg
    DSC01285.jpg
    193.9 KB · Views: 385
  • DSC01282.jpg
    DSC01282.jpg
    191.9 KB · Views: 339
  • DSC01284.jpg
    DSC01284.jpg
    181.1 KB · Views: 311
I don't know about a rd400 in particular, but hugh has a chop with a small tank on it. looks good. IMO, a tracker should have a large-ish tank, like a tx750 tank, wich goes right on, as well as the rd400.
I have a rd400 tank I want to put on my next chop/bob.
 
Thanks, ya its about the same length as a stocker just a little lower more sharp edges, would just have to fab rear mount and move petcock
 
Thanks, Brass cool picture of the café with the RD tank , yes shouldn't be to hard to mount, thinking of Omars TT seat fender and the flat track bars hope it looks ok I guess we will see,, I see you in Seattle lived over there for 65 years before I moved to MT. don't miss the traffic though
 
don't miss the traffic though

Don't even get me started...it's so bad lately that it takes all of my will power to venture out these days. I avoid driving in it at ALL costs.

Last weekend, as an example, there was a Seahawks game (Go Hawks!) and I had to be near the stadium for a wedding reception... 2 hours later (11 miles total) I was finally there... that's just stupid! There were some people coming from Bothell at the reception they said it took them 4 hours to drive it!

Montana doesn't sound like a bad move at all. :)

I could not imagine living in that amount of traffic. Heck, I get grumpy if I hear a car on our road more than 10 minutes apart. You can usually hear the trees growing where I live, and I hate driving into the towns. Too many people!
 
mddawg- as it happens, i started a cafe build about 3 weeks ago with an RD400 tank. they are much more interesting style-wise than the later stock tanks IMO. i do however like the XS1/2 early tanks and have one for the next build- which will be a board tracker style with 21"/ 19" MX wheels and substantial frame mods.

the RD tank requires removal of the stock tank mount ears (almost impossible to re-use them) and very careful relocation of custom ears that set narrower. it's much more involved than it looks.

plus the back end of the tank needs to be jacked up to clear the motor.

then a decision re how to supply gas. current plan is to use the two spigots under front of tank into two 1/4 turn shut-offs run parallel back to each carb- blocking off the stock petcock hole. the RD petcock will not clear an XS motor btw, and also fuel would not feed from both sides of tank without using the dual spigots connected under the frame tube which of course requires draining tank every time you need to remove it. major PITA.

lastly, wish some PO had not written "77 RD400" on the back of tank in permanent marker......... it's in decent shape otherwise with OEM finish.
 

Attachments

  • IM004286.jpg
    IM004286.jpg
    68.6 KB · Views: 336
  • IM004285.jpg
    IM004285.jpg
    70 KB · Views: 337
  • IM004282.jpg
    IM004282.jpg
    171.6 KB · Views: 306
  • IM004281.jpg
    IM004281.jpg
    84.4 KB · Views: 334
  • IM004280.jpg
    IM004280.jpg
    76.2 KB · Views: 335
  • IM004278.jpg
    IM004278.jpg
    84.1 KB · Views: 323
Last edited:
barncat , that's very nice just what I was thinking, yep your right prob not all that easy though, bike looks good , gonna be nice what are you gonna do for a seat/ fender
 
I've never seen a motorcycle hog tied to a bench before! ha ha ha

Great Idea!

I had painted my frame grey as well but came to find it's harder to keep clean, guessing manufactures figured that out long ago and almost all have black frames.

That writing on the tank should come off as it is probably on the clear coat that is covering the tank, that's if it's not all worn off by the previous seat rubbing on it.

A clay bar is supposed to help clean up things like this but there is probably at lot less expensive methods.

JPG has the web site just for reference and a youtube video.

Nice tank design, I'm with you on the look.

Good luck.

We are watching! :thumbsup:
 

Attachments

  • Clay Bar.JPG
    Clay Bar.JPG
    113.6 KB · Views: 214
mddawg- no final design choices yet on seat but i often use exterior grade 1/2" plywood as a base (holds staples well) with foam and heavy cordura nylon. don't want to jack this thread though so enough on that. will probably post a few build pics elsewhere.

Brian902- i've used gray on frames before, the trick is to never ride in the rain :thumbsup: thanks for suggestion re removing the ink- it's not responding to any attempts thus far, may have to live with it or cover it...
 
Hi barncat,
if you don't want to strip & paint the tank & the writing won't come off, you could build up the front of the seat to hide it.
FWIW, although plywood makes an OK seat base you are kinda locked in to building the seat onto a flat slab.
I'd suggest making a seat base from cardboard and sticky tape.
That material can be made into a shape with edges and curves to fit the frame and go up and over the back of the tank to hide the writing.
When the cardboard base is shaped how you want it, layer it both sides with fiberglass.
now you got a poorboy copy of an aerospace hybrid laminate.
Takes staples OK too.
 
fred- i'm definitely leaving the tank finish alone. it's a good 7 1/2-8 out of 10 and is more valuable as is. mddawg's tank appears to be practically NOS, which is rare...

thanks for the tip re seat construction. a horribly uncomfortable flat low profile seat is pretty standard for a cafe bike :). they can also be done with aluminum sheet and two-sided carpet tape with just exposed black foam. i like a race/industrial look anyway. i may just make a small aluminum plate to hide that lettering, not really a big deal at this point.
 
as referenced above- in the event anyone else needs to remove permanent marker from a painted surface without damaging the paint underneath, i had good luck with a simple pencil eraser:thumbsup:

there is basically zero abrasion, the heat generated by the friction breaks down the "ink". considerable pressure is required, and stay with it until it gets to the critical point- it does not seem to work at all at first. i also rubbed the eraser into some rouge buffing compound, and used a dab or two of WD40 to clean the surface. you have to clean the eraser off frequently.

test the process on a small area of your project first if you try it.
 

Attachments

  • IM004287.jpg
    IM004287.jpg
    60.5 KB · Views: 232
Hi barncat,
the ol' eraser trick, eh?
FWIW, back when drafting used pencils and paper instead of a CAD program, we used to use power erasers.
I suppose you could still find one to borrow if you looked.
Looked more or less like a Dremel tool with a chuck that held a 1/4" diameter rod of erasing material that you advanced through the chuck as it wore away.
Rubber for pencil on paper, plastic for wax pencil on mylar and perhaps the most suitable for magic marker ink on painted steel, hard rubber with embedded grit; originally for removing indian ink from drafting linen.
[edit] well I never, you can still get them! :-http://www.ebay.com/bhp/electric-eraser
We used to use the Bruning but they're expensive, you can get an el-cheapo for under $8
 
Last edited:
My painter put 7 coats of clear on the tank and later told me to use 1500 grit sandpaper with water to smooth out the finish.

And he does $1000 paint jobs all the time that look like $1,000,000 dollars.

Great fix!!!
 
Back
Top